
Instruction manual


If you have any further questions regarding the adjustment of your turntable, please
contact your music hall dealer.
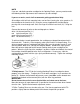
Azimuth Adjustment: Azimuth is the angle of the stylus to the record groove. Viewed
from head-on, you want the stylus to be perpendicular to the record groove so as to not
favor one channel over the other. Keep in mind that azimuth is properly set at the
factory and rarely needs to be adjusted. You can check the azimuth by performing a
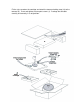
visual inspection. Place the tonearm (9) in the middle of a non-spinning record and look
to see that the stylus is perpendicular to the record groove. If it is off to one side or the
other, you will need to adjust the azimuth. To adjust azimuth, simply loosen the
setscrew located on the top of the tonearm (9) under the anti-skating rod (15). To
adjust the setscrew, you will need to first remove the anti-skating rod (15). Start with
the tonearm (9) in the tonearm rest (8). Remove the anti-skating weight (16) from the
anti-skating rod (15). Hold the anti-skating rod (15) between your thumb and forefinger
and unscrew it using a clockwise rotation. Lift the tonearm (9) up about 2 – 3 inches out
of the tonearm rest (8). Look carefully on top of the tonearm (9) near the area
previously occupied by the anti-skating rod (15). You will see a small setscrew. Slightly
loosen this screw. This will loosen the tonearm (9) and allow you to twist it from side to
side. Position the tonearm (9) so that the stylus is perpendicular to the record groove.
Tighten the setscrew. Replace the anti-skating rod (15) and anti-skating weight (16).
Listen. You are listening for a balanced soundstage with the greatest area and depth.
You may need to go back and forth a couple of times to achieve the best setting.
Please note that small changes in azimuth make a big difference in the sound.
*Save all packing materials, parts, and screws for possible future transport*
SITING
FLOOR MOUNTING - Place the deck on a small, light, rigid table, e.g., coffee table.
Ensure that the table is level on the floor and not rocking.
WALL MOUNTING - Wall mounting may be preferable when the floor is springy or when
there is risk of damage by children or pets. The shelf should be light and rigid, and fully
supported by, but not firmly screwed or glued to its brackets.
To allow the lid to open fully, a clearance of 3 inches (7.5 cm.) is required behind the
plinth and at least 13 inches (33 cm.) above.
AUDIO CONNECTION
The Goldring Eroica H is a high-output moving-coil cartridge. To play this cartridge
properly, you should plug the turntable into a MM (moving magnet) phono stage. Plug
the interconnect cable (14) (found in parts bag) into the turntable output connectors (27)
matching black to black and red to red. Attach the small ground wire to the thumbscrew
connection. Connect the other end of the interconnect cable to the MM (moving
magnet) phono input on your receiver or pre-amplifier in the same fashion.