
Instruction manual
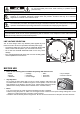

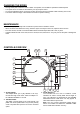


4. Center Spindle
This spindle holds the turntable PLATTER records
stable and centered.
5. Strobe Indicators Pilot Lamp
This is lamp specially designed to pulse a beam of light
at the STROBE INDICATORS on the turntable PLATTER.
This will give the illusion that indicators are not spinning
at certain speeds.
6. Power Switch
This is a rotary power switch. To turn main power on
turn the switch in a clockwise direction. To turn main
power off turn the switch in counterclockwise direction.
7. Start/Stop Button
This over sized push button controls platter motion. When
the unit is turned on the platter will not automatically
begin to spin. Pressing the button once will engage the
high torque motor and spin the platter, pressing this
again will stop the platter.
8. Headshell
The included HEADSHELL is used to connect your stylus
with the tone arm.
9. Headshell Locking Nut
After attaching the headshell to the tonearm, this
locking nut will securely hold the headshell to the
tonearm.
10. S-Shaped Tone Arm
The tonearm is the mechanism that holds the HEAD-
SHELL and stylus allowing it to glide across a record.
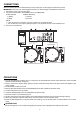
11. 33-RPM Speed Select Button
Engaging this button will rotate the platter at 33
revolutions per a minute (RPMs). A function LED will
glow when this function is activated.
12. 45- RPM Speed Select Button
Engaging this button will rotate the platter at 45 RPMs.
A function LED will glow when this function is activated.
13. Pitch Control Slider
This slider is used to adjust the playback pitch
percentage (platter speed).
14. Tone Arm Lever
This lever is used to safely elevates the tone arm
above a record surface without endangering a records
surface.
15. Arm Rest Clamp and Rest
Use this rest to safely hold the tonearm in position
during non-use and transportation.
16. Anti-skate Knob
The anti-skate applies inward force to the tonearm to
prevent outward skipping across the record due to the
centrifugal force cause by platter rotation. The anti-skate
value should be equally to that of the stylus
counterweight pressure.
17. Stylus-Pressure Ring
* The counterweight scale must face toward the DJ.
18. Extra Stylus Holder
This cut out has been designed to safely store an extra
stylus headshell.
19. Counterweight
Use the counterweight to balance the tone arm and to
adjust the stylus pressure.
20. Hinge For Dust Cover
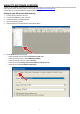
21. USB Socket (USB cable limit within 3m)
After connecting the Turntable to the computer via USB,
you can record your vinyl to your hard disk using the
included Audacity software.
22. Phono/Line Selector
This switch is used to change the mode of phono
output or line output.
23. RCA output Jacks
The output is able to switch to PHONO output or LINE
output. For example: These jacks are used to send a
low voltage "phono" level output signal to a mixers
"phono" input jacks. Turntables should be connected to
“Phono” inputs on a mixer. The red colored RCA jack
represents the right channel input and the white
represents the left channel input.
6