
User's Manual


Setting the clock
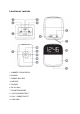
1. Plug in the CR60 but leave the power “OFF”.
2. Press and hold the BLUETOOTH PAIR / TIME SET button until the clock flashes in
the display.
3. Press the TUNE DOWN / HOUR button repeatedly to set the hour and press the
TUNE UP / MIN button repeatedly to set the minute.
4. Press the BLUETOOTH PAIR / TIME SET button again to store the new clock
setting.
Note: If you do not press any button for about 10 seconds while setting the clock, the
clock setting will be canceled.
Setting the alarm
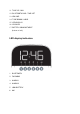
1. In standby mode, slide the ALARM 1 switch to the “SET” position and the display
will begin flashing.
2. Press the TUNE DOWN / HOUR or TUNE UP / MIN button to set the desired alarm
time.
3. Next press the VOLUME + or VOLUME – button to set the maximum alarm volume.
4. Slide the ALARM 1 switch to RADIO or BUZZ position to complete the process, the
alarm time will disappear and the alarm indicator will light up on the display.
Notes: To deactivate the alarm, slide the ALARM 1 switch to the “OFF” position.
Before setting the alarm, make sure that the clock time is set correctly (see “Setting the
clock”).
To wake to the radio alarm, first tune to the desired station and adjust the volume (see
“Playing the radio”),
To set ALARM 2, simply follow the same directions above but use the ALARM 2 switch.
Silencing the alarm
1. When the ALARM 1 sounds, slide the ALARM 1 switch to the “OFF” position to
silence the alarm.
2. To reactivate ALARM 1 the next time it is needed, slide the ALARM 1 switch to the
“RADIO” or “BUZZ” position and the ALARM 1 indicator will light up on the display,
then check to make sure the alarm time is correct.
Note: To silence or reactivate ALARM 2, simply follow the same directions above but
use the ALARM 2 switch.