
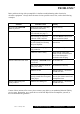
Specifications


Issue 2 : February 2005
kW Hybrid Line Preamplifier Instructions for use Page 7 of 9
OPERATION
STARTING . . . .
Press the POWER switch button on the
preamplifier front panel - the blue LED just
above the button will light indicating that
power is applied to the unit.
However, for about fifteen seconds no sound
will be heard from your speakers, and the red
MUTE LED near the power switch will light,
confirming initial mute action.
During this delay period, support feet
underneath the unit will also glow red, then
change to yellow showing that your kW
Preamplifier is ready for use. After about 35
minutes of operation, the feet colour will
further change to blue.
Unless using your audio system for off-tape
monitoring (see paragraph opposite)
ensure that the TAPE MONITOR button has
not been pressed accidentally, as otherwise no
sound will be heard through the speakers.
Select the required audio input source by
pressing an appropriate function button on the
front panel or remote control, and adjust the
volume control to obtain the preferred sound
level.
TAPE RECORDING
To record, simply select the required source
with the input selector button on the front panel
or remote control. This source will now be
routed to the kW Preamplifier’s TAPE
RECORD output sockets for recording by the
external tape deck. You will also be able to
hear the selected source through the
loudspeakers.
Note - adjustment of the volume control has no
effect on the recording level.
OFF-TAPE MONITORING
In conjunction with a 3-head cassette deck,
off-tape monitoring allows the user to
compare recorded sound with the original
whilst a recording is being made. To do this,
first select the required source in the normal
way and start recording.
The TAPE MONITOR button on the front
panel can now be used to switch between the
original source sound and the recorded
version, allowing direct comparison. The
blue LED just above the monitor button is lit
when the tape monitor function is operating,
confirming that the recorded sound is
selected.
On some 3-head tape decks there is an
additional ‘tape/source’ switch, which must
be in the ‘tape’ position for the above to
work.
If in doubt, please refer to your tape deck
operating manual.