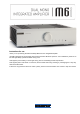
Instructions for use Thank you for purchasing the Musical Fidelity M6i dual mono Integrated amplifier. The M6i is designed to be partnered with present and future M6 series products. This combination yields one of the best high-fidelity systems available at any price. Used properly and carefully, it should give many years of outstanding musical reproduction. Dust regularly with a soft duster or soft brush, but be careful when using cleaning or polishing agents - they may harm the surface finish.
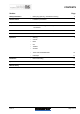
CONTENTS Section Page Safety Information – Mains plug (UK only), modification warning 3 General advice – Installation precautions 4 Disposal information – EU disposal information 5 Installation – Introduction, cleaning, installation, power connections, audio connections 6 Facilities and connections – Illustrations, main unit front & rear panels 7 Remote control handset – Operation and illustration 8 Operation – Starting 9 – Volume – Mute – CD – TUNER – AUX/HT – TAPE
SAFETY INFORMATION IMPORTANT! (U.K. only) This unit is supplied in the U.K. with mains lead fitted with a moulded 13 amp plug. If, for any reason, it is necessary to remove the plug, please remove the fuse holder and dispose of the plug safely, out of reach of children. It must not be plugged into a mains outlet. The wires in the mains lead supplied with this appliance are coloured in accordance with the following code: Green and yellow .............................Earth Blue...............................
GENERAL ADVICE Installation, Precautions & User Information This new M6i is designed and built to provide trouble-free performance, but as with all electronic devices it is necessary to observe a few precautions: • Heed all warnings shown on the back of the product. • Only connect the M6i to a mains outlet having the same voltage as marked at the back of the unit. • Always ensure that when disconnecting and reconnecting your audio equipment the mains supply is switched off.
ITEM DISPOSAL INFORMATION DISPOSAL The crossed out wheeled bin label that appears on the back panel of the product indicates that the product must not be disposed of as normal household waste. To prevent possible harm to the environment please separate the product from other waste to ensure that it can be recycled in an environmentally safe manner. Please contact local government office or retailer for available collection facilities.
INSTALLATION Introduction Congratulations on the purchase of the new M6i integrated amplifier. Great attention has been paid to internal layout, isolating each circuit section to prevent possible interaction. The unit features a finely tuned and tweaked preamplifier, for smooth sound coupled with low noise and virtually no distortion. The power amplifier consists of two monoblock amplifiers with separate supplies for the absolute best in separation and imaging.
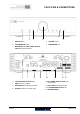
FACILITIES & CONNECTIONS 1 2 3 4 5 1 ON/OFF Button 4 VOLUME control 2 TAPE MONITOR button 5 IR RECEIVER lens 3 BALANCED, CD, USB, TUNER, HT/AUX, TAPE input selector buttons 6 7 8 6 LOUDSPEAKER OUTPUT Right 7 USB input from computer 8 BALANCED XLR right and left inputs 9 HT/AUX Selector for HT/AUX input 9 10 11 12 13 10 CD, TUNER, AUX/HT, TAPE input RCA Sockets 11 PRE, TAPE output RCA sockets 12 LOUDSPEAKER OUTPUT Left 13 IEC MAINS INPUT Issue 4 Page 7 of 14
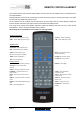
REMOTE CONTROL HANDSET The universal remote control shown below enables functions from this and related units to be operated from a convenient distance. Equivalent buttons on the remote control have the same functions as those on the front panel of the unit. Other functions are only available by remote control. As the handset uses an invisible infra-red light beam, the front edge must be pointed directly towards the receiver window at the front of the player, without visual obstruction between them.
OPERATION Starting Once all connections are made, switch on the unit, using the POWER button front of the unit. The MUTE LED will light. Speaker outputs are muted for about 6 seconds, so no sound will be heard from the speakers. Once the 6 seconds is up the MUTE LED goes out, indicating unit is settled, and ready for use. Volume The volume should be adjusted for normal listening levels. This is done by turning the volume up/down knob on the front panel.
OPERATION TAPE To use the TAPE input, connect external source to the TAPE input (see page 7). Select TAPE input by pressing the TAPE button so TAPE LED is lit. Selecting the TAPE input can also be achieved by pressing the corresponding button on the remote handset (see page 8). TAPE MONITOR To record to tape, (or alternatively CD recorder, DAT, minidisk or computer soundcard analogue input) connect the tape out to the tape recorder line in.
OPERATION USB input For the USB input, the LED will flash in absence of digital input signal. When a signal is present, the LED will light continuously. Computer setup for input USB input A good quality USB A to B cable is required to connect the unit to the computer. Plug the B (square) end into the socket in the back of the M6i Plug the A (rectangle) end into a free USB socket on the computer.
PROBLEMS? Basic problem-solving with an amplifier is similar to troubleshooting other electrical or electronic equipment. Always check the most obvious possible causes first, such as the following examples: Problem Probable Cause Remedy No power when POWER button is pressed. Mains power plug is not fully inserted into rear socket. Plug in securely. Mute function is still active. Press the MUTE button on the remote control to cancel.
SPECIFICATIONS Output Power Voltage Current peak-to-peak Damping factor Output devices 200 Watts per channel into 8 Ohms (23dBW) 45 Volts RMS, 20Hz to 20 kHz; onset of clipping (126 Volts peak-to-peak) 45 Amps 170 2 pairs per channel Line input THD+N Signal / noise ratio Input impedance Frequency response <0.01% typical, 20Hz to 20 kHz >100dB ‘A’-weighted 38k Ohms +0, –0.
MANUAL HISTORY RELEASE DATE CHANGES Issue 1 24th July 2009 1st release Issue 2 14th October 2009 Formatting Issue 3 Issue 4 Issue 4 th 16 October 2009 th 9 November 2009 Page 11 footer Back panel updated Page 14 of 14