
Owners Manual


Issue 1 Page 9 of 13
Starting
Once
all connections are made, switch on the unit, using the POWER button front of the unit. The MUTE LED
will light. Outputs are muted for about 6 seconds, so no sound will be heard. Once the 6 seconds is up the
MUTE LED goes out, indicating unit is settled, and ready for use.
Volume
The volume should be adjusted for normal listening levels. This is done by turning the volume up/down knob on
the front panel. Adjusting the volume can also be achieved using the remote handset, using the volume
up/down buttons (see page 8).
The red LED display shows the current dB step of the laser-trimmed electronic attenuator. The display
increments by accurate 0.5dB steps.
Note: above 99.5dB, the “0.5” digit is no longer visible, but each attenuator step remains as 0.5dB, so it takes
two 0.5dB steps or clicks on the volume control to update the display by 1dB.
Mute (Remote Control only)
The output may be muted by use of the MUTE button on the remote. Press once, and MUTE LED will light
indicating muted state. No sound will be heard from the speakers.
To return to listening; simply press the MUTE button again so MUTE LED is no longer lit.
PHONO input
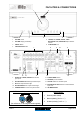
To use the PHONO input, connect record deck outputs to the PHONO input RCA sockets (see page 7). Set the
correct cartridge type using the MM/MC switch under the RCA input plugs. Select PHONO input by pressing
the PHONO button so PHONO LED is lit.
Selecting the PHONO input can also be achieved by pressing the corresponding button on the remote
handsets (see page 8).
CD input
To use the CD input, connect CD player outputs to the CD input RCA sockets (see page 7). Select CD input by
pressing the CD button so CD LED is lit.
Selecting the CD input can also be achieved by pressing the corresponding button on the remote handsets
(see page 8).
TUNER input
To use the TUNER input, connect tuner outputs to the TUNER input RCA sockets (see page 7). Select TUNER
input by pressing the TUNER button so TUNER LED is lit.
Selecting the TUNER input can also be achieved by pressing the corresponding button on the remote handset
(see page 8).
AUX1 input
To use the AUX1 input, connect tuner outputs to the AUX1 input RCA sockets (see page 7). Select AUX1 input
by pressing the AUX1 button so AUX1 LED is lit.
Selecting the AUX1 input can also be achieved by pressing the corresponding button on the remote handset
(see page 8).
AUX2/HT input
To use the AUX input as a standard input, move the AUX/HT switch on the back panel to the AUX position.
Connect source outputs to the AUX input RCA sockets (see page 7). Select AUX input by pressing the AUX
button so AUX LED is lit. Selecting the AUX input can also be achieved by pressing the corresponding button
on the remote handset, (see page 8).
To use the AUX/HT input as an HT input, move the AUX/HT switch to the HT position. This input is now
unaffected by the volume control, allowing volume control on an external Home Theatre processor to be used
directly. Connect Home theatre or other source outputs to the AUX input RCA sockets (see page 7). Select
AUX input by pressing the AUX button so AUX LED is lit.
IMPORTANT: Take great care when using the input in HT mode. Ensure that the volume control is turned right
down on the HT processor when first setting up. The HT mode is designed for sources which require their own
volume control to be used. Connecting sources in HT mode with no volume control could result in damage to
hearing and/or speakers due to uncontrolled loud sounds.
OPERATION