
Specifications


A1 FBP
OPERATION
Issue 1: 20
th
May 2008
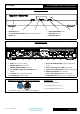
STARTING
Once all connections are made, switch on the unit, using
the POWER button front of the power supply unit. The
power LED will light on the supply, as well as the
backlit display on the main unit. The display will
indicate the product name will show but outputs are
muted, for about fifteen seconds, so no sound will be
heard from the speakers.
Once the 15 seconds is up the volume and selected
source input will indicate unit is settled, and ready for
use.
VOLUME
The volume should be adjusted for normal listening
levels. This is done by pressing the volume up/down
buttons on the front panel. The volume level is readily
identifiable on the display barographs and numeric
indicator, in the above example it is set to 33% of the
full range.
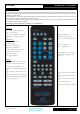
Adjusting the volume can also be achieved using the
remote handset, using the volume up/down buttons (see
p. 9).
MUTE (remote only)
The sound from the speakers may be muted by use of
the MUTE button on the remote. Press once and MUTE
will show in the display indicating muted state. No
sound will be heard from the speakers.
To return to listening; simply press the MUTE button
again so MUTE is no longer displayed.
PHONO (MM/MC)
To use the phono input, connect turntable cartridge
outputs to the phono input RCA sockets (see p.7). Select
PHONO input using the source up/down buttons until
PHONO is shown in the display.
Selecting the PHONO input can also be achieved using
the corresponding button on the remote handset, (see p.
9).
If moving coil cartridge is used, the MM/MC toggle
switch on back panel can be used to select MC
sensitivity.
The front panel display will then indicate that the unit is
setup for MC cartridges.
CD
To use the CD input, connect CD player outputs to the
CD input RCA sockets (see p.7). Select CD input using
the source up/down buttons until CD is shown in the
display.
Selecting the CD input can also be achieved using the
corresponding button on the remote handset, (see p. 9).
TUNER
To use the tuner input, connect tuner outputs to the tuner
input RCA sockets (see p.7). Select TUNER input using
the source up/down buttons until TUNER is shown in
the display.
Selecting the TUNER input can also be achieved using
the corresponding button on the remote handset, (see p.
9).
AUX/HT
To use the AUX, as standard input, check the AUX/HT
switch (back panel) is set to AUX position. The display
will then refer to this input as AUX.
Connect line outs from source to the AUX input (see
p.7). Select AUX input using the source up/down buttons
until AUX is shown in the display.
To use the AUX as Home Theatre direct input, move the
AUX/HT switch to the HT position. The display will
then refer to the input as HT.
Connect line level outputs from home theatre processor
to the AUX/HT input (see p.7). Volume control is now
only possible (for this input) on the external processor.
Please note connecting standard line signals to these
inputs in HT mode will cause very loud and damaging
signals into the speakers that cannot be controlled
through the volume control. Please ensure correct
AUX/HT switch position before using this input.
HT
™™™™ 33
AUX
™™™™
33
CD
™™™™
33
PHONO
MC
™™™™
33
PHONO
MM
™™™™
33
CD
MUTE 33
CD
™™™™ 33
A1 FBP V1.0
M MUTE 33
TUNER
™™™™
33
Page 10 of 15