748-34 ONLY FITS DURABASE® SHOWER FLOORS AS FOLLOWS: EXCLUSIVAMENTE PARA PISOS PARA DUCHA DURABASE® INSTALADOS SEGÚN EL SIGUIENTE PROCEDIMIENTO: CONVIENT UNIQUEMENT AUX BACS À DOUCHE DURABASE®, COMME SUIT : 732 736 748-32 748-34 3232M 3636M 3248M 3448M DURABASE® 32" x 32" DURABASE ® 36" x 36" DURABASE® 32" x 48" DURABASE® 34" x 48" PREPARATION: LA PREPARACION: PREPARATION : Before you assemble and install your DURAWALL® and DURABASE ® Fiberglass Shower unit you will have to prepare the rough-in area
Fig. A Fig.
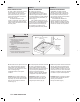
INSTALLATION INSTALACIÓN INSTALLATION STEP 1: PASO 1: ÉTAPE 1 : After you have determined where your DURAWALL® and DURABASE® shower is to be located, you will have to construct the appropriate alcove. Be sure to plan your rough plumbing requirements (drain-venting-supply lines) at this time. Refer to “ROUGH-IN” illustrations for dimensions. (Fig. A & B) After you have constructed your alcove and completed your rough plumbing requirements you are now ready to install the shower floor.
C. Place shower floor directly on subfloor or slab, and level floor in both directions. Place level along top edge of tile flanges. Do not use floor area which is tapered for water drainage. You may want to install shower floor in a bed of gypsum cement or panel/ floor adhesive for additional support. C. Coloque el piso para ducha directamente sobre la loza o la base del suelo y nivélelo en ambas direcciones. Sitúe el nivel de burbuja a lo largo del extremo superior de los rebordes de los azulejos.
E. You have been furnished with (6) mounting clips to secure the shower floor. Position (2) two clips per side at stud centers and securely fasten with screws provided. (Fig. D) E. La unidad incluye seis (6) abrazaderas para la sujeción del piso para ducha. Coloque dos (2) abrazaderas por lateral en los centros de las vigas y sujételas con los tornillos suministrados. (Fig. D) E. Vous avez en votre possession six (6) fixations destinées au bac à douche.
B. The Center and Side Panels have a mounting flange that is designed to accept standard deck screws, the positioning of the studs and bracing have been laid-out to give maximum support (horizontally and vertically) behind these flanges. The mounting flanges have pre-marked holes. To avoid cracking the flange, it is recommended that you pre-drill all of the holes with a 5/32" (inch) diameter drill bit. B.
STEP 4: PASO 4: ÉTAPE 4 : A. At this time dry fit all three panels. Start by securing center panel to stud with (1) one deck screw in the center hole of the top mounting flange. A. Ensamble los tres paneles. Primero fije el panel central a al viga insertando un (1) tornillo para plataforma en el agujero central del reborde de montaje de arriba. A. Assemblage des trois panneaux. Fixer le panneau central à la latte en insérant une (1) vis à bois dans le trou du centre de la bride de fixation du haut. B.
STEP 5: PASO 5: ÉTAPE 5 : INSTALACIÓN FINAL FINAL INSTALLATION A. Apply a bead of silicone sealant, approximately centered on the narrow flanges of the shower floor (both sides and back), and also where the Side Panel contacts the threshold. (Fig. G ) To eliminate vibration on the center or side panels, apply a bead of silicone sealant to the stud face that makes contact with the back surfaces of these panels. A.
Fig. H *1 Cuadro H *2 *1 Opcional: aplique una capa de impermeabilizador de silicona sobre ambos lados de la ranura *2 Lámina *3 Panel central *4 Panel lateral derecho Le schéma H *1 Facultatif : appliquez une ligne de mastic silicone transparent sur cette rainure - des deux côtés *2 Lame *3 Panneau central *4 Panneau latéral droit *3 *4 Fig.
CARE & CLEANING CUIDADO Y LIMPIEZA The surface of your DURAWALL and DURABASE® shower may be cleaned with a mild soap solution in warm water using a soft cloth. When using a cleaner product, carefully read the label to ensure that the cleaner is safe for use on the material. Stubborn stains can be cleaned using “Soft Scrub®” by Clorox®, “Tub & Tile Cleaner ® ” by Lysol ® or a powdered detergent such as “Spic-n-Span ®.” Do not allow cleaners to sit or soak on the surface.
ONE YEAR LIMITED CONSUMER WARRANTY We warrant to the original consumer user of the products of E.L. Mustee & Sons, Inc. for a period of one (1) year from the date of the sale to the consumer that our products will be free of defects in material and workmanship. Our liability under this Warranty shall be to either repair or replace the product with an identical or reasonably equivalent product.