
Specifications


Falcon II Outdoor series printers – Maintenance Manual
140
AP-74065, Rev. 1.0, 21/11/03
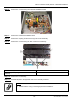
Step 6 : Remove the waste liquid sensor installation board.
Step 7 : Remove the screws (M2x8) fixing the waste liquid BOX sensor assembly.
1 = Waste liquid sensor installation board 2 = Waste liquid BOX sensor assembly
3 = Screws (M2x8)
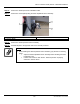
Step 8 : Remove the waste liquid BOX sensor assembly.
Step 9 : Reinstall all parts in the opposite order of the removal procedure.
Notes :
¾ When installing the waste liquid BOX sensor assembly, pay attention to following
points :
Adjust the waste liquid BOX sensor assembly before installing the waste
liquid bottle cover.
Position and install it so that "Sensor : Waste liquid tank" is properly
switched in "Sensor Menu".