
Specifications


Falcon II Outdoor series printers – Maintenance Manual
49
AP-74065, Rev. 1.0, 21/11/03
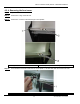
Step 7 : Remove the screws from the front of front media guide.
Notes :
¾ Please note that the amount of screws is size dependent.
Falcon II Outdoor 2 heater
1 = Screws on the front of front media guide
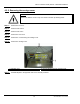
Falcon II Outdoor 4 heater
1 = Screws on the front of front media guide
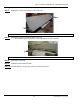
Step 8 : Standing before the unit move the front paper guide towards you.
Step 9 : Loosen the cables from their cable clamps.
Step 10 : Carefully loosen the connectors
Notes :
¾ Be sure not to damage the cables or connectors.
Step 11 : Remove the front paper guide.
Step 12 : Replace the parts inside the printer.
Step 13 : Reinstall all parts in the opposite order of the removal procedure.