VideoEase™ Component Video Hub (500250, 500251, 500252, 500253) Installation Guide P/N: 94-000382-B, SE-000581-B
© MuxLab Inc. Component Video Hub Installation Guide Copyright Notice : Copyright © 2006-2007 MuxLab Inc. All rights reserved. Printed in Canada. No part of this publication may be reproduced, stored in a retrieval system, or transmitted in any form or by any means, electronic, mechanical, photocopying, recording, or otherwise without prior written permission of the author. Trademarks : MuxLab and VideoEase are registered trademarks of MuxLab Inc.
© MuxLab Inc. Component Video Hub Installation Guide Table of Contents 1. Overview ........................................................................................................................4 1.1. Description........................................................................................................4 1.2. Features.............................................................................................................4 2. Technical Specifications ...............................
© MuxLab Inc. Component Video Hub Installation Guide 1. Overview 1.1. Description The VideoEase Component Video Hub allows one (1) full component video (YPbPr/RGB) source and one (1) digital or analog audio video source to be distributed up to eight (8) or sixteen (16) destinations depending on the model for more cost-efficient cabling. The 500250 supports up to eight (8) ports. The 500252 supports up to sixteen (16) ports.
© MuxLab Inc. Component Video Hub Installation Guide 2. Technical Specifications Environment Component baseband video (YPbPr/RGB) and Digital Audio Devices DVD players, DVR, AV matrix switchers, DLP projectors, plasmas, monitors, home theatre. Transmission Transparent to the user. 3 dB Bandwidth Video: DC to 77 MHz. Digital Audio: DC to 52MHz Insertion Loss (differential) Video: -0.8 dB @ 4 MHz Analog Audio: 20 to 20kHz Digital Audio: -1.26 dB @ 4 MHz. Analog Audio: 1 dB @ 4 MHz.
© MuxLab Inc. Connectors Component Video Hub Installation Guide Source Input: One (1) RJ45S on rear panel Looping Output: One (1) RJ45S on rear panel Distribution Outputs: Eight (8) or sixteen (16) RJ45S on front panel RJ45 Pin Configuration Red (Pr) : Pins 7 [R] & 8 [T] Reverse Polarity Sensitive Green (Y) : Pins 3 [R] & 6 [T] Blue (Pb) : Pins 1 [R] & 2 [T] Audio : Pins 4 [R] & 5 [T] Configuration Switch Sets hub to support digital or analog audio on fourth twisted pair.
© MuxLab Inc. Component Video Hub Installation Guide 3. Installation Procedure 3.1. Parts List The Component Video Hub comes with the following parts. Please verify that all pieces are present before proceeding. 3.2. • Base Unit • External Power Supply 12VDC/1.25A (500250, 500251) or 12VDC/2.5A (500252, 500253) • Rubber stand-offs (500250, 500251 only) • Installation Guide Product Overview The external connections and diagnostics of Component Video Hub are detailed in the following diagrams.
© MuxLab Inc. 3.3. Component Video Hub Installation Guide Pre-Installation Checklist The Component Video Hub provides a centralized component video distribution center via copper twisted pair cabling. 1. The Component Video Hub is typically installed in a remote telecom room and is connected to the component video source and display devices via Cat5 twisted pair. MuxLab component video baluns are installed at each component video devices to support the connection to the hub via Cat5 cable. 2.
© MuxLab Inc. Component Video Hub Installation Guide Figure 6: 16-port rack-mount installation 3.5. Installation Procedure The Component Video Hub is available in 8-port (500250, 500251) and 16-port (500252, 500253) versions. In order to install the product, please follow the steps below: 1. Install the Component Video Hub in its final location by performing steps 1 or 2 listed in the previous section. 2. Ensure that the power is turned off on the component video source and displays. 3.
© MuxLab Inc. Component Video Hub Installation Guide component video coaxial cable output of the video source according to the color code of the RCA cable leads. 7. Connect a Component Video/Digital Audio Balun (500050, 500051) or Component Video/Analog Audio Balun (500052, 500053) to each component video display. 8.
© MuxLab Inc. Component Video Hub Installation Guide 13. The following diagrams show a couple of typical configurations.
© MuxLab Inc.
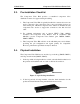
© MuxLab Inc. 3.6. Component Video Hub Installation Guide Cascading In order to drive more displays, the Component Video Hub may be cascaded with another hub. In order to optimize the image quality, it is recommended to cascade up to two (2) levels only as shown in the following diagrams.
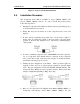
© MuxLab Inc. Component Video Hub Installation Guide In order to cascade two hubs together, connect a Cat5 straight-through cable between the Output Port (regular or cascade) of the source hub to the Input Port of the second hub as shown in the following diagram.
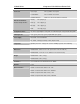
© MuxLab Inc. Component Video Hub Installation Guide 4. Troubleshooting The following tables describe some of the symptoms, probable causes and possible solutions in respect to the installation of the Component Video Hub. If you still cannot diagnose the problem, please call MuxLab Customer Technical Support at 877-689-5228 (toll-free in North America) or (+1) 514-905-0588 (International). Video Power LED Video LED Probable Causes Possible Solutions No image OFF OFF Power off.
© MuxLab Inc. Component Video Hub Installation Guide Digital Audio Digital Audio LED Probable Causes Possible Solutions No audio OFF Power off. Check power supplies of the audio equipment. No audio ON Wrong pin configuration. Check pin configuration and verify straightthru wiring. No audio ON No continuity in video link. Verify cable continuity between pairs of baluns. No audio ON Improper connection Swapped pairs. Check that baluns are connected to correct video inputs and outputs.
© MuxLab Inc. Component Video Hub Installation Guide 5. Product Warranty Policy Items under warranty - Company Policy MuxLab guarantees its products to be free of defects in manufacturing and workmanship for the warranty period from the date of purchase. If this product fails to give satisfactory performance during this warranty period, MuxLab will either repair or replace this product at no additional charge, except as set forth below.
© MuxLab Inc.
© MuxLab Inc.
© MuxLab Inc.
© MuxLab Inc. Component Video Hub Installation Guide MuxLab Inc. 8114 Trans Canada Hwy, St. Laurent, Quebec, Canada, H4S 1M5 Tel.: +1 (514) 905-0588 Fax: +1 (514) 905-0589 Toll Free (North America): 877 689-5228 URL: www.muxlab.com E-mail: videoease@muxlab.