HDMI 4x8 Matrix Switch, HDBT, PoE 500418-POE-US 500418-POE-UK 500418-POE-EU Installation Guide P/N: 94-00757-A SE-00757-A
© MuxLab Inc. HDMI 4x8 Matrix Switch, HDBT, PoE Installation Guide Copyright Notice: Copyright © 2014 MuxLab Inc. All rights reserved. Copyright © 2009 Real Time Engineers Ltd. This product uses an unmodified version of FreeRTOS V6.0.0. Source code available at www.freertos.com Printed in Canada.
© MuxLab Inc. HDMI 4x8 Matrix Switch, HDBT, PoE Installation Guide Table of Contents 1. Overview .....................................................................................................................................4 1.1. Description ............................................................................................................................... 4 1.2. Features ..................................................................................................................
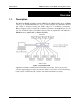
© MuxLab Inc. HDMI 4x8 Matrix Switch, HDBT, PoE Installation Guide 1. Overview 1.1. Description The MuxLab HDMI 4x8 Matrix Switch, HDBT, PoE (500418-POE) allows 4 HDMI sources to be switched/distributed to up to 8 remote displays via unshielded twisted pair (UTP) or shielded twisted pair (STP) cables for cost-efficient connectivity. Remote displays can be connected up to 230 feet (70 meters) @ 1080p Deep Color via Cat 5e/6 UTP/STP cables.
© MuxLab Inc. 1.2.
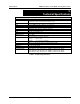
© MuxLab Inc. HDMI 4x8 Matrix Switch, HDBT, PoE Installation Guide 2. Technical Specifications Environment Devices Transmission Input Output Connectivity Maximum Distance Cables Power Matrix Switching Time LED Diagnostics Temperature Dimensions Accessories Included Shipping Weight Regulatory Warranty Order Information 4x8 Matrix Switch, HDBT, PoE HDMI 1.4A 3D Support LCD and Plasma TVs, DVD and Blu-Ray players, monitors, projectors, PCs, laptops, home theatre systems, home theater PCs, game consoles.
© MuxLab Inc. HDMI 4x8 Matrix Switch, HDBT, PoE Installation Guide 3. Installation Procedure 3.1. Part List The HDMI 4x8 Matrix Switch, HDBT, PoE (500418-POE) comes with the following parts: • Base unit • Four (4) IR Emitters • One (1) IR Sensor • Two (2) Brackets with screws • Power Cord (US, EU or UK) • One (1) USB Type A - Type B Cable • One (1) RS232 Cable • One (1) Infrared remote • One (1) Quick Reference Sheet Please verify that all parts are present before proceeding.
© MuxLab Inc. 3.2. HDMI 4x8 Matrix Switch, HDBT, PoE Installation Guide Product Overview The external connections and connection indicators of the HDMI 4x8 Matrix Switch, HDBT, PoE are detailed in Figure 2 and Figure 3. Please familiarize yourself with them before installing the unit.
© MuxLab Inc.
© MuxLab Inc. 3.3. HDMI 4x8 Matrix Switch, HDBT, PoE Installation Guide Pre-Installation Checklist The HDMI 4x8 Matrix Switch, HDBT, PoE provides a centralized HDMI switching center via UTP/STP cables. 1. The Matrix Switch is used in conjunction with MuxLab’s UTP/STP HDMI Receivers (500454-RX or 500454-POE-RX). 2. The Matrix Switch is typically installed in a remote telecom room and is connected to multiple video sources and display devices via Cat 5e/6 UTP/STP or HDMI cables.
© MuxLab Inc. 3.4. HDMI 4x8 Matrix Switch, HDBT, PoE Installation Guide Physical Installation MuxLab’s HDMI 4x8 Matrix Switch, HDBT, PoE comes with mounting brackets for standard 19” rack mounting. Select the final destination for the product and install the unit using standard rack-mount screws (Figure 6). Figure 6: Setup for Rackmount Installation For set-top installation, the side mounting brackets may be removed, and the included rubber feet placed on the bottom of the unit.
© MuxLab Inc. 3.5. HDMI 4x8 Matrix Switch, HDBT, PoE Installation Guide Installation Procedure In order to install the HDMI 4x8 Matrix Switch, HDBT,PoE, please follow the steps below: 1. Place the Matrix Switch in its final location (see Section 3.4 Physical Installation). 2. Ensure that power is OFF on all sources and displays. 3. Using HDMI cables (not included), connect each source to an HDMI IN port on the back panel of the Matrix Switch. 4.
© MuxLab Inc.
© MuxLab Inc.
© MuxLab Inc. 3.6. HDMI 4x8 Matrix Switch, HDBT, PoE Installation Guide Manual Control The HDMI 4x8 Matrix Switch, HDBT, PoE may be controlled manually by using the controls located on the front panel. Navigating the manual control menu is performed by using the ‘Info’, ‘Menu’, and ‘Switch’ buttons located on the front panel, just below the display, as well as the numeric keypad and arrows located to the right of the display.
© MuxLab Inc. HDMI 4x8 Matrix Switch, HDBT, PoE Installation Guide Startup The Startup screen is the first screen to appear once the Multimedia 4x8 Matrix Switch is powered up. It displays the MuxLab logo and product name. Information The information screen is reached by pressing the Info button. It displays the name of the device at top, followed by the IP and Mac addresses, device status, and firmware version. Main Menu The Main Menu screen is reached by pressing the Menu button.
© MuxLab Inc. HDMI 4x8 Matrix Switch, HDBT, PoE Installation Guide NOTE: If password protection is on, pressing the Menu button from the Startup or Information screens will prompt the Password screen to appear. The user must then enter the correct password in order to reach the Main Menu screen. Switch The Switch screen by either pressing the Switch button, or by highlighting the Switch entry in the Main Menu screen and pressing the Enter/Save button on the numeric keypad.
© MuxLab Inc. HDMI 4x8 Matrix Switch, HDBT, PoE Installation Guide Presets The Presets screen allows the user to select and apply a pre-existing preset (specific mapping of connections between sources and displays), or to save existing connections as a preset.
© MuxLab Inc. HDMI 4x8 Matrix Switch, HDBT, PoE Installation Guide Network The Network Settings screen allows the user to change the settings of the network: • IP Address • Mask Address • Gateway Address The user navigates the Network Settings screen using the arrow keys, and enters information using the numeric keypad. NOTE: In order to access the Network Settings screen, DHCP must be disabled (see below).
© MuxLab Inc. HDMI 4x8 Matrix Switch, HDBT, PoE Installation Guide Password The Password screen allows the user to set password protection on the system to ON or OFF, as well as to change the password (numeric characters only). RS232 The RS232 screen allows the user to modify the baud rate, data bits, stop bit, and parity settings of the device. Connect Source to Displays The Connect Source to Displays screen allows the user to select which source to connect to which displays(s).
© MuxLab Inc. HDMI 4x8 Matrix Switch, HDBT, PoE Installation Guide Connect Source by Name The Connect Source by Name screen allows the user to select which display(s) to connect to which source(s). The user selects displays and sources by their designated name. Connect All Displays to… The Connect All Displays to… screen allows the user to connect all displays to a given source. The user simply selects the source, which is displayed both by number and name.
© MuxLab Inc. HDMI 4x8 Matrix Switch, HDBT, PoE Installation Guide Select a Preset and Apply The Select a Preset and Apply screen is a two-tier menu that allows the user to select a preset from a list of eight options. Once selected, the user presses the Enter/Save button on the numeric keypad. The Select a Preset and Apply screen then confirms the selection.
© MuxLab Inc. HDMI 4x8 Matrix Switch, HDBT, PoE Installation Guide Once selected, the user presses the Enter/Save button on the numeric keypad. The Save Current Connections As screen then confirms the selection.
© MuxLab Inc. 3.7. HDMI 4x8 Matrix Switch, HDBT, PoE Installation Guide Remote Control of Matrix Switch The Matrix Switch can be controlled by a remote (Figure 11). The remote is divided into eight sections (1 through 8), each of which controls the corresponding display. The ◄ and ► buttons associated with each section allow the user to control which input (1 through 4) is fed to a given display. The System Code Switch at the bottom of the remote allows the user to change the system code.
© MuxLab Inc. 3.8. HDMI 4x8 Matrix Switch, HDBT, PoE Installation Guide Remote Control of Sources and Displays Sources and displays do not have to be controlled at their physical location. Using MuxLab receivers, each source and display can be controlled at different locations using their respective remotes. Using source remotes, sources can be controlled at display locations via receivers (see Figure 8).
© MuxLab Inc. 3.9. HDMI 4x8 Matrix Switch, HDBT, PoE Installation Guide EDID and DIP Switch Settings Every digital display has extended display identification data (EDID) that describes its capabilities to a video source. This enables the source to know which type of display is connected to it, and to send compatible signals to that display. The EDID settings of any display can be relayed to any source by means of a DIP switch located on the back panel of the Matrix Switch (Figure 12).
© MuxLab Inc. HDMI 4x8 Matrix Switch, HDBT, PoE Installation Guide 3.10. Port Control Operation MuxLab’s HDMI 4x8 Matrix Switch, HDBT PoE may be controlled in any one of two ways: 1. RS-232 Control 2. USB CDC Control 1. RS-232 Control The HDMI 4x8 Matrix Switch, HDBT PoE features built-in firmware that allows commands from an ASCII terminal to be sent directly to the device via an RS-232 connection. Ensure that the RS-232 cable has the straight-through configuration shown in Figure 13.
© MuxLab Inc. HDMI 4x8 Matrix Switch, HDBT, PoE Installation Guide 3.11. USB Driver Setup When interfacing a MuxLab device with the USB port on Windows XP, Windows 7, or Windows 8 operating systems, a driver setup file will be required. For Linux and Mac OS X operating systems, no driver is necessary. To install the USB serial driver, download the SC-000032-A USB to serial driver file from the MuxLab website and save it to the local hard drive.
© MuxLab Inc. HDMI 4x8 Matrix Switch, HDBT, PoE Installation Guide Figure 15: Found New Hardware Dialog Box Another dialog box will open (Figure 16). Click Browse and locate the SC-000032-A USB to serial driver file downloaded earlier. Once found, click Next.
© MuxLab Inc. HDMI 4x8 Matrix Switch, HDBT, PoE Installation Guide A security window will now appear, indicating that the driver software is unsigned (Figure 17). Select Install this driver software anyway. Figure 17: Windows Security A window will appear instructing that the software for the driver has been successfully installed (Figure 18). Click Close.
© MuxLab Inc. HDMI 4x8 Matrix Switch, HDBT, PoE Installation Guide 3.12. Ethernet Web Interface MuxLab offers users an Ethernet Web interface that provides the same functionality as manual control, with speeds of 10 Mbps or 100 Mbps. To use the Ethernet Web interface, the Matrix Switch must first be physically connected to an Ethernet network.
© MuxLab Inc. HDMI 4x8 Matrix Switch, HDBT, PoE Installation Guide The Logout hyperlink logs the user out of the system. The Language drop-down list provides the user with three interface languages: English, French, and Spanish. English is used by default.
© MuxLab Inc. HDMI 4x8 Matrix Switch, HDBT, PoE Installation Guide The Port Management submenu allows the user to make individual connections between specific displays and sources, or wholesale connections between all displays and sources by means of presets. Sources and displays are presented to the user in any one of four ways: • By source name • By source number • By display name • By display number Figure 19 illustrates sources and displays presented by display number.
© MuxLab Inc. HDMI 4x8 Matrix Switch, HDBT, PoE Installation Guide (2) Setup The Setup submenu (Figure 22) is used to perform the following tasks: • Modify port names • Modify present names • Modify network connections and passwords • Modify RS232 connections • Modify alarm settings • Upgrade firmware Figure 22: Setup Submenu – Port Names Tab In the Port Names tab, the user can modify port names in the Display Names and Source Names columns, and then click on Save to save these modifications.
© MuxLab Inc. HDMI 4x8 Matrix Switch, HDBT, PoE Installation Guide In the Preset Names tab (Figure 23), the user can modify the names of presets. Figure 23: Setup Submenu – Preset Names Tab After preset names are modified, the user clicks on Save to save these modifications. The length of preset names is limited to 20 characters each. In the Network tab (Figure 24), the user can modify network settings and passwords for users and (if applicable) administrators.
© MuxLab Inc. HDMI 4x8 Matrix Switch, HDBT, PoE Installation Guide To implement password modifications, an administrator makes changes to the Administrator Password and/or the User Password, and then clicks on the corresponding Save button. Regular users can only make changes to the User Password. In the RS-232 tab (Figure 25), the user can modify RS-232 settings.
© MuxLab Inc. HDMI 4x8 Matrix Switch, HDBT, PoE Installation Guide In the Alarms tab (Figure 26), the user can modify the settings that dictate when an alarm will be triggered. Figure 26: Setup Submenu – Alarms Tab Minimum and maximum temperatures are in degrees Celsius (°C). Fan rotation is in revolutions per minute (RPMs). Once all modifications have been made, the user clicks on Save.
© MuxLab Inc. HDMI 4x8 Matrix Switch, HDBT, PoE Installation Guide In the Administration tab (Figure 27), the user can modify passwords for users and (if applicable) administrators, select and install new firmware, restore or backup data and reset the unit to factory settings. Figure 27: Setup Submenu – Administration Tab To implement password modifications, an administrator makes changes to the Administrator Password and/or the User Password, and then clicks on the corresponding Save button.
© MuxLab Inc. HDMI 4x8 Matrix Switch, HDBT, PoE Installation Guide In the EDID tab (Figure 28), the user can apply pre-defined EDID settings to all input sources or apply EDID setting from any display to a given source. Figure 28: Setup Submenu – EDID Tab (3) Help The Help submenu (Figure 29) provides the user with contact and support information.
© MuxLab Inc. HDMI 4x8 Matrix Switch, HDBT, PoE Installation Guide Figure 30: Hardware Monitor Screen This screen can be accessed by clicking on the Product status link at the top right of any Ethernet web interface screen.
© MuxLab Inc. HDMI 4x8 Matrix Switch, HDBT, PoE Installation Guide 4. Troubleshooting Table 6 lists common problems that affect image quality, as well as their possible causes and solutions. If the information below does not solve the problem, the technical support contact information can be found at the end of this section.
© MuxLab Inc. HDMI 4x8 Matrix Switch, HDBT, PoE Installation Guide 5. Appendix A. ASCII Command Set Ensure that the terminal emulation program parameters are set to the following: BAUD Rate: 9600 Data bits: 8 Stop bits: 1 Parity: None Flow control: None It should be noted that commands are case sensitive and arguments must be separated by a single space.
© MuxLab Inc. HDMI 4x8 Matrix Switch, HDBT, PoE Installation Guide Serial/USB Port Commands 1.
© MuxLab Inc. HDMI 4x8 Matrix Switch, HDBT, PoE Installation Guide 2.
© MuxLab Inc. HDMI 4x8 Matrix Switch, HDBT, PoE Installation Guide 3.
© MuxLab Inc. HDMI 4x8 Matrix Switch, HDBT, PoE Installation Guide 4. EDID (Continued) edidcopy –o
© MuxLab Inc. HDMI 4x8 Matrix Switch, HDBT, PoE Installation Guide 5. Get (Continued) get -o Description: Get the connection state of all output ports Arguments: Example: Get connection state of all output ports get -o Response: Output 01 connected to: 03 Output 02 connected to: 04 Output 03 connected to: none …{and so on} (or an error message if the command failed) 6.
© MuxLab Inc. HDMI 4x8 Matrix Switch, HDBT, PoE Installation Guide 7.
© MuxLab Inc. HDMI 4x8 Matrix Switch, HDBT, PoE Installation Guide 7.
© MuxLab Inc. HDMI 4x8 Matrix Switch, HDBT, PoE Installation Guide 8. Network network Description: Get the network address values (IP, mask and gateway) Arguments: Example: Get network address values network Response: IP: 10.0.1.101 MASK: 255.255.0.0 GATEWAY: 10.0.0.1 DHCP: ON (or an error message if the command failed) Network –ip Description: Set a specific IP address (note that DHCP must be disabled to perform this action) Arguments: : #.#.#.
© MuxLab Inc. HDMI 4x8 Matrix Switch, HDBT, PoE Installation Guide 8. Network (Continued) Network –dhcp Description: Enable/disable DHCP feature Arguments: : on or off Example: Enable the DHCP feature Network –dhcp on Response: IP: 10.0.1.101 MASK: 255.255.0.0 GATEWAY: 10.101.1.5 DHCP: ON (or an error message if the command failed) 9.
© MuxLab Inc. HDMI 4x8 Matrix Switch, HDBT, PoE Installation Guide 11. Reset reset -f Description: Reset the unit and restore it to its factory settings Arguments: Example: Reset unit and restore it to factory settings reset -f Response: “Clearing flash memory... Rebooting...” (or an error message if the command failed) 12.
© MuxLab Inc. HDMI 4x8 Matrix Switch, HDBT, PoE Installation Guide 14.
© MuxLab Inc. HDMI 4x8 Matrix Switch, HDBT, PoE Installation Guide 15. Status status Description: Display the unit status Arguments: Example: Display the unit status status Response: Temperature: 28 Celsius Voltage monitors: Ok Fans: Fan 1: 1850 RPM Fan 2: 1850 RPM (or an error message if the command failed) 16. Version version Description: Get the current firmware version Arguments: Example: Get current firmware version version Response: Master firmware version: 1.0.
© MuxLab Inc. HDMI 4x8 Matrix Switch, HDBT, PoE Installation Guide B. IP Control Commands 1. Notice This section is provided for informational purposes only, and should only be used by software developers with a thorough understanding of the HTTP and JSON specifications. 2. Introduction The Matrix Switch can be controlled using basic IP commands. These commands are based on the JSON format and are sent and received in standard TCP/IP packets. To learn more about JSON, visit http://www.json.org.
© MuxLab Inc. HDMI 4x8 Matrix Switch, HDBT, PoE Installation Guide 4. Basic Authentication (Continued) If successful, you will receive an HTTP 201 Created response. Sessions will automatically close after 5 minutes of inactivity. They may also be closed at any time by a GET /var/logout.json.
© MuxLab Inc. HDMI 4x8 Matrix Switch, HDBT, PoE Installation Guide 5. GET Commands URL Response /var/conn.json Array of 8 integers. Contains 8 items for the 8 displays. Each number is the source connected to the associated display. 0 means a display is disconnected. In the example below, Display 1 is disconnected, Display 2 is connected to Source 3, etc. Example: [0,3,2,4,2,3,1,3] Array of 8 integers. Provide the connections state of the corresponding preset. Contains 8 items for the 8 displays.
© MuxLab Inc. HDMI 4x8 Matrix Switch, HDBT, PoE Installation Guide 6. POST Commands POST commands will always return 1 of 5 HTTP headers: HTTP 201Created HTTP 400 Bad Request HTTP 403 Forbidden HTTP 404 Not Found HTTP 501 Not Implemented Command was successful Received argument was malformed User does not have sufficient privileges URL is incorrect URL does not support receiving POST data URL Argument /var/conn.json Array of connections.
© MuxLab Inc. var/edidcopy_p.json HDMI 4x8 Matrix Switch, HDBT, PoE Installation Guide The response will be the data (in hexadecimal) returned if any: [“A105……450C”] Array of a single integer. Copy the specified predefined EDID values to all input ports. The different code value are: 1 : 1080p3D 2 : 1080p 3 : 1080i 4 : 1080p 5.1 5 : 1080p 7.1 Example to apply the predefined EDID “1080i”: [3] var/edidcopy_o.json Array of 4 integers. Contains 4 items for the 4 sources.
© MuxLab Inc. HDMI 4x8 Matrix Switch, HDBT, PoE Installation Guide C.
© MuxLab Inc. HDMI 4x8 Matrix Switch, HDBT, PoE Installation Guide 6. Product Warranty Policy Items Under Warranty - Company Policy MuxLab guarantees its products to be free of defects in manufacturing and workmanship for the warranty period from the date of purchase. If this product fails to give satisfactory performance during this warranty period, MuxLab will either repair or replace this product at no additional charge, except as set forth below.
© MuxLab Inc. HDMI 4x8 Matrix Switch, HDBT, PoE Installation Guide Warranty Periods Any product found to be defective within three (3) months of invoice, including one (1) month shelf life, may be returned for replacement by a new unit or a satisfactory repair within one (1) month of receiving any returned product. The customer must provide MuxLab with the serial number and proof of purchase of the defective unit being returned. All R.M.A.