
User's Manual


www.mxlmics.com 3
Unpack Your Microphone
Begin by examining the contents of your MXL USB kit.
You should have the following components:
• One MXL Tempo USB microphone
• USB 2.0 high speed cable
• Tripod stand
• Hard mount mic stand adapter
• Owner’s manual
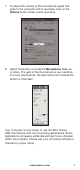
Getting Familiar with Your Microphone
In addition to speaking or singing into the side of the
microphone with the cardioid symbol you should
also notice the 1/8” stereo headphone jack on the back.
This is a stereo headphone jack for monitoring the
microphone’s signal as well as hearing the audio played
back from your computer. The 1/8” jack accepts most
headphones but the maximum headphone volume will
vary by manufacturer and model so care should always
be exercised when first plugging in.
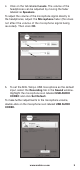
Using the Supplied Desktop Microphone Stand
1. Screw the microphone stand mount to the desktop
stand.
2. Separate the desktop stand’s legs and place it on a flat
surface.
3. While holding the microphone upright and firmly in one
hand, secure the microphone to the desktop stand by
screwing the black mounting ring into the microphone’s
base. The microphone should now sit securely in the
desktop stand.
4. Adjustments can be made to the angle of the
microphone by loosening the thumbscrew on the side
of the stand adapter.
5. At this point, attach the end of the USB cable that
matches the microphone’s connector. The other end
that will interface with Windows
®
operating system and
Mac
®
computers without the need for any special drivers.
Because it is a USB device, this microphone does not
require an external microphone preamp, as is the case
with most condenser microphones.
When recording an outdoor performance, use a windscreen
to protect your microphone from recording problems
caused by wind and damage from the elements.