
manual

4 9
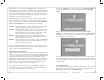
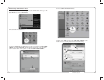
4. Click on the tab labeled Levels. The volume of the headphones can be
adjusted by moving the fader labeled as Speakers.
To adjust the volume of the microphone signal directly to the headphones adjust
the Microphone fader (this does not effect the volume of the microphone signal
being recorded). Then click OK.
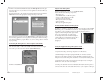
5. To set the MXL® Studio 1 USB microphone as the default input select the
Recording tab in the Sound window. Highlight the microphone icon labeled USB
AUDIO CODEC and click Set Default.
To make further adjustments to the microphone volume double-click on the
microphone icon labeled USB AUDIO CODEC.
Connecting the Microphone to Your Computer (Windows)
The MXL® Studio 1 USB microphone will operate with both USB 2.0 (high
speed USB) and USB 1.1 data buses. We recommend you connect your
microphone directly to the computer’s USB port as opposed to using a USB
hub. USB hubs have been known to interfere with the performance of various
USB devices.
PLEASE NOTE: Audio and video recording can be very taxing to a computer’s
resources. For this reason, you should close any and all running applications that
are non essential.
Please take the following steps to get connected:
If open, close your audio recording application. You will open it after the 1.
microphone is connected and operational.
Connect the remaining end of the USB cable to the computer’s USB port. 2.
You will see a red LED illuminate behind the microphones grill and Win-
dows will display the New Hardware Found dialog message.
Allow Windows time to identify the device.3.
In approximately one minute, Windows should display a dialog message 4.
stating that Your New Hardware is Installed and Ready for Use. After this
fi rst connection, Windows will require just a few moments to identify the
microphone.
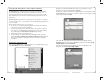
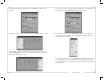
Initial Setup with Windows XP
1. To select the MXL® Studio 1 USB microphone as the default audio device go
to the Start Menu and select Control Panel.
www.mxl-usb.com