MBM Triumph 5551-06 Hydraulic Paper Cutter Instruction Manual Provided By http://www.MyBinding.com http://www.MyBindingBlog.
GB Operating Instructions Guillotines F Mode d´emploi NL Gebruiksaanwijzing I Manuale d´istruzione E Instrucciones de uso S Bruksanvisning EBA 551-06 EBA 551-06 LT Dieser Text darf nicht sein!! Dieser Text darf nicht sein!! B_Muster 5221-05EP _07-2005.pmd B_Muster 550-06LT___03-2006.pmd B_Muster 721-06LT___05-2006.
• Sicherheitshinweise • Safety precautions • • Consignes de sécurité • Veiligheidsvoorschriften • • Misure di Sicurezza • Normas de Seguridad • • Säkerhetsföreskrifter •Turvallisuusohjeita • Sikkerhetsforskriftene • • Środki bezpieczeństwa • Ìåðû ïðåäîñòîðîæíîñòè • 1234567890123456789 1234567890123456789 EBA 551-06 • EBA 551-06 LT 1234567890123456789 Bitte lesen Sie vor Inbetriebnahme der Maschine unbedingt diese Betriebsanleitung und beachten Sie die Sicherheitshinweise.
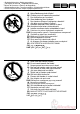
• Sicherheitshinweise • Safety precautions • • Consignes de sécurité • Veiligheidsvoorschriften • • Misure di Sicurezza • Normas de Seguridad • • Säkerhetsföreskrifter •Turvallisuusohjeita • Sikkerhetsforskriftene • • Środki bezpieczeństwa • Ìåðû ïðåäîñòîðîæíîñòè • D Keine Bedienung durch Kinder! GB Children must not operate the machine! F Pas d‘utilisation par un enfant! NL Geen bediening door kinderen! I Non lasciare utilizzare il tagliacarte a bambini! E ¡No dejar que la utilicen los niños! S Installera
• Sicherheitshinweise • Safety precautions • • Consignes de sécurité • Veiligheidsvoorschriften • • Misure di Sicurezza • Normas de Seguridad • • Säkerhetsföreskrifter •Turvallisuusohjeita • Sikkerhetsforskriftene • • Środki bezpieczeństwa • Ìåðû ïðåäîñòîðîæíîñòè • 1234567890123456789 1234567890123456789 EBA 551-06 • EBA 551-06 LT 1234567890123456789 D Messer nie lose liegen lassen! Messer nur mit Messerwechselvorrichtung oder im Messertransportkasten befördern! (Siehe Seite 26 und 28).
• Sicherheitshinweise • Safety precautions • • Consignes de sécurité • Veiligheidsvoorschriften • • Misure di Sicurezza • Normas de Seguridad • • Säkerhetsföreskrifter •Turvallisuusohjeita • Sikkerhetsforskriftene • • Środki bezpieczeństwa • Ìåðû ïðåäîñòîðîæíîñòè • DK Knivbladet må aldrig efterlades uden opsyn. Forsøg ikke at afmontere eller transportere knivbladet uden beskyttelse! (Se side 26 og 28). FARE! Risiko for legemlig beskadigelse. CZ Nikdy nenechávejte nůž bez krytu.
• Sicherheitshinweise • Safety precautions • • Consignes de sécurité • Veiligheidsvoorschriften • • Misure di Sicurezza • Normas de Seguridad • • Säkerhetsföreskrifter •Turvallisuusohjeita • Sikkerhetsforskriftene • • Środki bezpieczeństwa • Ìåðû ïðåäîñòîðîæíîñòè • 1234567890123456789 1234567890123456789 EBA 551-06 • EBA 551-06 LT 1234567890123456789 D Keine harten und splitternden Materialien schneiden! GB Do not cut hard materials or materials which may splinter! F La coupe de matériaux trop durs ou ris
• Safety precautions • The machine is designed for cutting stacks of paper to a specified size.
123456789012345678 123456789012345678 EBA 551-06 • EBA 551-06 LT 123456789012345678 123456789012345678 • Safety precautions • All components which could endanger the operator are covered by a guard (B)! Do not operate the machine without the following safety devices: • Safety beam guard (A) • Panels, tightly screwed (B). B A The cutting action, which is dangerous to the operator, is protected by a two-handed control system (C) and safety beam guard (D).
• Safety precautions • Protect mains cable against heat, oil and sharp edges! Standard machines are factory-set as follows: • Voltage 230 V (120 V) 1 phase • Frequency 50 Hz (60 Hz). When not in use for a longer period switch off. (Main switch to "0").
123456789012345678 123456789012345678 EBA 551-06 • EBA 551-06 LT 123456789012345678 123456789012345678 • Installation • The machine is mobile on castors. Align the machine as followes: • Remove cover (A). • Align machine with water level and adjust accordingliy. 4 x screws size 19 4 x nuts (B) • Reference area machine table (C). • Replace cover (A). C B A B The machine is delivered ready for operation. Side tables (A), left and right are available as an option. Assembly instructions are included.
• Operation • It is forbidden to operate the machine if the operating and safety instructions have not been understood. Please check the safety devices are functioning and complete before use. • All covers have to be mounted (A). A • The release for cutting is allowed only if the B • two-hand safety device is operated at the same time (C). The machine stops immediately if anyone reaches into the cutting area (B). We recommend you keep a record of your test results.
123456789012345678 123456789012345678 EBA 551-06 • EBA 551-06 LT 123456789012345678 123456789012345678 • Operation • Position the main switch to "I" (A). Blade locking facility (B) must be pulled out. Press S button (C). Machine will automatically go to the start position. The machine is now ready for use. C A B B The measurement is set either with the handwheel (A) or by programming (B) the cutting measurements. Measurement is shown on the display in inches or cm (B).
• Operation • Optical cutting line indicator: Optical cutting red line (A), indicates the position of the cut. Blade cuts on the front edge of the light beam. A B Mechanical cutting line indicator: The clamp (B) can be used as cutting line indicator for cutting. Pre-clamping can be performed using the foot pedal (C). Only use the optical cutting line indicator and mechanical cutting line indicator when no exact cut is required. C Position the paper on the backgauge (A) and side lays left or right (B).
123456789012345678 123456789012345678 EBA 551-06 • EBA 551-06 LT 123456789012345678 123456789012345678 • Operation • Clamp plate: A clamp plate (A) is fitted to the machine to prevent pressure marks on sensitive material. B To dismantle: • Remove the clamp plate (A) by turning the screwdriver (found in tool box) in the space between the clamp and clamp plate. © The remaining cut is 32 mm. To mount: • The clamp plate (A) is inserted to the top into the clamp (B). © The remaining cut is 60 mm.
• Operation • Setting clamping pressure If necessary, set clamping pressure with setting wheel (A). If a cutting process has been activated, the oil pressure can be seen on the oil pressure indicator (B). B A The clamp moves automatically when cutting is activated. The paper can be pressed in advance, with the foot pedal (A). Cutting is activated by pressing both buttons (B) on the front table.
123456789012345678 123456789012345678 EBA 551-06 • EBA 551-06 LT 123456789012345678 123456789012345678 • Operation • Cutting activation Do not reach into the cutting area when the blade is in motion. A cut can only be activated when the specified size is approached. The LED "S" on the display must be deleted. • Release the photo-electric beam guard (A). • Press both buttons of the safety two-handed control system (B) simultaneously and keep them pressed until the paper is completely cut.
• Operation • Operating elements AB- cm inch Safety beam guard Safety two-handed control system Pre-clamping and cutting C - Air table On-Off D - Backgauge control (EP) E - Foot pedal with clamp F - Main switch G - Hand-wheel for backgauge setting H - Blade locking I - Backgauge J - Side lay left and right K - Clamp pressure L - Clamp pressure adjustment M - Display cutting size (cm or inch) N - Select program step up O - Select program step down P - Stop and delete input Q - Start R - Memory multiple
123456789012345678 123456789012345678 EBA 551-06 • EBA 551-06 LT 123456789012345678 123456789012345678 • Operation • Start machine • Main switch to position "I", Pull out blade locking key . • Press S button © backgauge moves to the rear and searches for the reference position, wait until a measurement is shown in the display (57 cm or 22,44 inches). F H Q I D Warning! Before storing or cutting a measurement please check if the correct measurement scale (cm or inch) see above is stored.
• Operation • Eject function If button r is pressed instead of button S , after inserting the measurement, the backgauge will advance forwards to measurement 9 cm/3,54 inch (standard setting of the machine) so that paper can be removed. Finally the backgauge moves to the last setting. Q cm O Adjust the eject-dimension • Press p, press T, Press p press T © e on display. • Insert the desired dimension. • g Store dimension. inch Multiple cut • Enter the multiple cut size on the display .
123456789012345678 123456789012345678 EBA 551-06 • EBA 551-06 LT 123456789012345678 123456789012345678 • Operation • Programming This control system enables you to store 9 programs with 9 programmable steps. One step represents one measurement. After entering the program numbers you are able to change between several program steps with the button r and h. First figure on display = program number. Second figure = program step. Dimensions below 9 cm can only be approached with the S button held pressed.
• Operation • Eject function program • Set the measurement © push g button and r simultaneously. e appears shortly on the display. The backgauge will advance and eject the paper and finally return to the position shown on the display. cm inch Programming of multiple cut dimension • p Press © P appears on the display. • 1 ... 9 Enter program number 1 ... 9. First figure on display = program number. Second figure = program step. Enter the cut size on the display . • g Store the dimension. • 1 ...
123456789012345678 123456789012345678 EBA 551-06 • EBA 551-06 LT 123456789012345678 123456789012345678 • Operation • Working with programs • Press p © P appears on the display • 1 ... 9 Enter program number 1 ... 9. With the button r and h you are able to change between several program steps. With S the backgauge moves to the indicated dimension. With s the backgauge stops. General LED "S" blinks © the basic position will appear. LED "S" is off © the actual dimension appears.
• Blade and cutting stick replacement • If the cutting quality decreases: • Check the cutting depth (see page 33). • Check the cutting stick (see page 27). • Replace or grind the blade (see page 23 - 32). The blade cannot be ground if the blade height is less than 82 mm/3,23 inches. A new blade must be used. Blades may only be sharpened by a specialist. Danger! Risk of injury! The blade is extremely sharp. Do not extract or transport the blade without protection.
123456789012345678 123456789012345678 EBA 551-06 • EBA 551-06 LT 123456789012345678 123456789012345678 • Blade and cutting stick replacement • • Set mains switch (A) to position "I" . • Set clamping oil pressure (B) to min. 50 bar. • Press in blade locking key (C). • Activate cutting blade remains in lowest position. • Set mains switch to position "0". A B C Remove the left screw (D), using the extension. D Pull out blade locking key blade moves to the top.
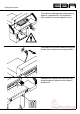
• Blade and cutting stick replacement • Remove both outer screws. Mount blade changing tool (A). A Tighten screws (B).
123456789012345678 123456789012345678 EBA 551-06 • EBA 551-06 LT 123456789012345678 123456789012345678 • Blade and cutting stick replacement • Remove remaining two screws (A). A Simultaneously slightly loosen both screws (B) and remove blade with blade changing tool. Weight of blade approx. 5 kg. B Place the blade into the blade carrier and screw it into place.
• Blade and cutting stick replacement • • Loosen screws (A) (SW4). • Remove cutting stick (B). • If needed the cutting stick can be turned or exchanged. • Turn screw (C) as far as possible to the right. B • Slightly tighten screws (A). The cutting stick can be used eight times. Replacing the cutting stick (not the blade) • Loosen screws (A) (SW4). • Remove cutting stick (B). A • Turn the cutting stick (the non-used side must be near to the blade).
123456789012345678 123456789012345678 EBA 551-06 • EBA 551-06 LT 123456789012345678 123456789012345678 • Blade and cutting stick replacement • Take the exchange blade carefully out of the blade box and screw it to the blade changing tool (D). B • Check, if when using the upper threads (B), the blade (E) is protected. A • The blade is not protected Use the lower thread (C) for fixing. The screws (A) may not exceed at the rear side of the blade. Danger! Blade (E) must be protected.
• Blade and cutting stick replacement • Screw in middle screws and tighten. Remove the blade changing tool. Slightly screw in outer screws.
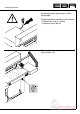
123456789012345678 123456789012345678 EBA 551-06 • EBA 551-06 LT 123456789012345678 123456789012345678 • Blade and cutting stick replacement • • Press in blade locking key. • Set main switch to position "I". 2. 1. • Activate cutting blade remains in the lowest position. 1. 1. • Set main switch to position "0". 2. Screw in slightly the left screw.
• Blade and cutting stick replacement • Loosen slightly screws (A) so that the blade slides onto the cutting stick. A Push the blade and screw (B) as far as possible to the left or right and then centralize them. The blade must rest on the cutting stick. B Push in the first screw on the left side and tighten. 1.
123456789012345678 123456789012345678 EBA 551-06 • EBA 551-06 LT 123456789012345678 123456789012345678 • Blade and cutting stick replacement • Tighten the remaining 3 screws beginning from the left. 4. 2. 3. Pull out blade locking key blade moves to the top. Tighten the screw which is visible at the right. 5.
• Blade and cutting stick replacement • Turn main switch to position "I". A A Paper cutting test. If the last sheet or several sheets are not completely cut, gradually turn the knob for blade depth adjustment (A) 1/6 turn to the left until the paper is cut along the entire length. Do not set too low as blade will soon become blunt.
123456789012345678 123456789012345678 EBA 551-06 • EBA 551-06 LT 123456789012345678 123456789012345678 • Maintenance and cleaning • Maintenance work may only be performed by trained staff. Danger! Disconnect the mains before starting any service work or before removing the cover. Grease and oil the machine according to the lubrication diagram after 1000 operating hours or once a year. If the machine is subject to excessive load then twice a year.
• Maintenance and cleaning • 1 Lubrication schedule Lubricate (1) to (8). Type of oil: SAE10 to SAE50 all types. Grease (9) to (16) 9 10 (9+10) Blade guidance (11-12) Clamp guidance Type of grease: Roller bearing grease - all types. Oil hinges of the foot clamping device at the front area of the machine room. Type of oil: SAE10 to SAE50 all types.
123456789012345678 123456789012345678 EBA 551-06 • EBA 551-06 LT 123456789012345678 123456789012345678 • Possible malfunctions • Machine does not function! Is the machine plugged in? • Main switch to position "I"? (A) • Blade locking facility (B) must be pulled out. • Push in the fuses in the back of the machine F1, F2, F3. • Check the units fuse and the on-site circuit breaker.
• Possible malfunctions • Cut cannot be made. • Measurement has not been reached correctly. LED "S" does not turn off. Push the S button again. • Measurement below 9 cm. Hold the S button until the measurement is achieved. cm inch • Oil pressure set too low. Increase oil pressure at rotary control (A). • Hydraulic oil shortage. Check hydraulic oil level (B), if necessary, top up. A B • Backgauge not in the right position, "C" on display. Contact your dealer.
123456789012345678 123456789012345678 EBA 551-06 • EBA 551-06 LT 123456789012345678 123456789012345678 • Possible malfunctions • Does not cut through the last sheet. Reset the cutting depth (A) ... A ... or turn / replace the cutting stick (B). (See page 27 "Blade and cutting stick replacement"). A reduction in the cutting quality indicates that the blade must be sharpened or a blade change is necessary.
• Possible malfunctions • Sender A Receiver D C EBA "Service" B D Trouble shooting-light beam • During normal operation the LED (A) must iluminate orange and LED (B) green. • Display (C) is permanently on orange when the sender and/or receiver require cleaning. Clean the glass (D) from the sender and receiver. None of the above mentioned methods helped to solve the problem: Contact Service Team under • www.eba.de © "Service" service@krug-priester.com.
123456789012345678 123456789012345678 EBA 551-06 • EBA 551-06 LT 123456789012345678 123456789012345678 • Accessories • Recommended accessories HSS - Blade • 4 244 4 036 6 Cutting sticks • 4 244 1 209 Blade changing tool 1 • 3 244 0 024 Paper knock-up block 1 • 9000 521 Side tables left and right • 3 245 7 027 1 - 40 - Included in delivery.
• Technical Data • A Technical Data Power supply: 230 V / 50 Hz / 8,5A / 1~ 120 V / 60 Hz / 12A / 1~ Cutting length: 550 mm Cutting height: 95 mm Table depth: 570 mm Sound level EN 13023: < 70 dB(A) Minimum space requirement (width x depth x height) without side tables (mm) 1070 x 1400 x 1370 with side tables (mm) 1630 x 1400 x 1370 Clamping pressure 200 daN bis 1100 daN Weight without side tables: 305 kg Capacity of hydraulic oil: 7l Aral Vitam DE 46 to DIN 51562.
Übersetzungen siehe 550 123456789012345678 123456789012345678 EBA 551-06 • EBA 551-06 LT 123456789012345678 123456789012345678 - 42 - 2006-09
D GB F NL I E S EG-KONFORMITÄTSERKLÄRUNG EC-declaration of conformity Déclaration de conformité CE EG-verklaring van overeenstemming Dichiarazione CE di conformità Declaración CE de conformidad EG-försäkran om överensstämmelse - Hiermit erklären wir, daß die Bauart von - Herewith we declare that - Par la présente, nous déclarons que - Hiermede verklaren wij, dat de in de handel gebrachte machine - Si dichiara che il modello della - Por la presente, declaramos que la - Härmed förklarar vi att den av oss le
123456789012345 1234567890123 1234567890123 123456789012345 EBA MadeS/C/CC/CCC in Germany EBA• 5140 1234567890123 123456789012345 Aktenvernichter Document Shredders Destructeurs de Documents Papiervernietigers Distruggidocumenti Destructoras de Documentos Dokumentförstörare Dokumentförstörare Printed in Germany 09/2006 Schneidemaschinen Guillotines Massicots Snijmachines Tagliacarte Guillotinas SkärmaskinerSkärmaskiner • EBA Krug & Priester • 72336 Balingen - 24 - • Germany • www.eba.