MWT-FM FM Single Channel Transmitter Operation Manual man_mwtfmV4 www.myeclubtv.
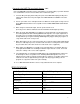
CONTENTS FCC COMPLIANCE STATEMENT………………………. 3 INDUSTRY CANADA COMPLIANCE…………………… 3 MWT-FM ORIENTATION…………………………………. 4 SAFETY PRECAUTIONS………………………………… 5 FINDING FM RADIO FREQUENCIES……………......... 5 SETTING THE TRANSMITTER CHANNEL……………. 5 LOCKING THE FREQUENCY SELECTOR……………. 6 CONNECTING THE TRANSMITTER…………………… 6 SPECIFICATIONS…………………………………………. 7 MWT-FM MOUNTING BRACKET……………………..… 8 WARRANTY…………………………………………….…..
FCC COMPLIANCE STATEMENT This device complies with Part 15 of the FCC Rules. Operation of this device is subject to the following two conditions: (1) This device may not cause harmful interference, and (2) This device must accept any interference received, including interference that may cause undesired operation. This equipment has been tested and found to comply with the limits for a Class B digital device, pursuant to Part 15 of the FCC Rules.
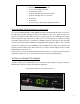
MWT-FM Orientation TRANSMITTER FRONT VIEW POWER INDICATOR LIGHT AUDIO INDICATOR LIGHT and ALC FREQUENCY DOWN FREQUENCY FREQUENCY UP DISPLAY TRANSMITTER REAR VIEW DUAL DIVERSITY ANTENNAS POWER INPUT JACK AUDIO INPUT JACKS 4
Safety Precautions • Read all instructions in this manual. • Use the power adapter provided. • Position cables safely. • Keep the unit away from water and moisture. • Keep the unit away from excessive heat. • Do not drop. • Do not open. • Have all service performed by a qualified technician. Finding Available FM Radio Channels to Transmit On Use a personal digital FM radio or MYE MWC-FM controller and begin with the tuner at one end of the FM frequency band.
“Locking” the Frequency Selector Once the frequency is selected it can be locked-in to avoid accidental or unwanted adjustments. LOCK: Press and HOLD down the Frequency UP and Frequency DOWN buttons for 3 seconds. “Loc” will appear in the LED display. The frequency selector is now locked and cannot be changed. Upon power down the unit will power up to the locked frequency. UNLOCK: Press and HOLD the Frequency UP and Frequency DOWN buttons for 3 seconds. “uLoc” will appear in the LED display.
Connecting the MWT-FM to an Audio Source - cont Note: The MWT-FM Transmitter features an Automatic Level Control (ALC) to provide distortion free sound without concern for loud commercials or audio track spikes. 3. Insert the DC power plug into the DC power jack on the MWT-FM and plug the AC power adapter into an AC outlet. The power light on the MWT-FM will turn “GREEN”. The unit is now ON. 4. Turn on your audio source and adjust audio level.
Mounting Bracket The MWT-FM comes with a Mounting Bracket that allows for easy wall, ceiling or under-shelf mounting of the transmitter. Four holes in the bracket give access for screws or nylon cable ties. The mounting bracket SNAPS into either the TOP or BOTTOM of the MWT-FM giving the transmitter a high level of adaptability and solid positioning in nearly all mounting scenarios.
WARRANTY Terms and Conditions PLEASE READ THESE WARRANTY TERMS AND CONDITIONS CAREFULLY BEFORE USING YOUR MYE ENTERTAINMENT PRODUCT. BY USING THE EQUIPMENT, YOU ARE CONSENTING TO BE BOUND BY THE FOLLOWING WARRANTY TERMS AND CONDITIONS. LIMITED WARRANTY MYE ENTERTAINMENT (MYE) WARRANTS ALL NEW MYE PRODUCTS TO BE FREE FROM DEFECTS IN MATERIALS AND MANUFACTURERS FOR THE WARRANTY PERIODS SET FORTH BELOW. THE WARRANTY PERIODS COMMENCE ON THE INVOICE DATE OF THE ORIGINAL PURCHASE.
WARRANTY – cont. THE WARRANTIES PROVIDED HEREIN ARE THE EXCLUSIVE WARRANTIES GIVEN BY MYE ENTERTAINMENT AND SUPERSEDE ANY PRIOR, CONTRARY OR ADDITIONAL REPRESENTATIONS, WHETHER ORAL OR WRITTEN. ANY IMPLIED WARRANTIES, INCLUDING THE WARRANTY OF MERCHANTABILITY OR FITNESS FOR A PARTICULAR PURPOSE THAT APPLY TO ANY PARTS DESCRIBED ABOVE ARE LIMITED IN DURATION TO THE PERIODS OF EXPRESS WARRANTIES GIVEN ABOVE FOR THOSE SAME PARTS. MYE HEREBY DISCLAIMS AND EXCLUDES THOSE WARRANTIES THEREAFTER.