Android TV Box Quad Core Enjoy TV Box ATV380 Quick Start Guide Thank you for purchasing this MyGica product. .Before using it, be sure to read the precautions contained in this User’s Guide. .Keep the User’s Guide in a safe place for future reference. .For the most up-to-date information about this product, visit official website at http://www.mygica.
Product Overview Panel Introduction Connection Place ATV380 on a flat platform near the TV, and make sure nothing block the remote control signal.
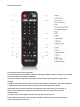
Remote Controller Learning Key function setup instruction: 1. Press and hold the Power button inside the learning area (Button 13) for 6 seconds, the red indic ator will change from flashing to solid light. 2. Press any button inside the learning area, the red indicator will change from solid to slow flashing. 3.
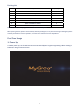
Packing List Item Description Quantity 1 ATV380 1 2 Power Adaptor 1 3 Remote Control 1 4 A/V cable 1 5 RC Battery 2 6 Quick installation Guide 1 7 Warranty Card 1 Please be advice, battery might not be included due to air express. After opening the box, please check carefully with the packing list, if any item is missing or damaged, please contact your dealer as soon as possible, or contact our customers service department. First Time Usage 1. Power Up 1.
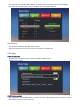
1.2 Home Screen 2. Settings Settings include all the basic settings for ATV380, if you want to access all the settings for the Android system, just click on “More Setting” 2.1 WiFi 2.1.1 It will automatically scan ambient WiFi networks when select “ON”.
2.1.2 Connect an available WiFi network. If connect a secured WiFi network, corresponding password will be input firstly. Or fail to connect and need reset password. 2.2 Ethernet Connect Box and Router by RJ45 network cable. Check the Ethernet box and it will connect to network automatically. 2.3 Display 2.3.1 Output mode Here you can change the output mode from 480i to 4k2k output. Default setting: 720p 2.3.
2.4 Language & input Change OSD language and input method. The default input method is android standard keyboard. 2.5 Date & Time Set date, time, time zone and time format 3. Apps Install & Uninstall On ATV380, you can install apps from Android Market over the Internet or other sources, such as other online sources, the internal storage and the USB storage device and SD card that you have mounted onto ATV380.
4. Application Usage 4.1 XBMC Media Center XBMC Media Center allows you to play and view most videos, music such as podcasts from the internet, and all common digital media files from local and network storage media. 4.1.1 Playback local media files Under Videos (same for Music and Pictures) there are 2 options, Files & Add-ons. To playback local media files, select ‘Files’ and enter Files interface, as shown in the picture: Select ‘Add Videos...’ and a pop up window “Add Video source” will comes out.
Scroll down to find the ‘Root filesystem’ and select OK, then search for ‘storage’ folder and once you enter storage folder, you will see all the devices connected to the player. If your media files are store in SD Card, select ‘sdcard’ folder, if the files are store in USB drive, select ‘usbdrive’ folder. Once you select the desire folder, select ‘OK’ and you will find out that folder will be added to the Files list. You can enter that folder and playback media files you want. 4.1.
Once you enter Add-ons, you will see a list of different channels. These channels are in alphabetical order, browse through the list and select the desire channels and start playback the internet media. 4.2 Local Media ATV380 is able to playback UHD (4K2K) videos, just use our built-in 4K movie player and you can enjoy Ultra HD video quality videos in your local storage drive.
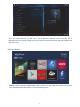
4.3 My Favorite folder You can change the favorite applications on the Home Menu. To do so, move the cursor to the APP you want to change, press and hold the OK button and you will see the following screen. Here we will use YouTube as an example. The APP with the “star” is one of the favorite applications on the Home Menu. Now choose the APP you want to switch with the APP on the Home Menu and press ok. Here we choose the APP AppInstaller.
Now you can see AppInstaller has become one of the favorite applications.