
Installation Guide

11 www.mylenstairs.com
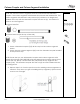
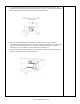
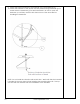
8. Slide a tread (6) down the column. Press the tread firmly down onto the
sleeve and measure the height from the top of the tread to the floor.
9. Because this is the second tread, the height from the floor to the top of the
tread should be two times the riser height calculated in Step 4. Calculate
how many spacers will be needed under the tread to raise the tread from
the measured height (without spacers) to two times the riser height of the
stair.
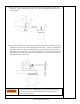
10. If spacers are required, remove the tread and add the correct number of
spacers on top of the sleeve. Reinstall the centering rings (4), sleeve (3),
tread (6) and spacers (5) if needed.
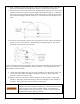
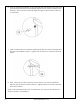
NOTE: If several spacers are required, they can be placed above and below the
sleeve for a more even appearance as shown above. (not applicable to the
sleeve below the first tread)
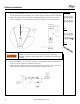
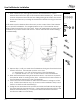
11. Verify that the height from the top of the tread to the ground is within 1/8”
of two times the stair riser height calculated in Step 4. Add or remove
spacers if off by more than 1/8”.
12. Repeat until the next sleeve will no longer fit on the column. Orient the
treads so that they alternate being on the left and right to help balance
the stair. They will be spun into position in later steps.
Do not stand on the treads until after the platform and
balusters are fully installed in later steps. Ensure that the stair is
adequately braced while installing treads and additional
column segments in the next steps. Failure to brace the stair
could result in serious injury or death.