
Installation Guide


9 www.mylenstairs.com
you calculated in 3b. If you do not have wood tread covers, the
measurement should be equal to the rise height calculated in 3b.
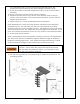
9. Place the number of spacers determined in 6b onto the center column
assembly.
10. Place a tread (8) over the center column assembly.
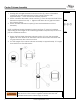
11. Measure the rise from the top surface of the bottom tread to the top
surface of the next tread. The measurement should be equal to the rise
height calculated in 3b.
12. Repeat steps 9-11 for the remaining treads and platform.
NOTE: Remember to add in the extra spacers calculated in 6e during the
assembly process. This will make sure the top of the platform is located
correctly at the end of the assembly process. This additional spacer will cause
the measurement to be 1/8” larger than the riser height when included. If you
have wood tread and platform covers, the top surface of the platform will be
¾” shorter than the loft surface.
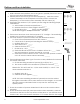
NOTE: Depending on how the platform is being mounted in your application,
3/8” holes may need to be drilled through the platform edge as needed to
install the mounting lag screws. If the platform is being mounted in a corner,
make sure that both edges of the platform are secured to the wall.
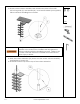
The platform is heavy. Steps 4 through 6 require a minimum of
3 people. One to keep the column steady and 2 people
hoist and hold the platform in place. A fourth person may
then drill and fasten the platform.
13. Use 3/8”x3” lag screws (C) and washers (B) to attach the platform to the
mounting surface.