
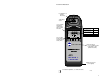
User guide


C. Calibration Procedures
a. Rinse conductivity cell three times with proper standard (KCl,
NaCl or 442) (ref. Conductivity/TDS Standard Solutions, pg. 14).
b. Refill conductivity cell with same standard solution.
c. Press key. If reading is acceptable, end procedure. If
reading is unacceptable, continue.
d. Remove cap plug labeled COND CAL on bottom of Instrument.
e. Refill conductivity cell with same standard solution.
f. While pressing the key, adjust COND CAL Control with
finger until the display agrees with the value on the standard
solution bottle.
g. Repeat steps b. & c. to verify the setting.
h. Replace bottom cap plug securely to maintain water resistance.
The COND/TDS Calibration procedure is now complete.
VII. CALIBRATION INTERVALS
There is no simple answer as to how often one should calibrate an
instrument. The AR1 is designed to not require frequent recalibration.
The most common sources of error were eliminated in the design, and
there are simple electromechanical adjustments. Still, to ensure specified
accuracy, any instrument has to be checked against chemical standards
occasionally.
A. Suggested Intervals
On the average, we expect calibration need only be checked monthly.
Measuring some solutions will require more frequent intervals.
B. Calibration Tracking Records
To minimize your calibration effort, keep records. If adjustments you are
making are minimal for your application, you can check less often.
Changes in conductivity calibration should be recorded in percent.
Calibration is purposely limited in the AR1 to approximately ±8% for the
conductivity cell because more than that indicates damage, not drift.
C. Conductivity or TDS Practices to Maintain Calibration
1. Clean oily films or organic material from the cell electrodes with
foaming cleaner or mild acid. Do not scrub inside the cell.
2. Calibrate with solutions close to the measurements you make.
Readings are compensated for temperature based on the
type of solution. If you choose to measure tap water with a
KCl compensation, which is often done (ref. Temperature
Compensation, pg. 15), and you calibrate with 442 solution
because it is handy, the further away from 25°C you are, the
more error you have. Your records of calibration changes
will reflect temperature changes more than the instrument’s
accuracy.
3. Rinse out the cell with pure water after making measurements.
Allowing crystals to form in the cell contaminates future samples.
VIII. CHANGING from CENTIGRADE to FAHRENHEIT
(Note: °F to °C is the reverse)
1. Dry Instrument THOROUGHLY.
2. Remove the 4 bottom screws and carefully open Instrument.
3. Locate dip switch labeled “TEMP COMP” on the right side of the
circuit board. Note: Factory setting is degrees “C”.
4. Set switch number 4 to the down position.
5. Carefully turn instrument over and press the key. The
displayed reading will be in Fahrenheit “°F”.
6. Replace bottom, ensuring the sealing gasket is installed in the
groove of the top half of case. Tighten screws securely.
IX. CARE and MAINTENANCE
The AR1 should be rinsed with clean water after each use. Solvents
should be avoided. Shock damage from a fall may cause instrument
failure.
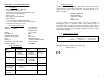
10 11
COND
TDS
COND
TDS
COND
TDS