
Specifications


10
Display on/off
The MI 240 is supplied set to “display-on” mode. This means that the display will be illuminated at all times.
When the display on/off function is chosen from the menu the display will read “DISPLAY MODE”. If the SEL key is
pressed the display will read “DISPLAY OFF”. A further press of the SEL key will switch the amplifier into “display-off”
mode and the display will briefly read “DONE” before automatically exiting the menu. (Alternatively the 3 and 4 keys
may be used to select the desired display mode before pressing the SEL key.) A similar process may be used to switch
the MI 240 from the “display-off” back to the “display-on” mode.
When the “display-off” mode is activated the display will remain illuminated for about 5 seconds and then switch off.
Operation of any of the amplifier’s control will cause the display to switch back on for about 3 seconds to indicate the
current status, before it switches off once again.
Input level trims
The MI 240 is supplied with all of its inputs set so that 400mV is required to produce 120W output into 8Ω. To balance
the loudness of sources which have different output levels, each input (including TAPE and LINE DIRECT) can have its
gain adjusted from 6dB below 400mV to 6dB above (equivalent to input sensitivities from 200 to 800mV).
First select the input to be trimmed (say, LINE DIRECT), enter the control menu and press 5 or 6 until the display
reads “TRIM”. Then press SEL and the display will read “DIR TRM +0dB” (only the first three characters of the selected
input’s name are displayed). Use the 5 or 6 keys to set the trim level desired from –6dB to +6dB in 1dB steps –
positive settings will make the input louder, negative quieter. Finally exit the menu by pressing SEL, MENU or EXIT or
allow the MI 240 to exit automatically.
The same procedure can be used to set individual sensitivities for each of the eight inputs.
Input renaming
Each of the inputs may be renamed to suit individual requirements. Up to five characters can be used for each input,
chosen from a full alphabet of capital letters, plus the numbers 0-9, spaces and a few symbols.
First choose “RENAME INPUT” from the control menu and press SEL. The display will indicate the currently selected
input, followed by “>_”, for example “DIRCT>_ “. Then use the 5 or 6 keys to scroll through the available characters
(5 will start the alphabet with A), then press the “4” key to choose this as the first character and move to the second.
Choose the remaining four characters in the same way. A space may be entered by pressing “4” twice. The “3” key
functions as a “back-space and delete” and may be used to make
corrections. At any stage the input to be renamed may
be changed by pressing the SOURCE+ or – keys on the remote.
Once the correct name has been entered, it may be stored by pressing the SEL key. Alternatively press the MENU or
EXIT key to leave the menu without renaming the selected input.
Please note – if the CD input is renamed as “FRED”, the “FRED” input will be selected by pressing “CD” key on the
remote control – and the “FRED” input will be selected via the Smart My-Link if a CD is played. For your
convenience the
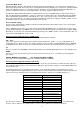
table below has been provided to record the new input names.
Remote control
Original input name New input name
Key name Key No.
LINE DIRECT 7.1 CH +10
TAPE TAPE 0
CD-R AUX 2 3
CD CD 9
TUNER TUNER 8
TV TV 5
DVD DVD 4
AUX AUX 1 2
Input name record