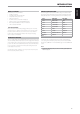
NEDERLANDS Owner’s Manual SVENSKA DEUTSCH ITALIANO ESPAÑOL FRANÇAIS AV Surround Sound Receiver ENGLISH T 777 РУССКИЙ ®
IMPORTANT SAFETY INSTRUCTIONS ENGLISH FRANÇAIS ESPAÑOL ITALIANO DEUTSCH NEDERLANDS SVENSKA 1. Read instructions - All the safety and operating instructions should be read before the product is operated. 2. Retain instructions - The safety and operating instructions should be retained for future reference. 3. Heed Warnings - All warnings on the product and in the operating instructions should be adhered to. 4. Follow Instructions - All operating and use instructions should be followed. 5.
23. Battery Disposal - When disposing of used batteries, please comply with governmental regulations or environmental public instruction’s rules that apply in your country or area. 24. Safety Check - Upon completion of any service or repairs to this product, ask the service technician to perform safety checks to determine that the product is in proper operating condition.
INTRODUCTION TABLE OF CONTENTS ENGLISH IMPORTANT SAFETY INSTRUCTIONS . . . . . . . . . . . . . . . . . . . . . . . . . 2 FRANÇAIS FRONT PANEL. . . . . . . . . . . . . . . . . . . . . . . . . . . . . . . . . . . . . . . . . . . . . . . . . . . . . 6 REAR PANEL . . . . . . . . . . . . . . . . . . . . . . . . . . . . . . . . . . . . . . . . . . . . . . . . . . . . . . 8 INTRODUCTION GETTING STARTED. . . . . . . . . . . . . . . . . . . . . . . . . . . . . . . . . . . . . . . . . . .
INTRODUCTION SAVE THE PACKAGING Please save the box and all of the packaging in which your T 777 arrived. Should you move or otherwise need to transport your T 777, this is by far the safest container in which to do so.
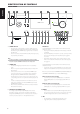
IDENTIFICATION OF CONTROLS FRONT PANEL ENGLISH 1 2 3 4 5 6 7 8 9 1 2 3 4 5 6 7 8 9 AV Surround Sound Receiver T 777 VOLUME d FRANÇAIS MEMORY a a NAD T777 INFO s SOURCE s DELETE f A SPEAKERS B AM/FM/DB TUNER MODE LISTEN MODE TONE TONE DEFEAT FRONT INPUT/MP ESPAÑOL A B C D E © NAD T 777 10 10 11 11 12 12 13 13 ITALIANO 1 STANDBY BUTTON • Press this button to switch ON the T 777 from standby mode.
IDENTIFICATION OF CONTROLS 14 LISTEN MODE • Toggle to select through the various Listening mode options. Depending on the format of the currently selected input (digital or analog, stereo or multichannel), various listening modes are available. • Refer also to the item about LISTENING MODE under the USING THE T 777 – MAIN MENU segment of the OPERATION section. 7 REMOTE SENSOR • Point the HTR 8 remote control at the remote sensor and press the buttons.
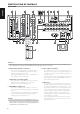
IDENTIFICATION OF CONTROLS REAR PANEL ENGLISH 1 2 3 230V VERSION ONLY 4 DAB 5 6 7 8 9 10 ANTENNA DIGITAL AUDIO S-VIDEO HDMI VIDEO AUDIO R 7.
IDENTIFICATION OF CONTROLS NOTE The external NAD DAB Adaptor module is not supplied with your T 777. 6 SOFT CLIPPING • Enables NAD’s proprietary Soft Clipping circuitry on all channels. • At ON position, Soft Clipping gently limits the output of the T 777 to minimize audible distortion should the T 777 be over-driven. • Soft Clipping may simply be left ON at all times to reduce the likelihood of audible distortion from excessive volume settings.
IDENTIFICATION OF CONTROLS REAR PANEL ENGLISH IR IN and IR OUT 1, IR OUT 2, IR OUT 3 • Connect the T 777’s IR IN to the IR OUT of a compatible device. Connect also the T 777’s IR OUT 1 (and/or IR OUT 2, IR OUT 3) to the IR IN of a compatible device. • With this setup, the T 777 acts as an “IR-repeater” allowing the device connected to the T 777’ s IR IN control or command of the other device linked to T 777’s IR OUT 1 (and/or IR OUT 2, IR OUT 3).
IDENTIFICATION OF CONTROLS ENGLISH REAR PANEL FRANÇAIS 17 AC MAINS INPUT • The T 777 comes supplied with a separate detachable mains power cord. Before connecting the plug to the mains powers source, connect firmly first the other end to T 777’s AC Mains input socket. • Always disconnect the mains power plug from the mains power source first, before disconnecting the cable from the T 777’s AC Mains input socket. • Connect only to the prescribed AC outlet, i.e.
OPERATION USING THE T 777 – MAIN MENU ENGLISH ABOUT THE ON-SCREEN DISPLAY (OSD) LISTENING MODE The T 777 employs a simple, self-explanatory system of on-screen display “menus” that will appear on the connected video monitor/TV. These are required during the setup process (and are useful in day-to-day operation), so be sure to connect the monitor/TV before proceeding with setup.
OPERATION 7.1 Speaker System Front (left & right), Center, Surround (left & right), Back Surround, Subwoofer Front (left & right), Center, Surround (left & right) and Back Surround (left and right) and subwoofer DTS NEO: 6 Two-channel recordings, whether stereo or surround-encoded, are reproduced with Neo: 6 surround with output to front left/right, center and discrete left/right surround channels plus subwoofer (assuming these are present in the current ‘Speaker Configuration’).
OPERATION USING THE T 777 – MAIN MENU ENGLISH DSP OPTIONS FRANÇAIS The following signal processing parameters can be setup under the DSP (Digital Signal Processing) Options menu. ESPAÑOL LIP SYNC DELAY DSP Options has the feature ‘Lip Sync Delay’ whose function is to match any delay that may occur in the picture relative to the audio. Audyssey Dynamic EQ selects the correct frequency response and surround volume levels moment-by-moment.
OPERATION ENGLISH USING THE T 777 – MAIN MENU ZONE CONTROLS The T 777 has three Tone Control levels – Treble, Bass and Center Dialog. Bass and Treble controls only affect the low bass and high treble leaving the critical midrange frequencies free of coloration. The Center Dialog (‘Dialog’ in the VFD) control boosts the ‘presence’ of the midrange region improving intelligibility of speech.
OPERATION USING THE T 777 – SETUP MENU ENGLISH SETUP MENU FRANÇAIS The Setup Menu allows one to customize the operation of the T 777 to the ancillary equipment used in one’s specific AV system. Unless your system exactly matches the factory defaults as shown in the accompanying Quick Start Guide, you will need to use the setup menu to configure the inputs of the T 777.
OPERATION SOURCE SETUP There are three sub-menu items under Source Setup. These are Source Setup (Normal View), Source Setup (Table View) and iPod Setup. Press [S] to move to the next character and at the same time save the changes done on the current character. The name can be as long as twelve characters. ENGLISH USING THE T 777 – SETUP MENU The new Name will be shown in the VFD as well as on the OSD.
OPERATION USING THE T 777 – SETUP MENU ENGLISH DIGITAL AUDIO To take advantage of the T 777’s high performance surround and digital audio circuitry, it is advisable that its sets of Digital Audio input are selected. There are three types of Digital Audio input for the T 777. These are HDMI, Optical and Coaxial digital input. A fourth option is “Off” whereby no incoming digital audio signal is selected by the particular Source.
OPERATION ENGLISH USING THE T 777 – SETUP MENU AUDYSSEY AUTO CALIBRATION The iPod Setup menu allows you to preset the following associated settings when iPod is the selected source. Enabled: Select “Yes” to enable iPod as a Source or “No” to disable it. Auto Connect: Select “Yes” to automatically enable and connect the iPod player docked in the linked NAD iPod docking station when Source 5 (the default iPod source allocation in the T 777) is selected.
OPERATION USING THE T 777 – SETUP MENU ENGLISH AUDYSSEY MultEQ XT ROOM ACOUSTICS CORRECTION Sound reflecting from room boundaries can disturb the spatial illusion of surround sound, and can also distort the tonal balance of the system. Professional Acoustical Engineers often add wall treatments and even move walls and relocate speakers to improve system performance, but for the average Home Theatre, this is either too expensive or just not a practical solution.
OPERATION ENGLISH USING THE T 777 – SETUP MENU ITALIANO ESPAÑOL FRANÇAIS Select the Target Curve you find to be most satisfactory by pressing the Audyssey key of the remote. The MultEQ XT corrected response can also be bypassed if you wish. It is recommended that you take full advantage of the T 777’s Audyssey Auto Calibration feature for your speaker setup.
OPERATION USING THE T 777 – SETUP MENU ENGLISH SPEAKER CONFIGURATION FRANÇAIS ESPAÑOL ITALIANO Every surround-sound system requires “bass-management” to direct lowfrequency content from any or all channels to the speakers best able to reproduce it. For this function to operate correctly, it is important that you correctly identify your speakers’ capabilities. We use the terms “Small” and “Large” (and “Off”) but note that physical size may be irrelevant.
OPERATION DEUTSCH NOTE If you are balancing levels “by ear”, choose one speaker—usually the center—as a reference and adjust each of the others in turn to “sound as loud” as the reference. Be sure that you remain in the primary listening position while balancing all channels. To produce the same SPL meter reading (or subjective loudness), use the remote’s [D/F] keys to adjust each speaker. NOTES • All speakers must be in their final locations before level-setting.
OPERATION USING THE T 777 – SETUP MENU ENGLISH ADJUSTING CHANNEL LEVELS ‘ON THE FLY’ FRANÇAIS You can make changes to the relative levels of center, surround and subwoofer outputs without having to go into the ‘Speaker Levels’ menu. This is very convenient in circumstances like increasing (or tone down) a film’s dialog level by raising (lowering) the center channel or reducing excessive deep bass (or enhance deep bass) by lowering (raising) the subwoofer level.
OPERATION ENGLISH USING THE T 777 – SETUP MENU LISTENING MODE SETUP The T 777 features three configurable +12V DC Trigger Output that can be used to activate a component or system it is fed into. A Trigger Input is also available to turn on the applicable link it is associated to. Use a combination of [A/S/D/F] and [ENTER] keys to navigate through the Trigger Setup menu parameters. The T 777 has various listening mode options and is mostly configurable.
OPERATION USING THE T 777 – SETUP MENU ENGLISH DOLBY DIGITAL PLUS Dolby Digital Plus is the next-generation audio technology for all highdefinition programming and media. It combines the efficiency to meet future broadcast demands with the power and flexibility to realize the full audio potential expected in the upcoming high-definition era. FRANÇAIS Dolby Digital Plus delivers multi-channel audio programs of up to 7.
OPERATION Under this menu, the Dolby Digital’s Dynamic Range Control can be adjusted as well as the settings for Dolby Digital Pro Logic IIx Music. Dyn Range Ctrl :You can select the effective dynamic range (subjective range from soft to loud) for playback of Dolby Digital soundtracks. For fully cinematic effect, always select 100%, the default. Settings of 75%, 50%, and 25% progressively reduce dynamic range, making soft sounds comparatively louder while limiting the peak loudness of loud ones.
OPERATION USING THE T 777 – SETUP MENU ENGLISH DTS - ES™ MATRIX 6.1 In this format, the additional signals of the back channel receive a matrix encoding and are inputted into the right and left surround channels. During reproduction they are decoded to the right, left and back surround channels. DISPLAY SETUP FRANÇAIS Since this bit-stream format is 100% compatible with conventional DTS signals, the DTS-ES Matrix 6.1 format effect can also be achieved from sources with DTS-ES 5.1 signals.
OPERATION A/V PRESETS ENGLISH USING THE T 777 – SETUP MENU SAMPLE PROCEDURE FOR SETTING UP A/V PRESETS 1 Setup first your preferred settings for the following options (access them through their respective menu page). The T 777’s simple but powerfully flexible system of “A/V Presets” allows you to customize virtually every aspect of your audio-video playback, and recall them with a single key-press.
OPERATION USING THE T 777 – SETUP MENU ENGLISH Speaker Setup: from the Speaker Setup menu, go to “Speaker Configuration” sub-menu and change “Subwoofer” from “On” to “Off”: “Front” becomes “Large” 3 At “A/V Presets” page, set “Preset: 1” to the following conditions - use [ D/F ] to select “Yes” or “No” and press [ENTER] to confirm selection and move on to the next setting. FRANÇAIS ESPAÑOL While at “Save Current Setup to Preset” menu line, use [ S ] to save the above settings to Preset 1.
OPERATION 6 At “A/V Presets” page, set “Preset: 2” to the following conditions - use [ D/F ] to select “Yes” or “No” and press [ENTER] to confirm selection and move to the next setting. FRANÇAIS Tone Controls: Tone Defeat: Off ENGLISH USING THE T 777 – SETUP MENU Note that “Speaker Setup” is set to “No”. At this condition, there will be no “Speaker Setup” values that will be effected at “Preset 2”.
OPERATION LISTENING TO AM/FM RADIO ENGLISH The T 777’s internal AM/FM tuner offers very high quality sound from radio broadcasts. The reception and sound quality will always be dependent to a degree however on the type of antenna(s) used as well as proximity to the broadcast origin, geography and weather conditions. FRANÇAIS ABOUT ANTENNAS The supplied ribbon-wire FM antenna can be connected to the rear panel FM antenna input using the included “balun” adapter and should be fully extended to form a “T”.
OPERATION ENGLISH LISTENING TO AM/FM RADIO ABOUT USER NAMES A Preset number can be assigned a twelve “User Name”. The assigned “User Name” will be shown in the VFD and OSD whenever the associated Preset number is recalled. ESPAÑOL FRANÇAIS ENTERING USER NAMES A Preset number can be assigned the user name “NEWS” by the following procedure. The buttons mentioned below refer to HTR 8 buttons. The corresponding front panel buttons execute the same functions as described.
OPERATION LISTENING TO XM RADIO ENGLISH The T 777 is “XM Ready” which means that with the addition of separately sold XM Mini-Tuner (Model: CNP-2000) and XM Mini-Tuner Home Dock, it has everything you need to listen to live XM. Everything else is built right in. Just subscribe to the XM service and your T 777 will be ready to receive XM content. FRANÇAIS NOTES • When using the HTR 8 to carry out XM commands, ensure that the DEVICE SELECTOR is set to “TUNER”.
OPERATION FRANÇAIS ESPAÑOL ITALIANO DAB P-No Service List 2 To tune to DAB broadcast services, press [TUNER MODE] and then toggle [ A/S ] to select either “Full Scan” or “Local Scan”. FULL SCAN will enable the scanning of the full range of digital frequencies (Band III and L-Band). LOCAL SCAN performs local scanning of available DAB services in your area. Check with your dealer or visit www.WorldDAB.org to check the applicable digital transmission frequencies in your area.
OPERATION LISTENING TO DAB RADIO ENGLISH 4 Press and hold [ENTER] button to check the strength of the incoming signal. The more segments visible in the lower display line, the stronger the signal. By changing the position of the antenna, you can increase the signal strength. You can also opt for an external antenna. Consult an antenna professional for more information.
OPERATION RESET INFORMATION SETTINGS The “Reset” option allows the connected (and separately sold) NAD DAB Adaptor to be reset to its factory default settings. 1 While listening to a DAB broadcast, press [TUNER MODE] button and [ A/S ] to select “Reset”. 2 Press [ENTER]. “Reset? No” will be shown in the lower line of the VFD. Press [ A/S ] to switch to “Reset? Yes” option. While listening to a DAB broadcast, the type of information displayed in the lower line of the VFD can be varied.
OPERATION LISTENING TO YOUR iPod PLAYER ENGLISH The T 777 is equipped with a data port in the rear panel where an optional “NAD IPD Dock for iPod” (NAD IPD) can be plugged in. With the NAD IPD linking the T 777 with your own iPod player, you can enjoy listening to your favorite tracks and playlists as well as view applicable still image and video playback. FRANÇAIS You can control your iPod player using the assigned buttons in the T 777 front panel.
OPERATION IMPORTANT NOTES • For you to control the NAD IPD 2 using the DR 1, you have to go to “iPod Setup” menu (please refer to the item about “iPod Setup” under the “USING THE T 777 - SETUP MENU” segment of OPERATION section) and then set “Auto Connect” to “No”. With this setting, you can then use the DR 1 to control your iPod player docked in the NAD IPD 2.
OPERATION USING THE HTR 8 REMOTE CONTROL ENGLISH OVERVIEW OF THE HTR 8 FRANÇAIS • • • • • • • Controls up to 8 devices. Learns up to 360 commands. Records up to 52 macros with a maximum of 64 commands each. Configurable punch-through. Key illumination with programmable timeout. Upgradable. Contains pre-programmed library of NAD remote codes. The NAD HTR 8 is ready to operate the T 777 right out of the box, but it is really eight remotes in one.
OPERATION PUNCH THROUGH MACRO COMMANDS The HTR 8’s “punch-through” function allows you to retain a function key from one Device Select “page” to another, so that, for example, the AMP [SURR MODE] function might still control the T 777 when the DVD DEVICE SELECTOR page is active. A “macro” command is a series of two or more remote codes issued automatically from a single keypress. You might use a macro to automate a simple command sequence, such as, “Turn on the DVD player and then press PLAY”.
OPERATION USING THE HTR 8 REMOTE CONTROL ENGLISH FRANÇAIS Example: Record a Macro to the [0] key to turn ON the T 777, turn ON the DVD Player, Select Input 1 (Source 1) and commence disc playback of connected Source 1 device (as in the DVD player) • On the HTR 8, simultaneously press-and-hold [MACRO] and [0] (numeric zero); the Learn LED turns steady green.
OPERATION Enter Library Mode by simultaneously pressing-and-holding for 3 seconds both the desired DEVICE SELECTOR key and the [A/V PSET] key, until the Learn LED turns green. Now press-and-hold the HTR 8’s [D] or [F] key; the remote will step through all the available codes at a rate of approximately 1 per second. While keeping the HTR 8 pointed toward the component, enter the first appropriate three-digit code-library number from the table below and then press [OFF].
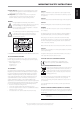
OPERATION USING THE HTR 8 REMOTE CONTROL ENGLISH USB INTERFACE USING THE ZR 7 REMOTE CONTROL The HTR 8 allows one to upload and download the configuration through a Windows® PC and NAD’s Proprietary HTR 8 programming software. Use a USB A male to mini USB B male 5-pin cable (not supplied) between your Windows® PC and the HTR 8. See illustration below on how to connect a USB A male to mini USB B male 5-pin cable to the HTR 8.
OPERATION The T 777 and the HTR 8 remote control must be set to the same channel. To change the Main Zone IR Channel on the T 777 • Press and hold [ a SOURCE ] and then toggle STANDBY button to select desired IR Channel – the VFD will show “IR Channel 1” or “IR Channel 0”. The default IR Channel is “IR Channel 0”. To change the IR Channel on the HTR 8 remote control • Include a channel number before the library code. For HTR 8, library code “100” is the default library table for “AMP” device.
REFERENCE TROUBLESHOOTING ENGLISH CONDITION No sound from all channels. POSSIBLE CAUSES • AC power unplugged. POSSIBLE SOLUTIONS • Check AC cable connection and outlet. • Power not switched on. • Outlet has no power. FRANÇAIS No sound from some channels. No sound from surround channels. • Mute function is activated. • Toggle [MUTE] button to deactivate Mute function. • Faulty/missing cables. • Check cables. • “Speaker Configuration” channel (s) set to “OFF”. • Check “Speaker Configuration” menu.
REFERENCE POWER CONSUMPTION 160W (22.0BW) IHF dynamic power; 4 Ω 260W (24.1dBW) Power output, Surround Mode 7 x 80W (19.0dBW) Total harmonic distortion at rated power <0.08% IM distortion at rated power <0.08% Damping factor, 8 Ω >60 Input sensitivity and impedance 1.15V (ref. 8Ω, VOL at 0 dB) Frequency response ±0.8dB (ref. 1 kHz, 20 Hz-20 kHz) Signal/noise ratio >92dB (ref. rated power at 8Ω, A-WTD) Signal/noise ratio >82dB (ref.
www.NADelectronics.com ©2012 NAD ELECTRONICS INTERNATIONAL A DIVISION OF LENBROOK INDUSTRIES LIMITED All rights reserved. NAD and the NAD logo are trademarks of NAD Electronics International, a division of Lenbrook Industries Limited. No part of this publication may be reproduced, stored or transmitted in any form without the written permission of NAD Electronics International.