
Owner's Manual


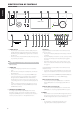

Table Of Contents
- IMPORTANT SAFETY INSTRUCTIONS
- introduction
- IDENTIFICATION OF CONTROLS
- operation
- USING THE T 787 – MAIN MENU
- USING THE T 787 – SETUP MENU
- SETUP MENU
- CONTROL/HDMI setup
- SOURCE SETUP
- Source Setup (Normal view)
- Source Setup (Table VIEW)
- iPod SETUP
- Speaker Setup
- AUDYSSEY AUTO CALIBRATION
- Speaker Configuration
- Speaker Levels
- Speaker Distance
- Adjusting the Volume
- Adjusting Channel Levels ‘On the Fly’
- Zone Setup
- AMPLIFIER SETUP
- trigger setup
- Listening Mode Setup
- Dolby Setup
- DTS Setup
- DTS Surround Modes
- ENHANCED STEREO
- Display Setup
- A/V PRESETS
- LISTENING TO AM/FM RADIO
- LISTENING TO XM RADIO
- LISTENING TO DAB RADIO
- LISTENING TO YOUR iPod PLAYER
- USING THE HTR 8 REMOTE CONTROL
- Controlling the T 787
- Learning Codes from other Remotes
- Punch Through
- Copy a Command from another key
- Macro Commands
- Button Illumination Timeout
- CONFIGURING THE BACKLIGHT
- Factory Reset
- Delete Mode
- Loading Code-Libraries
- Search Mode
- Checking Code-Library Number
- Summary of the HTR 8 Modes
- USING THE ZR 7 REMOTE CONTROL
- USING IR CHANNEL
- REFERENCE

6 VACUUM FLUORESCENT DISPLAY (VFD)
• Displays visual information about the current settings like the active Source,
volume level, listening mode, audio format, applicable RDS/XM/DAB as well
as iPod-related display information and other related indicators.
• Refer also to the item about DISPLAY SETUP under the USING THE
T 787 - SETUP MENU segment of the OPERATION section.
7 REMOTE SENSOR
• Point the HTR 8 remote control at the remote sensor and press the
buttons.
• Do not expose the remote sensor of the T 787 to a strong light
source such as direct sunlight or illumination. If you do so, you may
not be able to operate the T 787 with the remote control.
Distance: About 23ft (7m) from the front of the remote sensor.
Angle: About 30
o
in each direction of the front of the remote sensor.
8 a SOURCE s
• Toggle through the input selections - Source 1, Source 2, Source 3,
Source 4, iPod, Source 7, Front Input, Media Player and Tuner (AM/
FM/DAB/XM as applicable). More Sources can be directly recalled
upon enabling them at the Setup Menu.
• Refer also to the item about SOURCE SETUP under the USING THE
T 787 - SETUP MENU segment of the OPERATION section.
9 VOLUME
• The VOLUME control adjusts the overall loudness of the signal being
fed to the loudspeakers or headphones.
• Turn clockwise to increase the volume level; counter clockwise to
lower it.
10 PHONES
• Accepts stereo headphone using a standard 1/4-inch stereo phone
plug (use a suitable adaptor for headphones equipped with a
smaller plug).
• For headphone listening, the Front speakers must be set to “Large” at
the “Speaker Conguration” of the Speaker Setup item at the Setup
Menu; otherwise headphone bass response will be restricted.
NOTE
When you connect your headphone to PHONES jack, audio can be
heard simultaneously via your headphone and T 787’s SPEAKERS A and/
or SPEAKERS B. If you prefer to listen through your headphone only
and exclude both speakers, toggle SPEAKERS A and/or B button to set
and reect at the VFD “Speaker A O” and/or “Speaker B O” thereby
disabling SPEAKERS A and/or SPEAKERS B. To enable back or restore
audio at SPEAKERS A and/or SPEAKERS B, toggle SPEAKERS A and/or B
button to set them to “Speaker A On” and/or “Speaker B On”.
11 A SPEAKERS B
SPEAKERS A and B buttons engage or disengage the speakers connected
respectively to the SPEAKERS A and SPEAKERS B terminals on the rear panel.
· Toggle “A” to switch ON or OFF the speakers connected to the
SPEAKERS A terminals (“Speaker A On” or “Speaker B O” is reected
in the VFD). Toggle “B” to switch ON or OFF the speakers connected
to the SPEAKERS B terminals.
· Press both “A” and “B” to engage at the same time both SPEAKERS A
and SPEAKERS B (SPEAKERS A+B is illuminated in the VFD).
· Speaker A is the main set of 7 multichannel and surround speakers.
· Speaker B is an auxiliary set for remote locations such as other
rooms of your home. For Speaker B selection, all surround sound
sources are downmixed to stereo. Combining Speaker A and
Speaker B (SPEAKERS A + B) will also result to the source being
downmixed to stereo.
12 AM/FM/DB
• Toggle this button to select AM, FM, DAB (230V version only) or XM
(120V version only) tuner functions.
13 TUNER MODE
• In FM mode, this button will toggle between FM STEREO and FM
MONO.
• Select FM MONO (FM STEREO and FM MUTE icons at VFD are
extinguished) for stations that have too much interference or are
too weak.
• In DAB (230V version only) or XM (120V version only) radio, this
button enables the digital radio menu in conjunction with the
Navigation and Enter buttons.
14 LISTEN MODE
• Toggle to select through the various Listening mode options.
Depending on the format of the currently selected input (digital
or analog, stereo or multichannel), various listening modes are
available.
• Refer also to the item about LISTENING MODE under the USING THE
T 787 – MAIN MENU segment of the OPERATION section.
15 TONE
• Press to adjust TREBLE control using the VOLUME knob over a
±10dB range. Press again to adjust BASS control and a third time for
DIALOG control.
• Refer also to the item about TONE CONTROLS under the USING THE
T 787 – MAIN MENU segment of the OPERATION section.
16 TONE DEFEAT
• Tone Controls are enabled or disabled by pressing this button. Tone
controls are bypassed at “Tone Defeat” while at “Tone Active”, the
tone controls are enabled again.
• Refer also to the item about TONE CONTROLS under the USING THE
T 787 – MAIN MENU segment of the OPERATION section.
17 FRONT INPUT/MP
• Toggle button to switch between Front Input and Media Player
input.
18 FRONT INPUT PORTS
• Use these convenience jacks for occasional sources such as a
camcorder, video game console, any analog audio or HDMI sources
and composite or S-Video sources.
• If your source has a single audio out jack only or is marked “Mono
output”, plug this into the T 787’s Front “R (MONO)” input (item B).
• On the other hand, if your source has two output jacks indicative of
stereo output, insert both jacks into the T 787’s corresponding Front
“L” (item A) and “R (MONO)” input to achieve stereo output as well.
• Connect composite video output source to the front composite
video input (item C).
• Connect S-Video output source to the front S-Video input (item D).
• Use the front HDMI input (item E) to connect directly an HDMI
output source.
19 FRONT MP/MIC INPUT
• Connect your Media Player’s standard stereo phone jack to this
input.
• This is also same input where the supplied Audyssey microphone is
connected for Audyssey Auto calibration.
• Refer also to the item about AUDYSSEY AUTO CALIBRATION under
the USING THE T 787 - SETUP MENU segment of the OPERATION
section.
IDENTIFICATION OF CONTROLS
FRONT PANEL
7
ENGLISHFRANÇAISESPAÑOLITALIANODEUTSCHNEDERLANDSSVENSKAРУССКИЙ