
User Manual


1 PHONO INPUT
• Input for a turntable. This unit is compatible with turntables
equipped with a moving magnet (MM) phono cartridge.
• Use a twin RCA-to-RCA lead to connect the turntable’s left and right
“Outputs” to this input.
2 CD INPUT
• Input for a CD or other line-level signal source.
• Use a twin RCA-to-RCA lead to connect the CD player’s left and right
“Audio Outputs” to this input.
3 VIDEO INPUT
• Input for the audio signal from a stereo VCR (or stereo TV/Satellite/
Cable receiver) or other line-level audio source.
• Using twin RCA-to-RCA leads, connect to the left and right “Audio
Outputs” of the unit to these inputs.
NOTE
These are audio inputs only.
4 AUX INPUT
• Input for additional line level input signals such as another CD
player.
• Use a twin RCA-to-RCA lead to connect the auxiliary unit’s left and
right “Audio Outputs” to this input.
5 TUNER INPUT
• Input for a tuner or other line-level signal source.
• Use a twin RCA-to-RCA lead to connect the tuner left and right
“Audio Outputs” to this input.
6 SPEAKERS
• Connect the right speaker to the terminals marked “R +” and “R-”
ensuring that the “R+” is connected to the “+” terminal on your
loudspeaker and the “R-” is connected to the loudspeaker’s “-”
terminal. Connect the terminals marked “L+” and “L-” to the left
speaker in the same way.
• Always use heavy duty (16 gauge; 1.5mm, or thicker) stranded
wire to connect loudspeakers to your C 316BEE. The high-current
binding post terminals can be used as a screw terminal for cables
terminating in spade or pin sockets or for cables with bare wire
ends.
• The C 316BEE is designed to produce optimum sound quality when
connected to speakers with impedances within its operating range.
Please make sure that all the speakers are rated 4 ohms minimum
per speaker.
7 AC POWER CORD
• Connect AC power cord only to the prescribed AC Outlet, i.e., 120V
60 Hz or 230V 50 Hz.
8 POWER SWITCH
• The POWER switch supplies the master AC mains power for the
C 316BEE. When this switch is in the ON position, the unit is in
standby mode, as shown by the amber status condition of the
standby LED.
• Press the front panel’s STANDBY button to turn ON the C 316BEE or
press again to return to standby mode.
• Switch o the POWER switch if you intend not to use the C 316BEE
for long periods of time (such as when on vacation).
• If the rear panel POWER switch is switched o the C 316BEE cannot
be turned ON using the front panel STANDBY button or AMP 4
remote control’s [ON] button.
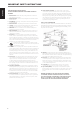
IDENTIFICATION OF CONTROLS
REAR PANEL
ATTENTION!
Please make sure that the C 316BEE is powered o or unplugged before making any connections. It is also advisable to power down or unplug all
associated components while making or breaking any signal or AC power connections.
TUNERAUXVIDEOCDPHONO
MM
© NAD C 316BEE v2
1 432 5 8
6 7
8
ENGLISH FRANÇAIS ESPAÑOL ITALIANO DEUTSCH NEDERLANDS SVENSKA РУССКИЙ