
Operation Manual
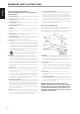


IDENTIFICATION OF CONTROLS
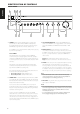
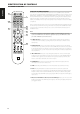
FRONT PANEL
1 STANDBY: With the rear panel POWER switch set to ON position,
press this button to switch ON the C 326BEE from standby mode.
The Standby LED indicator will turn from amber to blue. Pressing the
STANDBY button again turns the unit back to standby mode.
The C 326BEE can also be switched ON from standby mode by pressing
any of the front panel buttons.
AUTO STANDBY
Auto Standby feature is an integral feature of the C 326BEE that
conforms to European ecodesign regulations. When Auto Standby is
enabled, the C 326BEE will automatically go to standby mode if there is
no active input at current source or no user interface interaction within
30 minutes.
Auto Standby can be enabled or disabled by the following button
combinations and Standby LED indicator response. Execute below
steps while the C 326BEE is at operating mode.
Press and hold [AUX] button and then press Standby button. Observe
the number of times the Standby LED ashes.
• Auto Standby enabled : Standby LED ashes once.
• Auto Standby disabled : Standby LED ashes twice.
2 STANDBY LED: This indicator will light up amber when the C 326BEE
is in standby state. When the C 326BEE is at ON state, this indicator will
illuminate blue. When infrared command from the SR 8 is received, this
indicator will also ash momentarily.
In cases of serious abuse of the C 326BEE, such as excessively low
loudspeaker impedance and short circuit, the C 326BEE will engage its
Protection circuitry, indicated by the Standby LED turning from blue to
red and the sound being muted.
In such a case, turn the C 326BEE OFF by the rear panel POWER
switch, wait for it to cool down and/or check the speaker connections,
making sure the overall loudspeaker impedance doesn’t go below 4
ohms. Once the cause for the protection circuitry to engage has been
removed, switch ON the rear POWER switch and the STANDBY button to
resume normal operation.
3 SOFT CLIPPING INDICATOR: The blue SOFT CLIPPING LED shows
that the SOFT CLIPPING mode is engaged. Refer also to the item below
about SOFT CLIPPING at the IDENTIFICATION OF CONTROLS – REAR
PANEL.
4 REMOTE SENSOR: Point the SR 8 remote control at the remote
sensor and press the buttons. Do not expose the remote sensor of the
C 326BEE to a strong light source such as direct sunlight or illumination.
If you do so, you may not be able to operate the C 326BEE with the
remote control.
Distance: About 23ft (7m) from the front of the remote sensor.
Angle: About 30o in each direction of the front of the remote sensor.
5 PHONES: A 1/4” stereo jack socket is supplied for headphone listening
and will work with conventional headphones of any impedance.
Inserting a headphone jack into this socket automatically switches o
the loudspeakers. The volume, tone and balance controls are operative
for headphone listening. Use a suitable adapter to connect headphones
with other types of sockets, such as 3.5mm “personal stereo” jack plugs.
NOTE
Make certain that the volume control is turned to minimum (fully
counter-clockwise) before connecting or disconnecting headphones.
Listening at high levels can damage your hearing.
6 MP SOCKET: Using a 3.5mm stereo plug, connect into this socket the
audio output of a Media Player.
NOTES
• If an external Media Player is connected to the front MP socket (using a
3.5mm stereo plug) while listening to a MP line-level source, the external
Media Player will be directly selected with the MP line-level source
immediately disconnected.
• It is recommended to mute the volume or switch to a dierent input
before plugging/unplugging the external Media Player cable.
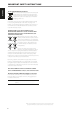
1
111095 6 7 8
2 3 4
6
ENGLISH FRANÇAIS ESPAÑOL ITALIANO DEUTSCH NEDERLANDS SVENSKA РУССКИЙ