
Owner`s manual


IDENTIFICATION OF CONTROLS
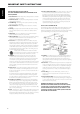
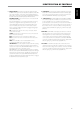
FRONT PANEL
1 STANDBY: With the rear panel POWER switch set to ON position,
press this button to switch ON the C 326BEE from standby mode.
The Standby LED indicator will turn from amber to blue. Pressing the
STANDBY button again turns the unit back to standby mode.
The C 326BEE can also be switched ON from standby mode by pressing
any of the front panel buttons.
2 STANDBY LED: This indicator will light up amber when the C 326BEE
is in standby state. When the C 326BEE is at ON state, this indicator will
illuminate blue. When infrared command from the SR 8 is received, this
indicator will also ash momentarily.
In cases of serious abuse of the C 326BEE, such as excessively low
loudspeaker impedance and short circuit, the C 326BEE will engage its
Protection circuitry, indicated by the Standby LED turning from blue to
red and the sound being muted.
In such a case, turn the C 326BEE OFF by the rear panel POWER
switch, wait for it to cool down and/or check the speaker connections,
making sure the overall loudspeaker impedance doesn’t go below 4
ohms. Once the cause for the protection circuitry to engage has been
removed, switch ON the rear POWER switch and the STANDBY button to
resume normal operation.
3 SOFT CLIPPING INDICATOR: The blue SOFT CLIPPING LED shows
that the SOFT CLIPPING mode is engaged. Refer also to the item below
about SOFT CLIPPING at the IDENTIFICATION OF CONTROLS – REAR
PANEL.
4 REMOTE SENSOR: Point the SR 8 remote control at the remote
sensor and press the buttons. Do not expose the remote sensor of the
C 326BEE to a strong light source such as direct sunlight or illumination.
If you do so, you may not be able to operate the C 326BEE with the
remote control.
Distance: About 23ft (7m) from the front of the remote sensor.
Angle: About 30o in each direction of the front of the remote sensor.
5 PHONES: A 1/4” stereo jack socket is supplied for headphone listening
and will work with conventional headphones of any impedance.
Inserting a headphone jack into this socket automatically switches o
the loudspeakers. The volume, tone and balance controls are operative
for headphone listening. Use a suitable adapter to connect headphones
with other types of sockets, such as 3.5mm “personal stereo” jack plugs.
NOTE
Make certain that the volume control is turned to minimum (fully
counter-clockwise) before connecting or disconnecting headphones.
Listening at high levels can damage your hearing.
6 MP SOCKET: Using a 3.5mm stereo plug, connect into this socket the
audio output of a Media Player.
NOTES
• If an external Media Player is connected to the front MP socket (using a
3.5mm stereo plug) while listening to a MP line-level source, the external
Media Player will be directly selected with the MP line-level source
immediately disconnected.
• It is recommended to mute the volume or switch to a dierent input
before plugging/unplugging the external Media Player cable.
1
111095 6 7 8
2 3 4
6
ENGLISH FRANÇAIS ESPAÑOL ITALIANO DEUTSCH NEDERLANDS SVENSKA РУССКИЙ