
Operation Manual


MDC CLASSIC UPGRADE SLOT
The delivery format of digital content is constantly changing in pure
digital systems like the C 390DD. Each of these formats typically requires
specialized hardware and software, often with licensed IP and content copy
protection.
In order to address such continuous technological evolution, NAD’s
design team placed all digital interface circuitry of the C 390DD on easily
upgradable modules. NAD calls this the Modular Design Construction
(MDC). The C 390DD includes one MDC module already – the DD USB 1
(Direct Digital USB) which has Type A and Type B USB input terminals.
There are other optional Modular Design Construction (MDC) modules that
can be integrated with the C 390DD by installing them on the vacant slots
in the rear panel. The following are the optional MDC modules
• DD HDMI-1 (HDMI) with 3 HDMI inputs (stereo only, no surround
decoding) and one 1 HDMI Output (Video pass through).
• DD AP-1 (Direct Digital Analog Phono) with SINGLE-ENDED stereo,
BALANCED stereo and PHONO inputs.
• DD BluOS featuring BluOS, a complete digital music solution that allows
the integration of Hi-Res audio, network streaming and music control
using the BluOS app.
DD HDM‑1 (DIRECT DIGITAL HDMI)
The DD HDM-1 oers three HDMI input terminals and one HDMI output
with video pass through. With DD HDM-1 installed, the C 390DD can be
the heart of a “Video 2.0” system using the mandatory 2 channel linear
PCM soundtrack from Blu-ray or DVD to make a compelling high denition
theater presentation. DD HDM-1 is fully 3D video compatible but without
surround sound decoding or video processing.
A HDMI OUT: Connect the HDMI Monitor OUT
to a HDTV or projector with HDMI input.
B HDMI 1 -3: Connect the sets of HDMI input
to the HDMI OUT connectors of source
components such as DVD player, BD player or
HDTV satellite/cable box.
WARNING
Before connecting and disconnecting any HDMI cables, both the
C 390DD and the ancillary source must be powered OFF and unplugged
from the AC outlet. Failure to observe this practice may cause permanent
damage to all equipment connected via HDMI sockets.
DD AP‑1 (DIRECT DIGITAL ANALOG‑PHONO)
DD AP-1 uses high quality Analog-to-Digital conversion to make analog
sources compatible with C 390DD’s pure digital circuitry. The PHONO circuit
has impedance settings for MM and MC with gain automatically set.
The DD AP-1 consists of the line level input terminals – PHONO, SINGLE-
ENDED (ANALOG) and BALANCED.
A PHONO: Input for either a Moving Coil
or Moving Magnet phono cartridge.
Connect the twin RCA lead from your
turntable to this input.
B SE IN (SINGLE-ENDED): Use a twin
RCA-to-RCA lead to connect these
sockets to the left and right analog
output of a CD player, preamplier or
processor.
C PHONO GROUND CONNECTOR:
Turntables normally includes a single
wire earth lead. Use the C 390DD
phono ground connector to connect this lead. Unscrew the
terminal to expose the hole that will accept the lead. After insertion,
tighten the terminal to secure the lead.
D BALANCED: Connect XLR audio source to these connectors. Ensure
that proper pin congurations are followed – Pin 1: Ground, Pin 2:
Positive (signal live) and Pin 3: Negative (signal return).
DD BluOS
BluOS is a music management software developed by NAD’s sister brand,
Bluesound. Integrating DD BluOS will add BluOS network and internet
music streaming with advanced music management to your NAD C 390DD.
Refer to the MDC DD BluOS Mounting Instructions and Conguring
DDBluOS on how to install and integrate the DD BluOS with the C 390DD.
IMPORTANT NOTE
BluOS audio cannot be streamed through digital output terminals.
BluOS PLAYBACK CONTROLS
Using the AVR 4 remote control, the following control buttons are
applicable for BluOS playback. Set DEVICE SELECTOR to MP for BluOS
playback control.
4 : Resume playback from pause mode.
j : Pause current playback.
9 : Skip back to the beginning of current song.
0 : Skip forward to the next song.
RPT: Repeat track (song), playlist or repeat o.
DISP: Toggle to display applicable information about current song,
broadcast or media.
BluOS SETUP MENU
The BluOS Setup menu has to be enabled after integration of the DD BluOS
module. There are two ways to enable the BluOS Setup menu.
Using the front panel buttons
• Press and hold together front panel buttons [SOURCE s] and [ENTER]
Using the AVR remote control
• Press and hold [DISP] button
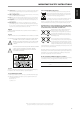
IDENTIFICATION OF CONTROLS
REAR PANEL
A
B
C
D
A
B
9
ENGLISHFRANÇAISESPAÑOLITALIANODEUTSCHNEDERLANDSSVENSKAРУССКИЙ