
Owner`s manual


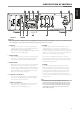


6 GROUND TERMINAL
The C 390DD requires a grounded AC receptacle or a separate earth
ground. Use this terminal to properly ground your C 390DD. The
C 390DD can be connected to ground by connecting a ground lead
wire or similar to this ground terminal. After insertion, tighten the
terminal to secure the lead.
EXAMPLE ILLUSTRATION OF GROUNDING THE C390DD VIA THE
REAR PANEL GROUND TERMINAL
NOTES
• TheaboveillustrationshowstheC390DDbeingconnectedtoground
via a metal water pipe. There maybe other grounding conductor points
in your home. Consult with a licensed electrician to properly locate
or correctly install a grounding conductor in your home. NAD is not
responsible for any malfunction, damage or costs associated with the
installation, connection or grounding of your C 390DD.
• ThegroundingwireisnotsuppliedwithyourC390DD.
7 +12V TRIGGER OUT
The +12V TRIGGER OUT is used for controlling external equipment that
is equipped with a +12V trigger input.
• Connect this +12V TRIGGER OUT to the other equipment’s
corresponding +12V DC input jack using a mono cable with 3.5mm
male plug.
• This output will be 12V when the C 390DD is ON and 0V when the
unit is either OFF or in standby mode.
+12V TRIGGER IN
With this input triggered by a 12V DC supply, the C 390DD can be
switched ON remotely from standby mode by compatible devices such
as ampliers, preampliers, receivers, etc. If the 12V DC supply is cut o,
the C 390DD will return to standby mode.
• Connect this +12V Trigger input to the remote device’s
corresponding +12V DC output jack using a mono cable with
3.5mm male plug. The controlling device must be equipped with a
+12V trigger output to use this feature.
8 IR IN
This input is connected to the output of an IR (infrared) repeater
(Xantech or similar) or the IR output of another component to allow
control of the C 390DD from a remote location.
9 RS 232
NAD is a certied partner of AMX and Crestron and fully supports
these external devices. Check out the NAD website for information
about AMX and Crestron compatibility with NAD. See your NAD audio
specialist for more information.
• Connect this interface using RS-232 serial cable (not supplied)
to any Windows compatible PC to allow remote control of the
C 390DD via compatible external controllers.
• Refer to the NAD website for information about RS232 Protocol
documents and PC interface program.
10 PRE OUT/SUBW (1,2)
• These output terminals have dual function. They are used either as
PRE OUT or SUBWOOFER terminals.
• These terminals are enabled or disabled via the Pre Out/Subwoofer
sub-menu of the SETUP menu.
• Refer also to the item about PRE OUT/SUBWOOFER at the USING
THE C 390DD section of the OPERATION page.
11 AC MAINS INPUT
The C 390DD comes supplied with a separate detachable mains power
cord. Before connecting the plug to the mains power source, ensure
that it is rmly connected to the C 390DD’s AC Mains input socket rst.
• Always disconnect the mains power plug from the mains power
source rst, before disconnecting the cable from the C 390DD’s AC
Mains input socket.
12 POWER
• Supply the AC mains power to the C 390DD.
• When the POWER switch is set to ON position, the C 390DD goes
to standby mode as shown by the amber status condition of the
Standby LED. Press the front panel Standby button or AVR 4 remote
control’s [ON] button to switch ON the C 390DD from standby
mode.
• If you intend not to use the C 390DD for long periods of time (such
as when on vacation), switch o the POWER switch.
• With POWER switched o, neither the front panel Standby button
nor AVR 4 remote control’s [ON] button can activate the C 390DD.
IDENTIFICATION OF CONTROLS
REAR PANEL
8
ENGLISH FRANÇAIS ESPAÑOL ITALIANO DEUTSCH NEDERLANDS SVENSKA РУССКИЙ