
Owner`s manual


INTRODUCTION
GETTING STARTED
UNPACKING AND SETUP
WHAT’S IN THE BOX
Packed with your C 516BEE you will nd:
• An audio cable connector
• The CD 7 remote control with 2 (two) AAA batteries
• This owner’s manual
SAVE THE PACKAGING
Please save the box and all of the packaging in which your C 516BEE
arrived. Should you move or otherwise need to transport your C 516BEE,
this is by far the safest container in which to do so. We’ve seen too many
otherwise perfect components damaged in transit for lack of a proper
shipping carton, so please: Save that box!
CHOOSING A LOCATION
Choose a location that is well ventilated (with at least several inches to
both sides and behind), and that will provide a clear line of sight, within
25 feet/8 meters, between the C 516BEE’s front panel and your primary
listening/viewing position. This will ensure reliable infrared remote control
communications. The C 516BEE generates a modest amount of heat, but
nothing that should trouble adjacent components. It is perfectly possible to
stack the C 516BEE on top of other components.
NOTE ON INSTALLATION
IMPORTANT! Install the C 516BEE Compact Disc player on a level, vibration-
free surface. Severe vibration or operation in a tilted position may cause
the player to mis-track. The player may be stacked with other stereo
components, as long as there is adequate ventilation around it. If the
C 516BEE is placed in close proximity to a radio tuner (AM or FM), a VCR or
a television set, the operation of its digital circuits may produce static that
would interfere with reception of weak broadcast signals. If this occurs,
move the C 516BEE away from other devices or switch it o when viewing
or listening to broadcasts.
QUICK START
In case you simply cannot wait to experience the performance of your new
NAD C 516BEE, we provide the following “Quick Start” instructions to get
you underway.
Please make all the connections to your C 516BEE with the unit unplugged.
It is also advisable to power-down or unplug all associated components
while making or breaking any signal or AC power connections.
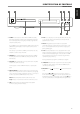
PLAY A CD
1 Connect a twin RCA-to-RCA lead from the L (left) and R (right) Line
Output jacks to the corresponding CD inputs on your amplier.
2 Plug in the AC power cord.
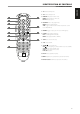
3 Press the POWER button to turn ON the player.
4 Press [OPEN/CLOSE] to open the disc drawer.
5 Place a CD, label side up, in the tray’s circular recess. Be certain that the
disc is centered within the recess.
6 Press [PLAY]. The drawer closes automatically, and the disc begins to
play.
7 At any time you may press [SKIP or ] to select dierent tracks on
the disc.
8 Press [PAUSE] if you want to stop play temporarily while keeping the
pickup at its current position on the disc. Press [PAUSE] again or [PLAY]
when you want to resume playback. Press STOP if you want to end play
and reset the pickup to the beginning of the disc.
6
ENGLISH FRANÇAIS ESPAÑOL ITALIANO DEUTSCH NEDERLANDS SVENSKA РУССКИЙ