T770 Surround Sound Receiver GB Owner’s Manual
IMPORTANT SAFETY INSTRUCTIONS CAUTION ATTENTION: RISK OF ELECTRIC SHOCK DO NOT OPEN RISQUE DE CHOC ELECTRIQUE NE PAS OUVRIR CAUTION: TO REDUCE THE RISK OF ELECTRIC SHOCK, DO NOT REMOVE COVER (OR BACK). NO USER SERVICEABLE PARTS INSIDE. REFER SERVICING TO QUALIFIED SERVICE PERSONNEL. Warning: To reduce the risk of fire or electric shock, do not expose this unit to rain or moisture.
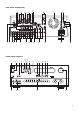
REAR PANEL CONNECTIONS FRONT PANEL CONTROLS 3
FIGURE A FIGURE B 5
FIGURE 1 FIGURE 3 FIGURE 2 FIGURE 4
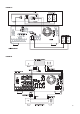
FIGURE 5 2 1 3 4 7 5 6 8 9 11 10 12 13 15 14 T770 RC NAD © 1998 16 7
NAD T770 Surround Sound Receiver NOTES ON INSTALLATION Your NAD T770 should be placed on a firm, level surface. Avoid placing the unit in direct sunlight or near sources of heat and damp. Allow adequate ventilation. Do not place the unit on a soft surface like a carpet. Do not place it in an enclosed position such a bookcase or cabinet that may impede the air-flow through the ventilation slots. Make sure the unit is switched off before making any connections.
12. S-VIDEO VIDEO 1, VIDEO 2, VIDEO 3, VIDEO 4, MONITOR OUT The S-Video standard allows for higher quality video signal transfer when compared to the Video Composite standard. If your video components have an S-Video connector use dedicated S-Video leads to connect them to the T770 in the same way as described with the Video composite equivalents (No. 9, 10 and 11 above). NOTE: The MULTI SOURCE PRE OUT will only pass on input signals connected to the analogue inputs.
CONNECT THE SPEAKERS Connect the right speaker to the terminals market ‘R +’ and ‘R -’ ensuring that the ‘R +’ is connected to the ‘+’ terminal on your loudspeaker and the ‘R -’ is connected to the loudspeaker’s ‘-’ terminal. Connect the terminals marked ‘L +’ and ‘L -’ to the left speaker in the same way. Always use heavy duty (16 gauge; 1.5mm or thicker) stranded wire to connect loudspeakers to your T770. 24.
REMOTE CONTROL STAND-BY button (green, No. 1 on remote control drawing): Press this button to switch the unit from operating to the Stand-by mode and vice versa: Press this button again to switch the unit on from Stand-by; the last selected source will be indicated in the display. NOTE: Stand-by mode is indicated by the Stand-by indicator (No. 2) just over the green POWER button on the front panel (No. 1). In Stand-by mode the T770 uses very little power.
8. BASS & TREBLE CONTROLS The T770 is fitted with BASS and TREBLE tone controls to adjust the overall tonality of your system. The 12 o’clock position is ‘flat’ with no boost or cut and a detent indicates this position. When tuned to a non-RDS station: The PS/RT button toggles the display to show either the station frequency or user entered station name. If no user name was entered the display will just flash once. Rotate the control clockwise to increase the amount of Bass or Treble.
By briefly tapping the or you can engage manual tuning respectively up or down the frequency band for precise tuning to a specific frequency. With each successive tap of the keys, the tuner will take 0.05 MHz steps on FM so you can accurately tune into the desired frequency. For AM the tuning steps can be 9 kHz or 10 kHz, depending on the version of your T770. This tuning mode can also be useful when trying to receive a radio station which is too weak for the auto search mode.
In the EARS (Enhanced Ambience Retrieval System) Surround Mode, a realistic level of ambience of surround sound is added to a normal stereo source such as a CD or FM radio. Surround Mode Off switches to normal Stereo operation. NOTE: When using Digital Audio Input 3, the Surround Mode Off is selected, the analogue inputs will be selected. Therefore, ensure that the analogue outputs of the digital sources are connected as well to the same input the Digital Audio input has been assigned to.
The other Menus available are: INPUT SELECTOR (FIG. 8) • When calling the “INPUT SELECTOR” up for the first time, both “Picture and “Audio” will be highlighted. By using the or cursor button you can scroll through and choose one of the inputs. It is also possible to select the video input signal independent from the audio input signal. SPEAKER A SETUP With the “Speaker A Setup” mode (Fig. 12), you can select submenus to set all parameters for a surround sound system: Speaker Selection (Fig.
STORING, RECALLING AND NAMING PRESETS TO STORE A PRESET • Tune to the radio station you wish to enter into a Preset (refer to chapter “Front Panel Controls” section 15). If the station is transmitting RDS information, the RDS indicator will light up and station initials will be shown in the Display Panel. If a nonRDS station is found, then just the frequency will be shown. • To store that station as a Preset, press Memory (No. 14).
3. MUTE Press the MUTE button to temporarily switch off the sound to the speakers and headphones. Mute mode is indicated by “AUDIO MUTE” flashing in red in the display area. Press MUTE again to restore sound. Mute does not affect recordings made using the Tape outputs but will affect the signal going to the Audio Pre-outs. 4. TUNER Whereas the T770’s front panel has separate buttons for AM and FM, the remote control has a single Tuner button. The tuner section can be activated by pressing Tuner.
16. CASSETTE DECK CONTROL (For use with single (DECK B) or double transport (A and B) NAD Cassette Decks) or engages Forward Play or Reverse Play. Record / Pause. Press to put cassette deck into recordpause. Press Play to start recording. Stops Play or Recording. engages Rewind. engages Fast Forward. For best results, you should consider using a center speaker.
To resolve this problem, the T770’s circuitry includes a system that will delay the signal for the speaker closest to the listener. This ensures sound coming from all speakers always arrives at the listener’s ears at the correct time. To set Speaker Distance: • From the listening position, measure the exact distance to each speaker. • Call up the Main menu of the On Screen Display (Fig. 6). • Select the “Speaker A Menu” (Fig. 12). • Choose the “Speaker Distance” submenu (Fig. 14).
TROUBLESHOOTING Problem • Power AC lead unplugged or power not switched on • Tape 2 Monitor selected • Mute on • Speakers not switched on • Check if AC lead is plugged in and power switched on • De-select Tape 2 Monitor mode • Switch off Mute • Switch Speakers on NO SOUND ONE CHANNEL • Speaker not properly connected or damaged • Input lead disconnected or damaged • Check connections and speakers • No surround mode selected • Mono sound source • Speakers not properly connected • Surround volume level t
GB 21
WWW.NAD.CO.UK ©1998 NAD ELECTRONICS LTD LONDON ENGLAND All rights reserved.