NEDERLANDS Owner’s Manual SVENSKA DEUTSCH ITALIANO ESPAÑOL FRANÇAIS AV Surround Sound Receiver ENGLISH T 747 РУССКИЙ ®
IMPORTANT SAFETY INSTRUCTIONS ENGLISH THE LIGHTNING FLASH WITH ARROWHEAD SYMBOL, WITHIN AN EQUILATERAL TRIANGLE, IS INTENDED TO ALERT THE USER TO THE PRESENCE OF UNINSULATED “DANGEROUS VOLTAGE” WITHIN THE PRODUCT’S ENCLOSURE THAT MAYBE OF SUFFICIENT MAGNITUDE TO CONSTITUTE A RISK OF ELECTRIC SHOCK TO PERSONS.
ATTENTION Disconnect this apparatus from the AC mains completely by unplugging the power cord plug from the AC receptacle. CAUTION REGARDING PLACEMENT To maintain proper ventilation, be sure to leave a space around the unit (from the largest outer dimensions including projections) that is equal to or greater than shown below.
INTRODUCTION TABLE OF CONTENTS ENGLISH IMPORTANT SAFETY INSTRUCTIONS . . . . . . . . . . . . . . . . . . . . . . . . . 2 FRANÇAIS FRONT PANEL. . . . . . . . . . . . . . . . . . . . . . . . . . . . . . . . . . . . . . . . . . . . . . . . . . . . . 6 REAR PANEL . . . . . . . . . . . . . . . . . . . . . . . . . . . . . . . . . . . . . . . . . . . . . . . . . . . . . . 8 REMOTE CONTROL . . . . . . . . . . . . . . . . . . . . . . . . . . . . . . . . . . . . . . . . . . . . .
INTRODUCTION CHOOSING A LOCATION Audio Input Video Input Source 1 HDMI 1/ Audio 1 IN HDMI 1 Source 2 Optical 1/ Audio 2 Component Video Input 2 Source 3 Optical 2/ Audio 3 S Video 3 iPod Audio 4 S-Video 4 Source 5 Coaxial 1/Audio 5 IN Video 4 Multi 7.1 Ch. Input Component Video Input 3 Front Optical Front Input/ Audio Front Input S-Video Front Input MP MP Front Input Tuner ESPAÑOL SAVE THE PACKAGING Please save the box and all of the packaging in which your T 747 arrived.
IDENTIFICATION OF CONTROLS FRONT PANEL ENGLISH 1 2 3 4 5 6 7 8 9 FRANÇAIS ESPAÑOL 10 ITALIANO 1 POWER BUTTON: Press this button to switch ON the T 747. The Standby LED indicator will turn from amber to blue and illuminate the VFD. Pressing the power button again turns the unit back to standby mode. 2 STANDBY LED: This indicator will light up amber when the T 747 is in standby state. When either the T 747 main zone or Zone 2 is at the ON state, this indicator will illuminate blue.
IDENTIFICATION OF CONTROLS ENGLISH FRONT PANEL 10 PHONES: Accepts stereo headphone using a standard 1/4-inch stereo phone plug (use a suitable adapter for headphones equipped with a smaller plug). Plugging in headphones automatically mutes output from all channels. With headphone listening, toggle front panel’s LISTENING MODE button (or AVR 3’s [SURR] button) to select between “Dolby H/P” (Dolby Headphone) and “Dolby H/P Off” (Dolby Headphone Off).
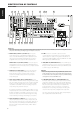
IDENTIFICATION OF CONTROLS REAR PANEL ENGLISH 1 2 3 4 5 6 7 8 9 10 FRANÇAIS ESPAÑOL 11 12 13 14 15 16 17 18 19 20 21 22 ITALIANO ATTENTION! Please make sure that the T 747 is powered off or unplugged before making any connections. It is also advisable to power down or unplug all associated components while making or breaking any signal or AC power connections.
IDENTIFICATION OF CONTROLS The AM loop antenna supplied with the T 747 (or a suitable replacement) is required for AM reception. Open the clip terminal lever; insert the wire making sure to match the color-coded (white and black) ends of the wire to that of the terminal and close the lever ensuring that the lever locks the wire in place. Testing different positions for the antenna may improve reception; vertical orientation will usually produce the best results.
IDENTIFICATION OF CONTROLS REAR PANEL ENGLISH 18 ZONE 2 FIX, ZONE 2 VAR: Connect both ZONE 2 FIX and ZONE 2 VAR to the corresponding audio input of an external integrated amplifier, preamplifier or receiver. FIX: When FIX is the selected ZONE 2 audio output port, the ZONE 2 volume level can only be varied by using the VOLUME control of the external amplifier or receiver it is connected to. Neither the front panel VOLUME nor ZR 5’s [VOL ] can vary Zone 2 audio output.
IDENTIFICATION OF CONTROLS 6 5 9 10 NOTE The remote control handset supplied with the T 747 is of a universal NAD type, designed to operate several NAD models. Some buttons are applicable only to specific NAD models. Contact your dealer or NAD audio specialist for assistance. 11 1 POWER ON & OFF: The AVR 3 remote has a separate ON and OFF button. Press the ON button to switch the unit from Standby to operating mode. Press the OFF button to switch the unit to Standby mode.
IDENTIFICATION OF CONTROLS REMOTE CONTROL ENGLISH 10 VOL [ ] : Press [ ] button to increase or decrease the loudness level. Release the button when the desired level is reached. The VFD on the front panel will indicate the level set. For NAD Receivers, the VFD will also show “Volume Up” or “Volume Down” or “Volume: _ _ dB” (_ _ indicates the numerical dB level) while pressing AVR 3’s . 11 [ ] : Select an item in a menu.
IDENTIFICATION OF CONTROLS ENGLISH REMOTE CONTROL ITALIANO ESPAÑOL FRANÇAIS TUNER CONTROL (for use with NAD Receiver, AM/FM/DAB Tuner): Set the DEVICE SELECTOR to “TUN” in order to gain access to these buttons. Refer to the corresponding labels printed in the remote control faceplate and their respective assigned buttons to make use of these functions.
IDENTIFICATION OF CONTROLS REMOTE CONTROL ENGLISH LIBRARY The AVR 3 can store or assign a different NAD code library for a particular DEVICE. If the original default library does not control your NAD CD player, DVD player, or other component, follow the procedure below to change the library code. Note that there maybe some remote control functions or buttons specific for a particular NAD model not available when a particular library code is stored in a device.
OPERATION LISTENING MODE The T 747 receiver employs a simple, self-explanatory system of on-screen display “menus” that will appear on the connected video monitor/TV. These are required during the setup process (and are useful in day-to-day operation), so be sure to connect the monitor/TV before proceeding with setup.
OPERATION USING THE T 747 – MAIN MENU ENGLISH NEO:6 Two-channel recordings, whether stereo or surround-encoded, are reproduced with Neo:6 surround with output to front left/right, center and discrete left/right surround channels plus subwoofer (assuming these are present in the current “Speaker Configuration”). The T 747 provides two DTS NEO:6 variations - NEO:6 Cinema and NEO:6 Music. See also section about “ADJUSTING LISTENING MODES” below.
OPERATION The T 747 has two Tone Control levels - Treble and Bass. Bass and Treble controls only affect the low bass and high treble leaving the critical midrange frequencies free of coloration. These controls allow one to tweak on-the-fly, the frequency response of the source. Use the [ ] keys to adjust Treble and Bass within the range ± 10 dB.
OPERATION USING THE T 747 – SETUP MENU ENGLISH SETUP MENU The Setup Menu allows one to customize the operation of the T 747 to the ancillary equipment used in one’s specific AV system. Unless your system exactly matches the factory defaults, you will need to use the Setup Menu to configure the settings of your T 747.
OPERATION SAMPLE PROCEDURE FOR SETTING UP A/V PRESETS ENGLISH USING THE T 747 – SETUP MENU Speaker Setup: from the Speaker Setup menu, go to “Speaker Configuration” sub-menu and change “Subwoofer” from “On” to “Off”: “Front” becomes “Large” 1 Setup first your preferred settings for the following options (access them through their respective menu page). ESPAÑOL FRANÇAIS Listening Mode: Stereo ITALIANO DSP Options: 5 ms With the above settings setup, scroll to “A/V Presets” from the SETUP MENU page.
OPERATION USING THE T 747 – SETUP MENU ENGLISH 3 At “A/V Presets” page, set “Preset: 1” to the following conditions: 4 Now, repeat again Step 1 above but this time with the following settings Listening Mode: PLIIx Music FRANÇAIS Use [ ] to select “Yes” or “No” and press [ENTER] to confirm selection and move on to the next setting. ESPAÑOL While at “Save Current Setup to Preset” menu line, use [ ] to save the above settings to Preset 1.
OPERATION 7 You can setup up to 5 Presets. These same Presets can also be associated/defaulted to each Source in the “Source Setup (Normal View)” window as below In the above example, “Preset 1” settings are allocated for Source 1. Whenever Source 1 is accessed, the “Preset 1” settings will be applied to Source 1. You can still manually override the assigned Preset allocation in a specific Source with another Preset setting/number by way of pressing the appropriate remote control buttons.
OPERATION USING THE T 747 – SETUP MENU ENGLISH Source The T 747 is equipped with ten configurable Sources (Source 1 -10). The settings for each Source are dependent on the configurations set forth in the parameters for that particular Source window. While at “Source” line item, use [ Digital Audio To take advantage of the T 747’s high performance surround and digital audio circuitry, it is advisable that its Digital Audio inputs are selected. ] keys to toggle through the Sources.
OPERATION SOURCE SETUP (TABLE VIEW) ENGLISH USING THE T 747 – SETUP MENU iPod SETUP If you are using an HD capable TV, you should connect either HDMI or Component Video, not both. All SD sources will be upscaled to HD over these HD connections. Be sure your TV is HD capable before selecting an HD resolution. Note that the default SD is backward compatible with non-HD sets.
OPERATION USING THE T 747 – SETUP MENU ENGLISH AUTO CALIBRATION It has been shown that many, if not most, surround sound systems are not accurately setup and calibrated. To be done properly, calibration requires special knowledge and instrumentation that the average person probably doesn’t possess.
OPERATION ENGLISH USING THE T 747 – SETUP MENU SPEAKER LEVELS Every surround-sound system requires “bass-management” to direct lowfrequency content from any or all channels to the speakers best able to reproduce it. For this function to operate correctly, it is important that you correctly identify your speakers’ capabilities. We use the terms “S” (Small), “Large” and “Off”, but note that physical size may be irrelevant.
OPERATION USING THE T 747 – SETUP MENU ENGLISH SETTING SPEAKER LEVELS AT TEST MODE While at “Speaker Levels” menu, press the AVR 3 remote’s “Test” key activating the T 747’s Speaker Levels balancing test signal. You will hear a Test tone. To test each channel, use AVR 3’s [ ] keys to move up or down the speaker channels. If you do not hear the Test tone, check your speaker connections or “Speaker Configuration” settings.
OPERATION LISTENING MODE SETUP If the surround back speakers are not used in the main zone, their surround back amplifier channels could be assigned for Main Back, Zone 2 or Bi-Amp. The T 747 has various listening mode options and is mostly configurable. These are provided to reproduce a variety of sound effects depending upon the content of the source to be played.
OPERATION USING THE T 747 – SETUP MENU ENGLISH DOLBY DIGITAL SURROUND MODES The following are further descriptions about the Dolby Digital surround modes. FRANÇAIS Dolby Digital Plus Dolby Digital Plus is the next-generation audio technology for all highdefinition programming and media. Dolby Digital Plus delivers multi-channel audio programs of up to 7.
OPERATION Dolby Pro Logic IIx Music: Please refer to the item about “PRO LOGIC IIx” under the topic “ADJUSTING LISTENING MODES” at the “OPERATION - USING THE T 747 - MAIN MENU” discussions above. DTS SETUP Under this menu, the Center Gain settings of NEO:6 Music can be adjusted. Please refer to the item about “NEO:6 Music” under the topic “ADJUSTING LISTENING MODES” at the “OPERATION – USING THE T 747 – MAIN MENU” discussions above.
OPERATION USING THE T 747 – SETUP MENU ENGLISH VIDEO SETUP The Vacuum Fluorescent Display (VFD) and On-Screen Display (OSD) can be shown in various ways by navigating through the parameters at the “Front Panel Display Setup” menu. This menu allows you to set the display resolution of the T 747 along with the compatible video format setting and picture setup. FRANÇAIS FRONT PANEL DISPLAY SETUP ESPAÑOL DISPLAY Select “On” to display all applicable data or characters at the VFD.
OPERATION ENGLISH USING THE T 747 – SETUP MENU FRANÇAIS PICTURE SETUP ] to cancel the change in Frame Rate: Frame rate refers to the number of frames or images that are projected or displayed per second in motion pictures, television or computer video display.
OPERATION LISTENING TO AM/FM RADIO ENGLISH The T 747’s internal AM/FM tuner offers very high quality sound from radio broadcasts. The reception and sound quality will always be dependent to a degree however on the type of antenna(s) used as well as proximity to the broadcast origin, geography and weather conditions. FRANÇAIS ABOUT ANTENNAS Connect the supplied lead-type FM antenna to the FM antenna input. Extend the lead.
OPERATION DELETING A STORED PRESET You can empty a preset by deleting the stored information. 1 Select the preset number to be deleted. 2 While at the selected preset number, press the AVR 3’s [DELETE] button. 3 The preset will then be deleted and “DELETED” scrolls on the display. 4 To clear all the Presets at the same time, repeat step 2 again but this time do not release the [DELETE] button. Press and hold [DELETE] button until the current Preset number shown in the VFD is extinguished (P--).
OPERATION LISTENING TO XM RADIO ENGLISH The T 747 is “XM Ready” which means that with the addition of separately sold XM Mini-Tuner CPC-9000 and XM Mini-Tuner Home Dock, it has everything you need to listen to live XM. Everything else is built right in. Just subscribe to the XM service and your T 747 will be ready to receive XM content. FRANÇAIS NOTES • Check with your NAD audio specialist for other versions of XM MiniTuner compatible with T 747.
OPERATION NOTES • When using the AVR 3 remote control to carry out DAB commands, ensure that the DEVICE SELECTOR is set to “TUN”. • At DAB mode and with DEVICE SELECTOR set to “TUN”, AVR 3’s [TUNER MODE] button has the same function as that of front panel’s [MENU] button. CONNECTING THE DAB MODULE Plug-in the other end of the DIN connector (supplied with your NAD DAB Adaptor DB 1) from the DAB module’s output port into the corresponding DAB module input socket on the rear panel of the T 747.
OPERATION LISTENING TO DAB RADIO ENGLISH SETTING DAB PRESETS The T 747 can store as many as 99 DAB stations of your favorite DAB broadcast for immediate recall. 1 To store a DAB preset, first tune the DAB broadcast, and then press the AVR 3’s panel [MEMORY] button (DEVICE SELECTOR must be set to “TUN”). The VFD will show “Preset Memory” and the next available vacant Preset number (the number is blinking).
OPERATION ENGLISH LISTENING TO DAB RADIO INFORMATION SETTINGS While listening to a DAB broadcast, the type of information displayed in the lower line of the VFD can be varied. Toggle the AVR 3’s [INFO] button to step through the following display options: DLS FRANÇAIS Program Type Station Name Time and Date Audio Signal information ESPAÑOL Channel and Frequency Signal Q Software version ITALIANO DLS Dynamic Label Segment (DLS) is the scrolling text supplied by the broadcasting station.
OPERATION LISTENING TO YOUR iPod PLAYER ENGLISH The T 747 is equipped with a data port in the rear panel where an optional NAD IPD Dock for iPod (NAD IPD) can be plugged in. With the NAD IPD linking the T 747 with your own iPod player, you can enjoy listening to your favorite tracks and playlists as well as view applicable still image and video playback. FRANÇAIS You can control your iPod player using the assigned buttons in the T 747 front panel.
OPERATION ENGLISH LISTENING TO YOUR iPod PLAYER NAD IPD 2 The NAD IPD 2 has its own remote control - the DR 1. DR 1 can be used to control NAD IPD 2 only at “Simple Mode”. When using the DR 1 to command your iPod player docked in the NAD IPD 2, you have to refer to your iPod player’s own display screen to make full use of its feature; there is no OSD at this condition. FRANÇAIS In addition to the above commands common to the DR 1, below are the descriptions of the other DR 1 control buttons.
REFERENCE TROUBLESHOOTING ENGLISH CONDITION No sound from all channels. POSSIBLE CAUSES • AC power unplugged. POSSIBLE SOLUTIONS • Check AC cable connection and outlet. • Power not switched on. • Outlet has no power. No sound from some channels. FRANÇAIS No sound from surround channels. • Faulty/missing cables. • Check cables. • “Speaker Configuration” channel (s) set to “Off”. • Check “Speaker Configuration” menu. • No surround listening mode is engaged. • Select appropriate listening mode.
REFERENCE ENGLISH SPECIFICATIONS AMPLIFIER SECTION 2 x 110 W (ref. 0.08 % THD, 8 Ω) 2 x 160 W 2 x 220 W 7 x 60 W 0.08 % 0.08 % >60 300 mV/47 kΩ ±0.5 dB (ref. 20Hz - 20 kHz) >100 dB (ref. rated power 8Ω) >90 dB (ref. 1W 8Ω) FRANÇAIS Power output, Stereo Mode IHF dynamic power - 8 Ω 4Ω Power output Surround Mode Total harmonic distortion at rated power IM distortion at rated power Damping factor, 8 Ω Input sensitivity and impedance Frequency response Signal/noise ratio, A-weighted FM BAND 87.
www.NADelectronics.com ©2013 NAD ELECTRONICS INTERNATIONAL A DIVISION OF LENBROOK INDUSTRIES LIMITED All rights reserved. NAD and the NAD logo are trademarks of NAD Electronics International, a division of Lenbrook Industries Limited. No part of this publication may be reproduced, stored or transmitted in any form without the written permission of NAD Electronics International.