
Owner`s manual

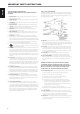


6 VACUUM FLUORESCENT DISPLAY (VFD)
• Displays visual information about the current settings like the active
Source, volume level, listening mode, audio format, applicable
RDS/XM/DAB as well as iPod-related display information and other
related indicators.
• Refer also to the item about DISPLAY SETUP under the USING THE
T 757 - SETUP MENU segment of the OPERATION section.
7 REMOTE SENSOR
• Point the AVR 4 remote control at the remote sensor and press the
buttons.
• Do not expose the remote sensor of the T 757 to a strong light
source such as direct sunlight or illumination. If you do so, you may
not be able to operate the T 757 with the remote control.
Distance: About 23ft (7m) from the front of the remote sensor.
Angle: About 30° in each direction of the front of the remote sensor.
8 3 SOURCE 4
• Toggle through the input selections - Source 1, Source 2, Source 3,
Source 4, iPod, Source 7, Front Input, Media Player and Tuner (AM/
FM/DAB/XM as applicable). More Sources can be directly recalled
upon enabling them at the Setup Menu.
• Refer also to the item about SOURCE SETUP under the USING THE
T 757 - SETUP MENU segment of the OPERATION section.
9 VOLUME
• The VOLUME control adjusts the overall loudness of the signal being
fed to the loudspeakers or headphones.
• Turn clockwise to increase the volume level; counter clockwise to
lower it.
10 PHONES
• Accepts stereo headphone using a standard 1/4-inch stereo phone
plug (use a suitable adaptor for headphones equipped with a
smaller plug).
• Plugging in headphones automatically mutes output from the
speakers.
• For headphone listening, the Front speakers must be set to “Large” at
the “Speaker Conguration” of the Speaker Setup item at the Setup
Menu; otherwise headphone bass response will be restricted.
• Plugging in headphones will automatically switch the T 757 to
Stereo, Stereo Downmix or Analog Bypass modes.
11 FRONT INPUT PORTS
• Use these convenience jacks for occasional sources such as a
camcorder, video game console, any analog audio or optical digital
audio sources and composite video sources.
• If your source has two output jacks indicative of stereo output,
insert both jacks into the T 757’s corresponding Front “L” (item A) and
“R (MONO)” input to achieve stereo output as well.
• On the other hand, if your source has a single audio out jack only or
is marked “Mono output”, plug this into the T 757’s Front “R (MONO)”
input (item B).
• Connect composite video output source to the front composite
video input (item C).
• Use the front optical audio input (item D) for optical digital audio
sources.
12 FRONT MP/MIC INPUT
• Connect your Media Player’s standard stereo phone jack to this
input.
• This is also the same input where the supplied Audyssey
microphone is connected for Audyssey Setup calibration.
• Refer also to the item about AUDYSSEY SETUP under the USING THE
T 757 - SETUP MENU segment of the OPERATION section.
IDENTIFICATION OF CONTROLS
FRONT PANEL
7
ENGLISHPORTUGUÊS FRANÇAISESPAÑOLITALIANODEUTSCHNEDERLANDSSVENSKAРУССКИЙ