
Operation Manual


LOADING CODE LIBRARIES
The HTR 6 can store a dierent library of default NAD codes for each of its
Device Selector “pages.” If the original default library does not control your
NAD CD player, DVD player, or other component, follow the procedure
below to change the code-library.
Begin by ensuring that the component you wish the HTR 6 to control is
plugged in and powered-up (“on,” not merely in standby). To enter the
HTR 6’s Library Mode, simultaneously press-and-hold for 3 seconds both the
desired Device Selector key and the [PROGRAM] key, until the Learn LED
turns green.
While keeping the HTR 6 pointed toward the component, enter the rst
appropriate three-digit code-library number from the table below. Press
[OFF]. If the component turns o, press [ENTER] to accept that code-library
number and exit the Library Mode. If the component does not turn o,
enter the next three-digit code-library number from the table.
When you enter the correct number the component will turn o; press
[ENTER] to accept that code library number and exit the Library Mode.
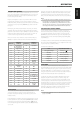
LIBRARY CODE
NAD PRODUCT
DESCRIPTION
LIBRARY CODE
NAD PRODUCT
DESCRIPTION
100
Receiver/Processor
(Discrete ON/OFF)
301 L75, L76 Tuner
101
Receiver/Processor
(Toggle ON/OFF)
302 L70 Tuner
102 S170 303 L53 Tuner
103 L75 304 L73 Tuner
104 Second Zone Commands 305 C425
105 L70 306 C445
106 L76 307 Txx5 Series Tuner
107 118 400 Tape Deck B
108 L53 401 TAPE Deck A
109 L73 500 TV 280
110
Stereo Receiver/
Amplier
501 MR13
111 Stereo Second Zone 502 MR20
112 Txx5 Series 503 PMR45
200 CD Player 600 T535, T562, T585, M55
201 CD Player (old) 601 T550, L55
202 5170, 5240, 5340 602
T512, T531, T532, T571,
T572
203 5325 603 L70, L73 DVD
204 5060 604 L56
205 M5 605
T513, T514, T515, T524,
T533, T534
300 Tuner 606 L53 DVD
SEARCH MODE
If none of the codes from the table, when entered, turns on the
component, and if you are quite sure you have followed the above
procedure completely and carefully, you may want to try the “search”
method as follows:
Enter Library Mode by simultaneously pressing-and-holding for 3 seconds
both the desired Device Selector key and the [PROGRAM] button until the
Learn LED turns green. Now press-and-hold the HTR 6’s [ ]) key; the
remote will step through all the available codes at a rate of approximately
1 per second.
When the component turns o, immediately release the cursor key; press
[ENTER] to accept that code-library and exit the Library Mode. Try a few
commands; should you prove to have stepped past the needed code-
library, re-enter the Library Mode and use the cursor key to step back to it.
NOTE
Itispossiblethatsearchmodewillndcode-librariesthatoperate,at
leastpartially,someotherbrand(non-NAD)components.Youmay
certainlyexploitsuchcapabilitiesasyoundthem.However,sincewe
canonlyensurethecompletenessoraccuracyofNADcode-libraries,we
cannotsupporttheHTR6’soperationwithother-brandcomponents.
CHECKING CODE-LIBRARY NUMBER
You can check the current code-library on any Device Selector key as
follows. Enter Library Mode by simultaneously pressing-and-holding for
3 seconds both the desired component’s Device Selector key and the
[PROGRAM] key until the Learn LED turns green. Press the [DISP] key; the
HTR 6 indicates the current code-library by ashing its [CUSTOM], [VCR],
and [MACRO] keys.
For example, to indicate code-library #501, the HTR 6 will ash [CUSTOM] 5
times, pause, and then ash [MACRO] once. You might wish to make a note
of your components’ code-library numbers.
Summary of the HTR 6 Modes
Mode Keys To Press (for 3 seconds)
Learn/Copy/Punch Through Device Key + [ ] Key
Delete Mode Device Key + RTN Key
Macro Record Macro Key + Function Key
Library Mode Device Key + Program Key
Back Light Timeout DISP Key + Digit Key
Factory Reset See “Factory Reset” above
SLEEP MODE
The Sleep Mode timer will switch the VISO TWO to Standby mode
automatically after a preset number of minutes. Pressing the HTR 6’s SLEEP
button once will display the setting of the sleep time increment. Pressing
the HTR 6’s SLEEP button a second time within a 3-second period will
change the sleep time increment in 30-minute intervals, after which time
the VISO TWO will automatically switch into Standby mode.
To adjust the sleep delay, press the HTR 6’s SLEEP button twice; rst to
display the sleep time increment, and a second time to change the
sleep time increment. The sleep time increment and a “SLEEP” icon will
continuously display on the VISO TWO’s front panel Vacuum Fluorescent
Display (VFD). Each consecutive press increases the sleep time in 30-minute
increments from 30 to 90 minutes. To cancel the sleep mode, continue
pressing the HTR 6’s SLEEP button until “Sleep O” displays on the VFD.
Switching the VISO TWO to standby from either the HTR 6’s OFF or the
VISO TWO’s POWER button will also cancel the sleep mode
NOTE
InordertouseSLEEPbutton,makesurethatHTR6’sDEVICESELECTOR
pageissetto“AMP”.
OPERATION
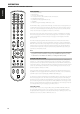
USING THE HTR 6 REMOTE CONTROL
31
ENGLISHFRANÇAISESPAÑOLITALIANODEUTSCHNEDERLANDSSVENSKAРУССКИЙ