GEQ Series Graphic Equalizers Owner’s Manual +12 +6 +3 0 -3 -6 -12 20 LOW CUT EQ +13 OFF 0 25 32 40 50 63 80 100 125 160 200 250 315 400 500 630 800 1K 1.25K 1.6K 2K 2.5K 3.15K 4K 5K 6.3K 8K 10K 12.5K 16K 20K -5 POWER +12 +6 +3 0 -3 -6 -12 +12 +6 +3 0 -3 -6 -12 +20 ON GEQ 131 31 BAND GRAPHIC EQUALIZER GAIN 25 +12 +6 +3 0 -3 -6 -12 40 63 100 160 250 400 630 1K 1.6K 2.5K 4K 6.
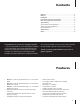
Contents Features........................................................................................ 2 Warning......................................................................................... 3 Installation..................................................................................... 4 Front Panel Controls & Connections......................................... 5 Rear Panel Controls & Connections.......................................... 6 Typical Set-Up...................................
Warning 1. . 3. 4. 5. 6. 7. 8. Read all instructions before using the product. Do not use this product near water (e.g., near a bathtub, washbowl, kitchen sink, in a wet basement, or near a swimming pool, etc.). This product should be used only with a cart or stand that will keep it level and stable and prevent wobbling. This product, in combination with headphones or speakers, may be capable of producing sound levels that could cause permanent hearing loss.
Installation INSTALLATION To ensure years of enjoyment from your NADY AUDIO graphic equalizer, please read and understand this manual thoroughly before using the unit. These three equalizer models are each designed for mounting in a standard 19” equipment rack or one of the many rack type portable cases available on the market. The units are either 1u single rack (1.75”) or 2u double rack (3.5”) as noted. All three models are 5 inches deep. Install the equalizer in a rack with rack screws (not included).
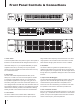
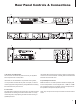
Front Panel Controls & Connections 2 3 4 5 1 6 2 3 4 2 5 6 1 6 1 3 4 5 1. Power Switch To turn the equalizer ON or OFF, press the upper or lower portion of this button. The internal LED indicator will light when the unit is on. stage rumble and low frequency resonance that can occur while using speakers in an enclosed acoustic environment. The LED status indicator will light yellow when the Low Cut is enabled.
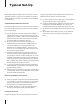
Rear Panel Controls & Connections 8 7 9 8 9 7 8 7 9 7. IEC Power Cord Receptacle This is used to connect the AC power source to your equalizer. Power requirements: 115VAC, 60Hz CAUTION: After checking the AC supply voltage, be sure that the correct fuse is in the fuse holder. A 20mm glass tube 500mA 250V fast-blow fuse should be used.
Typical Set-Up NADY AUDIO graphic equalizers may be used wherever modification of the frequency contour of a sound system is needed. A graphic equalizer is a solution to any number of sound problems or creative urges. engineer’s bag. NADY AUDIO equalizers offer the features and flexibility to perform where it counts in the studio. SOUND REINFORCEMENT APPLICATIONS B.
Specifications EQUALIZER: Equalizer Control Bands 1X31, 1/3 Octave ISO Spacing From 20Hz to 20KHz 2X31, 1/3 Octave ISO Spacing From 20Hz to 20KHz 2X15, 2/3 Octave ISO Spacing From 25Hz to 16KHz Filter Type Constant Q Slider Travel 20mm (Center Detent) for GEQ 131/215/231 Level Control Range +/-12dB INPUTS: Type Active Balanced/Unbalanced Connectors 3-Pin XLR, 1/4” TS (Balanced) Impedance 40K Ωs Balanced; 20K Ωs Unbalanced Maximum Level 28dBV OUTPUTS: Type Unbalanced THD + Noise <0.
Notes
Service For Your NADY AUDIO Product (U.S.) Should your NADY AUDIO product require service, please contact the NADY Service Department via telephone at (510) 652-2411, or e-mail at service@nady.com. (International) For service, please contact the NADY AUDIO distributor in your country through the dealer from whom you purchased this product. Do not attempt to service this unit yourself as it can be dangerous and will also void the warranty. NADY SYSTEMS, INC. 6701 Shellmound Street, .