PSS-300 Portable Sound System Owner’s Manual
CONTENTS INTRODUCTION................................................................................................................. 3 USING THIS MANUAL....................................................................................................... 3 SYSTEM FEATURES.......................................................................................................... 4 PSS-300 INSTALLATION...................................................................................................
INTRODUCTION Congratulations on your choice of a portable sound system — you have purchased one of the finest portable sound systems on the market today. This unit was developed using the expertise of professional sound engineers and working musicians. You will find that your new NADY AUDIO portable sound systems has superior performance and greater flexibility than any other portable sound systems in its price range. Please read this manual carefully to get the most out of your new unit.
SYSTEM FEATURES PSS-300 PORTABLE SOUND SYSTEM • • • • • • Ultra compact portable PA system with 2 speakers and detachable 8-channel powered mixer Lightweight (21 lbs) for easy transport and set up. Speakers are pole mountable on optional SPST-1A speaker stands (with included adapters). Mixer mic stand mountable (with included adapter).
INSTALLATION To ensure years of enjoyment from your NADY AUDIO PSS-300 Portable Sound System, please read and understand this manual thoroughly before using the unit. 1. INSPECTION Your NADY AUDIO PSS-300 Portable Sound System was carefully packed at the factory in packaging designed to protect the units in shipment. Before installing and using your unit, carefully examine the packaging and all contents for any signs of physical damage that may have occurred in transit.
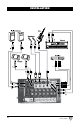
INSTALLATION Speakers and Stands If using the optional SPST-1A, fully extend the speaker stand tripod legs and tighten the base screw. Extend the pole of the stand to the desired height and insert the safety pin completely through the stand hole above the pole thumbscrew. Lower the pole so that the pin rests on the holder and tighten the pole thumbscrew. Attach the included speaker stands to the bottom of the speakers and tighten with included bolts until completely secure.
INSTALLATION 7 n a d y.
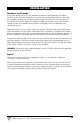
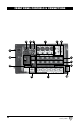
FRONT PANEL CONTROLS & CONNECTIONS 1. CHANNEL 1-4 XLR / ¼” INPUT - The XLR mic inputs are an electronically balanced XLR type designed to accept mic level signals from any balanced or unbalanced low impedance (Low Z) microphone. The XLR jacks are configured for: Pin1 = ground, Pin2 = positive (+), Pin3 = negative (-). The 1/4” mono line inputs are designed to accept unbalanced line level signals such as those from keyboards, drum machines, or samplers. 2.
FRONT PANEL CONTROLS & CONNECTIONS 13 12 11 2 1 3 17 15 16 8 14 6 9 8 9 5 10 4 7 18 n a d y.
SPECIFICATIONS OUTPUT POWER: 150W per side into 6 Ω load OVERLOAD PROTECTION AMA™: Servo system limits the power amplifier input to (Automatic Maximum Amplitude) prevent clipping distortion that can damage speakers FREQUENCY RESPONSE: 40Hz to 20KHz at 1 watt / 1meter TONE CONTROLS: Bass: 100 Hz ±10 dB; Treble: 10 KHz ±10 dB INPUT IMPEDANCE: Mic input: 2 K Ω, Line input: 12 K Ω MAX GAIN: 86 dB mic input to speaker output DISTORTION: Less than 0.
ONE YEAR LIMITED WARRANTY Nady Systems, Inc. warrants to the original consumer purchaser that the unit is free from any defects in material or workmanship for a period of one year from the date of original retail purchase. If any such defect is discovered within the warranty period, Nady Systems, Inc. will repair or replace the unit free of charge, subject to verification of the defect or malfunction upon return to Nady Systems.
Nady Systems, Inc • Emeryville,CA, USA • nady.