Manuel D’utilisation – Français LECTEURS CD CD555 • CDX • CD5 XS • CD5si
Sommaire Section Page Introduction FR1 1. Branchements FR1 2. Alimentation électrique FR1 3. Installation générale FR2 CD555 FR3 4. CD 555 Introduction et Installation FR3 5. Branchements CD555 FR4 6 CD555 Utilisation FR5 CDX2 FR6 7. CDX2 Introduction et Installation FR6 8. Branchements CDX2 FR6 9 CDX2 Utilisation FR7 CD5 XS FR8 10. CD5 XS Introduction et Installation FR8 11. Branchements CD5 XS FR8 12. CD5 XS Utilisation FR9 CD5si FR10 13.
Introduction La conception des produits Naim Audio vise en premier lieu les performances. Une installation minutieuse est nécessaire pour assurer la réalisation de tout leur potentiel. Ce manuel couvre les lecteurs de CD suivants : CD 555, CDX2, CD5 XS et CD5si, ainsi que leurs alimentations électriques associées ou de mise à niveau. Le manuel commence par des informations générales concernant l’installation et les avertissements réglementaires sur la sécurité.
3. Installation générale Le matériel Naim est conçu pour garantir les meilleures performances possibles en évitant tant que possible, tout compromis. Ceci peut donner lieu à des circonstances qui sont inattendues. Les notes ci-dessous contiennent des recommandations spécifiques au matériel Naim, ainsi que des avertissements plus généraux concernant l’utilisation des appareils audio domestiques. Veuillez les étudier attentivement.
CD555 4. CD 555 Introduction et Installation Le lecteur de CD Naim CD555 ne peut fonctionner qu’avec son alimentation associée Naim CD 555PS. Le schéma de branchement de l’alimentation est illustré en Section 5.2. Les commandes et le fonctionnement du lecteur de CD sont décrits aux Sections 16, 17 et 18. Le lecteur CD555 doit être installé sur un support de matériel dédié, prévu pour une telle utilisation.
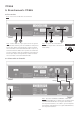
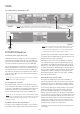
CD555 5. Branchements CD555 5.1 Face arrière Note : Les icônes sont décrites à la Section 19. Note : Les prises de sorties RCA et DIN ne doivent pas être connectées en même temps. Note : L’entrée RC5 est conçue pour recevoir les signaux de commande externes pour les installations multi-pièces. Pour de plus amples renseignements, veuillez contacter votre revendeur ou directement Naim Audio. La prise optionnelle d’interface RJ45 comm.
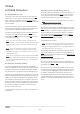
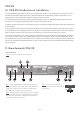
CD555 6 CD555 Utilisation 6.3 Remise à zéro et étalonnage du tiroir En cas de problème de fermeture ou d’ouverture du tiroir, ou en cas de clignotement du bouton door en face supérieure, il se peut que la porte ait besoin de remise à zéro et d’étalonnage. Les procédures à suivre sont les suivantes : 6.1 Chargement d’un CD Pour ouvrir le tiroir du lecteur, appuyer sur le bouton door sur le lecteur, ou sur le bouton open de la télécommande. Poser le disque sur le plateau, suivi du presse-cd magnétique.
CDX2 7. CDX2 Introduction et Installation Le lecteur de CD Naim CDX2 peut fonctionner avec son alimentation intégrée ou pour des performances supérieures, avec une alimentation externe Naim CD 555PS ou XPS. Le schéma de branchement de l’alimentation XPS est illustré en figure 11.2. Les commandes et le fonctionnement du lecteur de CD sont décrits aux Sections 16, 17 et 18. Le lecteur CDX2 doit être installé sur un support de matériel dédié, prévu pour une telle utilisation.
CDX2 8.2 CDX2 relié à l’alimentation XPS Note :En cas d’utilisation d’une alimentation CD 555PS avec un lecteur CDX2, utiliser uniquement la prise de sortie alimentation N° 1. Câble CD Burndy Note : En cas d’utilisation d’une alimentation externe avec le CDX2, ce dernier ne doit plus être relié directement au secteur. Il faut débrancher son cordon d’alimentation secteur avant de brancher l’alimentation externe.
CD5 XS 10. CD5 XS Introduction et Installation Le lecteur de CD Naim CD5 XS peut fonctionner avec son alimentation intégrée ou pour des performances supérieures, avec une alimentation externe Naim Flatcap ou Hi-Cap. Le schéma de branchement de l’alimentation est illustré en figure 14.2. Les commandes et le fonctionnement du lecteur de CD sont décrits aux Sections 16, 17 et 18. Le lecteur CD5 XS doit être installé sur un support de matériel dédié, prévu pour une telle utilisation.
CD5 XS 11.2 CD5 XS relié à l’alimentation Flatcap Note : Le Flatcap et le CD5 XS doivent tous deux être reliés au secteur et allumés. 12. CD5 XS Utilisation 240° 5 to 5 pin DIN 12.3 Mise à niveau de l’alimentation Une mise à niveau du CD5 XS est possible en y associant une alimentation externe Flatcap ou Hi-Cap.
CD5si 13. CD5si Introduction et Installation Le lecteur CD5si doit être installé sur un support de matériel dédié, prévu pour une telle utilisation. Eviter de placer le lecteur directement sur un autre appareil Naim Audio. Veiller à installer le lecteur bien de niveau. Une vis de transport située en-dessous du boîtier du CD5si doit être retirée avant d’utiliser l’appareil, et doit être remise en place en cas de déplacement ou d’emballage du lecteur pour expédition.
16. Commandes et fonctionnement des lecteurs de CD Le fonctionnement et les commandes de tous les lecteurs de CD Naim sont basés sur une interface utilisateur commune. Cette section du manuel décrit l’interface utilisateur, en identifiant les éventuelles différences entre les différents lecteurs Les boutons de commande des lecteurs de CD sont dupliqués sur les télécommandes, qui peuvent aussi fournir des fonctions complémentaires. La télécommande assure également des fonctions de programmation de CD.
17. Télécommande R-com La télécommande R-com est fournie d’origine avec le NAC 552 et le CD555 et peut être achetée comme accessoire optionnel. Elle permet de commander rapidement et de manière intuitive, les fonctions les plus souvent utilisées des lecteurs de CD, des préamplificateurs, des amplificateurs intégrés et des tuners Naim. Pour installer les piles, retirer le couvercle du bas au moyen de l’outil fourni, puis installer les piles à l’intérieur en respectant l’orientation.
18. Télécommande NARCOM 5 La télécommande NARCOM 5 est une télécommande multifonctions spécialement conçue pour les lecteurs CD, les tuners analogiques et les préamplificateurs (y compris les modèles intégrés) de Naim. Pour installer les piles, retirez le couvercle du compartiment à piles et insérez-les dans le compartiment en veillant à respecter la polarité. Remettez le couvercle en place. 18.1. Utilisation de NARCOM 5 18.
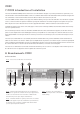
19. Icônes des schémas Interrupteur M/A Interface RS232 Signal analogique Signal de commande à distance RC5 Signal audio numérique S/PDIF Alimentation secteur CEI Bouton de sélection de prise DIN/Phono Connecteur 5 broches DIN 180° Connexion 555PS Marqueur de direction de câble Connexion 555PS en option Connexion XPS en option Connexion FlatCap ou Hi-Cap en option 20.
21.
Go Deeper 12-001-0034 Issue 8C Naim Audio Ltd. Southampton Road, Salisbury, England SP1 2LN Call. +44 (0) 1722 426600 Email. info@naimaudio.com naimaudio.