
User Guide

E11
n-Vi
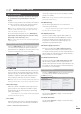
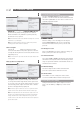
On Screen Setup
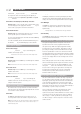
75% Colour Scale Test
Pattern
The display must be viewed
using a 47b blue separation
filter. Adjust the display’s
colour and tint/hue control
until the four large boxes (1, 2, 3 and 4) appear the same
shade of blue.
7.3.5 Lip Sync (Audio/Video delay)
DVD video and audio can sometimes appear to be a little out of
synchronisation.
Lip Sync
provides adjustment in 10mS steps
to compensate for any apparent error. Use the handset
3
key
to delay the audio and
4
key to delay the video.
Note:
The default value for lip sync is -10 which ensures correct
audio/video synchronisation on the DVI and BNC video outputs. For
correct synchronisation with interlaced video outputs (SCART and
S-Video) lip sync should be set to 0.
7.3.6 Aspect Ratio
Sets the player to output video appropriate to the display.
For 16:9 (widescreen) displays, non-widescreen programme
material will be accommodated by leaving a proportion of the
display either side of the picture unused. Widescreen material
on 4:3 (conventional) displays can be accommodated by
selecting either the
pan-scan
or
letter box
options. The
pan-
scan
option uses the full height of the display but dynamically
pans the material to ensure that the important information is
always displayed. The
letter box
option displays the material’s
full width but leaves a proportion of the display above and
below the picture unused.
7.3.7 Video Outputs Off
Enables unused video sockets to be selectively switched off
during playback. Switching off the video sockets will improve
sound quality of audio CD and DVD-A material.
Note:
All video outputs will operate when player is in stop mode or
when the OSD menu is displayed.
7.4 Progressive Scan Setup
Selection of
Progressive Scan Video Setup
from the top level
menu generates a second level menu described and illustrated
below.
The
Progressive Scan Output
menus enable selection of the
signal format to be output from the player’s
BNC
sockets.
The signals available from the BNC sockets provide improved
quality over the SCART and S-Video outputs.
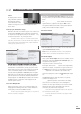
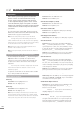
7.4.1 Colour Format
The
Colour Format
sub-menu enables selection of the video
signal
Colour Format
(RGB, YPbPr).
Note:
YPbPr is the appropriate selection for most programme
material. Video colour formats are explained in Section 10.
7.4.2 Picture Adjust
Three separate
Picture Adjust
sub-menus are available. One for
adjustment of the player’s
Progressive Scan RGB
output, one
for adjustment of the player’s
Progressive Scan
YPbPr (YUV)
output and one that is common to both.
Each signal channel of the
RGB
outputs can be independently
adjusted. For example, to emphasise red, green or blue tones
in an
RGB
picture boost the R, G or B channels respectively.
YPbPr
adjustment covers luminance and saturation only.
The picture adjustments common to
Progressive Scan
outputs
are
Vertical Offset
,
Horizontal Offset
and
YC Delay
.
The
Offset
adjustments enable the picture to be properly
centred in the display screen.
YC Delay
adjustment provides compensation for the timing
errors that can occur between the colour and brightness
elements of a video signal. YC Delay is best left at its default
adjustment unless picture abnormalities that cannot be
corrected by any other means are apparent.
Note:
Offset and YC Delay adjustment made from this menu will
also be reflected in the DVI output.
Note:
No picture adjustment is available on the player’s SCART
and S-Video outputs.
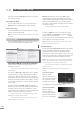
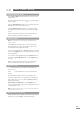
Sets the player to output video appropriate to the display.
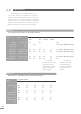
7.4.2 Picture Adjust
MENU
DVD playback
system setup
video setup
prog. scan setup
audio setup
speaker setup
parental control
exit menu
output format
black level
SCART settings
test patterns
lip sync
aspect ratio
video outputs off
4
16:9 widescreen
up/down to select
ok to confirm
left or return to go
back with no change
menu for help
4
4
5
6
The
Colour Format
sub-menu enables selection of the video
MENU
DVD playback
system setup
video setup
prog. scan setup
audio setup
speaker setup
parental control
exit menu
colour format
picture adjust
4
YPbPr
up/down to select
ok to confirm
left or return to go
back with no change
menu for help
4
4
5
6
!
!