
Installation Guide

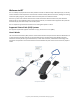
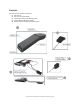

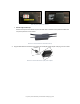
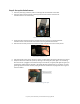
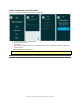

Table Of Contents

Proprietary and Confidential | IGT QuickStart Guide | Page 8 of 11
Step 2: Set up the Palm Scanner
1. Insert the power plug end of the power cord through the mounted base on the table.
2. Insert the power cord into the wall and the opposite end into the back of the scanner.
The device will turn on automatically.
Palm Scanner power cord connection
3. Loosen the mount screw (if necessary) and place the scanner face up on the mounted base.
The device screen and card reader insert needs to be facing towards the customer.
4. Place the scanner firmly in the base and twist the black screw into the mount to firmly secure.
Palm Scanner mounting screw
5. Push down gently on the scanner to see if it moves. If it does, tighten the screw a little more until secure.
6. Verify the electronics module has power by checking to see if the green power light is on and blinking.
Once the scanner is plugged in and communicating to the antenna, the green power light will light up on
the electronic module and start blinking. It will always be blinking when there is a connection. If a solid
green light appears and does not blink, unplug the antenna and scanner and plug them back in again to
restart the device.
Electronics module blinking power light