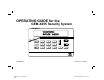
OPERATING GUIDE for the GEM-X255 Security System GEMINI SYSTEM ARMED 01/01/00 12:00 AM TUS STA ED ARM A 1 2 3 B 4 5 6 J E F C 7 8 9 0 G COMPUTERIZED SECURITY SYSTEM © NAPCO 2001 GEM-X255_OI273_USER.pub page 1 DESIGN PATS.
INTRODUCTION The GEM-RP1CAe2 is a “smart” user-friendly, menu-driven keypad designed for your Napco GEM-X255 control panel. The keypad is interactive. Its alphanumeric screen will not only display the status of your system, but will also give you step-by-step instructions to guide you through all operations. This booklet contains important information about the operation of your system with this GEM-RP1CAe2 Keypad. Read it carefully and keep it handy for future reference.
TABLE OF CONTENTS TABLE OF CONTENTS Section Page KEYPAD CONTROLS & INDICATORS............................................ 4 SETTING THE ALARM (ARMING) WHEN LEAVING....................... 6 PROTECTING YOURSELF WHILE ON THE PREMISES................ 8 TURNING OFF THE ALARM (DISARMING) WHEN RETURNING .. 10 TO SILENCE AN ALARM, ENTER YOUR CODE, AND PRESS J.
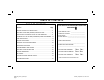
KEYPAD CONTROLS & INDICATORS 1 GEMINI 2 SYSTEM ARMED 01/01/00 12:00 AM 3 7 TUS STA ED ARM J 4 A 1 2 3 5 B 4 5 6 6 C 7 8 9 0 COMPUTERIZED SECURITY SYSTEM E F G 8 9 10 11 12 4 GEM-X255_OI273_USER.
KEYPAD CONTROLS & INDICATORS 1 Window. Displays system status 5 messages, zone descriptions, etc. 2 STATUS Light. Lights (green) to indicate that the system is ready 6 for arming. If a zone is not secured the light will be off and the zone will display in the window. If a zone has been bypassed, the STATUS light will blink while 7 armed. 8 3 4 ARMED Light. Lights (red) to indicate that the system is armed. If an alarm has occurred, the 9 ARMED LED will be flashing. FUNCTION Button.
SETTING THE ALARM (ARMING) WHEN LEAVING SYSTEM READY EXIT TIME 060 PLEASE LEAVE NOW Arming the System 1 Check the keypad. The green STATUS light must be on in order to arm. If the green light is off, “ZONES FAULTED” will display in the window followed by the number and description of each faulted zone. Note each problem zone and secure it by closing a window, door, etc. When all zones are secure, the green STATUS light will come on and the window will display “SYSTEM READY”. 2 Arm the system.
SETTING THE ALARM (ARMING) WHEN LEAVING SYSTEM TROUBLE SYS/TRBL SYS/TRBL SYS/TRBL LOW BATTERY E02- 00 SERVICE PRESS RESET KEY CAN’T ARM SYSTEM EXIT TIME 060 PLEASE LEAVE NOW System Trouble If you attempt to arm with a “SYSTEM TROUBLE” display alternating with an indicated trouble code (e.g. “E02-00” (low battery); see SYSTEM TROUBLE ERROR CODES), a 3-second tone will sound at the keypad. The window will display “PRESS RESET KEY, CAN'T ARM SYSTEM”.
PROTECTING YOURSELF WHILE ON THE PREMISES BYPASSED Bypassing Interior Zones SYSTEM READY Interior Zones, when bypassed, allow free movement within the home while the protection of armed perimeter zones is maintained. To bypass Interior Zones, press E and enter your User Code followed by D. Your system may have provisions for two groups of Interior Zones.
PROTECTING YOURSELF WHILE ON THE PREMISES Easy Exit (Optional - Easy Exit programmed? !YES !NO) Your system may have been programmed for Easy Exit, which allows a user to exit the premises while the system is armed. By activating Easy Exit while the system is armed, the Exit Delay countdown will take place, during which time you are permitted to leave through the exit door. The Easy Exit Delay time will be identical to the Exit Delay time the system gives you each time it is armed.
TURNING OFF THE ALARM (DISARMING) WHEN RETURNING ENTRY TIME XXX DISARM SYSTEM INVALID ENTRY TRY AGAIN Disarming the System 1 Enter your premises through the Entry/Exit door. The keypad will sound a steady tone to remind you to disarm the system before your Entry Delay time expires. 2 Enter your User Code and press D. The red ARMED light will go out, indicating that the system has been disarmed. • If you enter an invalid code, the keypad will beep 4 times, signifying an error.
FIRE PROTECTION (Applicable only where local ordinance permits use of this alarm control panel for fire protection.) FIRE FIRE ALARM Fire-Zone Alarm If a fire is detected, “FIRE ALARM” will be displayed and the keypad sounder will pulse. 1 If a fire is in progress, evacuate the premises immediately! If necessary, call the Fire Department from an outside phone. 2 Press the C button to silence the keypad sounder. 3 If there is no evidence of a fire, enter your User Code and press Jto turn off the alarm.
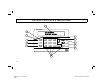
FIRE PROTECTION Preparing a Fire Escape Plan Even with the most advanced fire alarm system, adequate protection requires an escape plan. To prepare your plan, draw floor plans of your building. (Space is provided on the next page.) Show two exits - a front or back door and a window from each room. (Make sure the window works. You may need a special fire-escape ladder if the window is high up.) Write down your outside meeting place. Family Rehearsal. Rehearse each of the following activities: 1.
FIRE PROTECTION Floorplan Draw a plan of your premises in the space provided below. Floorplan 13 GEM-X255_OI273_USER.
FIRE PROTECTION LIMITATIONS OF FIRE ALARM WARNING SYSTEMS Although a fire alarm system may be of a reliable and state-of- the-art design, neither it nor its peripheral detection devices can offer guaranteed protection against fire. Any such equipment may fail to warn for a variety of reasons: Control panels, communicators, dialers, smoke detectors, and many other sensing devices will not work without power.
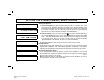
KEYPAD FUNCTIONS The keypad can provide access to a wide assortment of utility functions. The functions are displayed in a prompting “YES/NO” format. 1 To enter the Function Menu, press A. • In all UL-listed or high-security installations, a valid User Code must first be entered followed by A. 2 To skip a function, answer NO (F) or A. 3 To select and execute a function, answer YES (E) or J. • Functions may be manually scrolled forward or backward using A and B, respectively.
KEYPAD FUNCTIONS Y/N Activate Bell Test? Activates the alarm (while disarmed) for about 2 seconds and performs a battery test. If the alarm does not sound, call for service. • If the battery is low, a “LOW BATTERY E02-00 SERVICE” will appear in the display indicating a low battery condition. Allow 24 hours for the battery to recharge. If the trouble continues, call for service.
KEYPAD FUNCTIONS RESET SYS TRBL RESET SENSOR MSG Y/N Y/N Reset System Trouble? System troubles display and sound at the keypad. Correcting the trouble will clear most indications, however the following error codes will require manual reset: E13; E19; E20 and E22. (See SYSTEM TROUBLE ERROR CODES for a description of error codes.) Reset Sensor Watch Failure? (Sensor Watch programmed? !YES !NO).
KEYPAD FUNCTIONS ACTIVATE DIALER TEST Y/N TO ARM IN 1-4 HRS PRESS 1-4 /N Activate Telephone Test? (Telephone Test programmed? !YES !NO). Sends a communicator test to the central station. A communication failure will be indicated at the keypad by a system trouble “E03-FAIL TO COMM” display. Repeat the test to attempt to correct a communication failure, as any successful communication will clear this display. Delay Arming 1-4 hours. (Not for UL-listed systems.
KEYPAD FUNCTIONS ACTIVATE PROGRAM Y/N Activate Program? Activates the Program Mode from Keypad No. 1. Note: This feature is disabled while armed . (See PROGRAMMING USER CODES) ACTIVATE DOWNLOAD Y/N Activate Download? For installer's use only. If accidentally enabled, press to exit. Note: This feature is disabled while armed. Y/N Relay Control? (Relay Control programmed? !YES !NO). Turns ON or OFF one or more programmed Relay Groups.
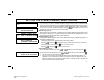
CENTRAL STATION MONITORING Your alarm specialist may have programmed your system to be monitored by a central station. The built-in digital communicator can transmit emergency signals and status reports to the central station 24 hours a day. armed. Any or all of up to 96 different users can each be identified. If your system reports on arming (Closing Report), the central station will acknowledge arming. This will signal at the keypad as a “ringback” beep.
ADVANCED FEATURES Security Bypass/Unbypass (Security Bypass programmed? !YES !NO). In high-security applications, zones may be bypassed (or unbypassed) only if a valid code is entered first, as follows: 1. Enter a User Code valid for bypass, then press B. The display will read * BYPASS ENABLED * 2. Press B then the zone number (or vice versa) to deactivate that zone. Similarly, a bypassed zone may be unbypassed using the same procedure.
PROGRAMMING (OPTIONAL) User Program Mode Your Installer has programmed into your system a special User Program Code which can be used to not only Arm and Disarm the system, but also to enter the User Program Mode, where you can program other User Codes, Zone Descriptions and also set the system Time and Date.
PROGRAMMING (OPTIONAL) Reviewing a Programmed User Code To review an existing User Code, enter the 2-digit user number and the corresponding User Code will display. Exiting the User Program Mode When you have completed programming or erasing User Codes, press C to exit the User Program Mode. Programming Example Program the User 30 Code to “3784”: 1 Enter your User Code, followed by A. 2 Answer NO (press F ) repeatedly until “ACTIVATE PROGRAM Y/N” is displayed, then press YES (E).
PROGRAMMING (OPTIONAL) Programming Zone Descriptions The zone descriptions which appear on the keypad display may be programmed in the User Program Mode. ACTIVATE PROGRAM Enter the User Program Mode 1 2 Y/N 001- FRONT DOOR Enter your User Code, then press A to enter the Function Mode. Answer NO (press F) until “ACTIVATE PROGRAM Y/N” is displayed, then press YES (E). “ENTER USER CODE” will display, press NEXT (E) and the keypad will display the Zone 1 Description.
PROGRAMMING (OPTIONAL) Programming the system Date and Time. The User Program Mode may also be used to set the system Date and Time which display on the keypad. ACTIVATE PROGRAM Enter the User Program Mod e Y/N 1 2 ENTER DATE 0 0/ 0 0/ 0 0 Enter your User Code, then press A to enter the Function Mode. Answer NO (press F) until “ACTIVATE PROGRAM Y/N” is displayed, then press YES (E). “ENTER USER CODE” will display, press NEXT (E) until the keypad displays the “Enter Date” screen.
KEYPAD MESSAGES The keypad can display the following functional messages. Other diagnostic messages are available for the installer or servicer. Should any unfamiliar message appear, call your dealer for service. SYSTEM READY (DATE) (TIME) C PLEASE WAIT FOR RINGBACK EXIT TIME XXX SI PLEASE LEAVE NOW All zones operating; system can be armed. If displayed, “C” denotes Chime Mode on. (Note: This message may have been customized by your installer.) Panel reporting to central station on arming.
KEYPAD MESSAGES ****ALARM**** Alarm condition, followed by zone description(s). “ALARM” and zones will display after system is disarmed. Note zones, then press C to clear keypad. ***FIRE TRBL*** (With pulsing sounder.) Trouble condition on a Fire Zone. Press C to silence sounder. Correct trouble or call for service. ***FIRE ALARM*** (With pulsing sounder.) Alarm condition on a Fire Zone. Press C to silence sounder. Evacuate premises or correct cause of alarm.
KEYPAD MESSAGES ATTEMPTING TO CANCEL The system is in the process of reporting a cancel signal to central station which will cancel the alarm which it has just reported. ALARM CANCELED The system has received an acknowledgment from central station of the cancellation of the alarm signal. **SYSTEM TRBL** Indicates problem(s) detected on system. (See examples below and SYSTEM TROUBLE ERROR CODES for a complete list of system troubles and corrective actions.
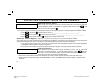
GLOSSARY Following are brief descriptions of terms and features used herein that may be unfamiliar to you. Some of the features are programmable options that may or may not apply to your particular system. Abort Delay - A delay period that allows the control panel to be reset, thus aborting a report to a central station. Access Code - A code (up to 6 digits) used to remotely unlock a door. Ambush Code - A 2-digit code entered just prior to the User Code when forced to disarm.
GLOSSARY INTERIOR Button - Bypasses Interior Zones on arming (see Zones Interior Zones). Instant Protection - Arming without entry delay using the F button while remaining on the premises. Keypad - Puts control-panel functions at your fingertips. It can be mounted anywhere in your premises. Manager's Mode - In a partitioned system, a low-security operating mode that allows arming by area. Panic Buttons - Blue buttons on the keypad (G and 7, 8 or 9).
GLOSSARY Zones - Independent circuits that protect specific areas of the premises: Auto-Bypass Zone: A zone that will be automatically bypassed from the protection system if it is in trouble (faulty) when the system is armed. Burglary Zone: Detects intrusion. Day Zone: A zone that will cause a visual and audible indication at the keypad if it is in trouble while disarmed. Exit/Entry Follower Zone: Provides exit and entry delay for interior devices.
SYSTEM TROUBLE ERROR CODES Your control panel is capable of detecting a variety of troubles that may affect system performance. In the unlikely event that a problem should occur, the SYS TBL (system trouble) icon will display on the left side of keypad window along with one or more of the following error codes. If the problem is related to a specific zone or device, the corresponding number will also be indicated.
SYSTEM TROUBLE ERROR CODES Trouble Indication System Trouble Condition Action E04-NNN Wireless Transmitter Supervisory Failure A problem has been detected with a wireless transmitter. Call installing company for service E05-NNN Wireless Transmitter Low Battery The battery in a wireless transmitter is low and should be replaced. This transmitter is on the zone corresponding to the number NNN.
SYSTEM TROUBLE ERROR CODES Trouble Indication System Trouble Condition Action E10-NN Keypad Response Failure Call installing company for service. E11-NN Keypad Tamper A keypad has been removed from the wall. Call installing company for service if problem cannot be repaired. E12-NN Expansion Zone Module Response Failure Call installing company for service. E13-NN Expansion Module Tamper The cover has been removed from a zone expansion module.
SYSTEM TROUBLE ERROR CODES Trouble Indication System Trouble Condition Action E19-00 User Program Memory Call installing company for service. E20-00 Dealer Program Memory Call installing company for service. E21-00 System Shutdown Call installing company for service. E22-NNN Sensor Watch Activity Failure A Motion Sensor on the zone indicated has failed the programmed Sensor Watch activity test.
SYSTEM TROUBLE ERROR CODES Trouble Indication System Trouble Condition Action E40-00 RF Self Test Failure A wireless motion sensor on the zone indicated has failed its automatic self test routine. Call installing company for service. E41-NNN Fire Trouble A problem has been detected on the Fire zone indicated. Call installing company for service. E51-00 Bell/Siren Trouble There is a problem with the Bell or Siren. Call installing company for service.
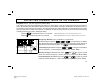
TROUBLESHOOTING What do I do if... For more info... I try to arm my system but the keypad just displays “ZONES NOT NORMAL” and “CAN’T ARM SYSTEM” and beeps at me. If the green STATUS light is off, a zone is open. Find and secure the open window or door. See Page 6 I try to arm my system but the keypad displays “SYSTEM TROUBLE” and beeps at me. The Error Codes numbers are displayed. See Page 7 & 28 A System Trouble has been detected. Note the scrolling error codes, which represent the trouble.
NOTES 38 GEM-X255_OI273_USER.
NOTES 39 GEM-X255_OI273_USER.
NAPCO LIMITED WARRANTY NAPCO SECURITY SYSTEMS, INC. (NAPCO) warrants its products to be free from manufacturing defects in materials and workmanship for thirty-six months following the date of manufacture. NAPCO will, within said period, at its option, repair or replace any product failing to operate correctly without charge to the original purchaser or user.