
Technical Manual


12 All technical manuals are available in PDF format at tech.napcosecurity.com Napco iSecure Security System
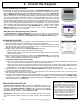
SELECT MOUNTING LOCATION
Keypad installation is basically identical for all models. The ISEC-WL-KEYPAD (in Kit 1) is bat-
tery powered, requiring one CR123 Lithium battery (with optional 2
nd
battery for extended life).
Both the ISEC-WL-TOUCH 4.3" Color Touchscreen Keypad (in Kit 2) and the IBR-TOUCH-
WL 7" Wireless IoT Touchscreen (in Kit 3) require an un-switched 120VAC electrical wall
outlet to supply power to the 12V@1A power adapter (select a location that allows the power
wires to be hidden within the mounting surface). Mount keypads within easy reach of the exit/
entry door(s) to simplify entry or exit. To ensure a constant wireless connection, mount the
keypad between approximately 15 and 100 feet of the Go-Anywhere Smart Hub, where you
find good signal strength between the keypad and the Go-Anywhere Hub. Mount the keypad
indoors only, avoiding high condensation areas such as bathrooms. Avoid mounting where
direct sunlight or bright light shines directly on the display screen. Install in indoor locations
only. Environmental temperature limits: ISEC-WL-KEYPAD LCD keypad: 32°F to 122°F.
ISEC-WL-TOUCH 4.3" Color Touchscreen Keypad: -10°F to 140°F. IBR-TOUCH-WL 7"
Wireless IoT Touchscreen: 32°F TO 122°F.
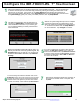
ISEC-WL-TOUCH Keypad Diagnostics (Optional)
See ISEC-WL-TOUCH "System Diagnostics" on page 65 to help you find the optimum
mounting location for your ISEC-WL-TOUCH keypad by displaying the signal strength of the
900MHz radio signal link between the Go-Anywhere Hub and the ISEC-WL-TOUCH keypad.
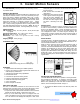
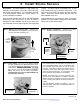
KEYPAD INSTALLATION
1. Detach the keypad rear case by inserting a flat head screwdriver into the two slots at the
bottom, then push and turn the screwdriver to unhook the two plastic tabs.
2. At the final mounting location, use the keypad rear case as a template to mark the mounting
holes (always use a level to ensure horizontal mounting). For keypads powered by the wall
adapter, mark the center hole for the power wire.
3. Install the Sliding Label Plate (Kit 1 ISEC-WL-KEYPAD model only):
With the handle facing forward, affix the label and felt backing.
With the handle facing forward, push the Plate down the guides at the rear of the keypad
until it snaps into place.
4. Drill the two keypad mounting holes (four holes with the IBR-TOUCH-WL) in the mounting
surface. When mounting to hollow drywall or similar surface, we recommend using wall
anchors or similar hardware appropriate for the installation.
For keypads powered by the power adapter:
Using a 1/2" drill bit, drill the center hole and snake the power wire inside the wall and out through the drilled center
hole. Do not connect the power adapter to the electrical wall outlet at this time.
Firmly connect the power wire connectors and then push the wire and the connectors back into the drilled wall center
hole until the rear case is flat against the wall surface. Insert screws through the rear case mounting holes and secure.
Important: Do not over-tighten the mounting screws; over-tightening may distort the rear case.
5. Power the keypad: For the battery-powered ISEC-WL-KEYPAD, insert battery (provided) into 1 of the 2 battery hold-
ers; otherwise, power up the power adapter.
6. Assemble the keypad by placing the top edge of the keypad front case over the two hooks at the top of the rear case.
Push the bottom of the keypad until it snaps together.
7. Power the Go-Anywhere Hub and test the keypad signal strength: The system will not allow arming and disarming without
a valid Wi-Fi link. Test the keypad by arming STAY (press 1 2 3 STAY, and the keypad display will read ARMED STAY)
and disarming (press 1 2 3 ENTER, and the keypad display will read READY). Note: The keypad factory default User
Code is 1 2 3; this can be changed later.
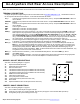
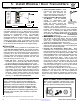
ADD AN ADDITIONAL KEYPAD
Program the Go-Anywhere Hub by entering the " RF ID #" (printed on the
sticker to located on the back of the keypad) into the iSecure Cloud Web Portal,
as follows: Click Wireless Modules > Keypads, then complete all of the fields
for each additional keypad. When finished, click Save and click Upload/
Download to send the data to your Go-Anywhere Hub.
IMPORTANT: All wireless devices, including Z-Wave devices, must be sig-
nal tested with all enclosure covers fully closed, including the Go-Anywhere
Hub.
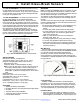
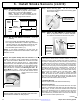
2. Install the Keypad
ISEC-WL-KEYPAD
Wireless Battery-Operated
Standard Keypad
ISEC-WL-TOUCH
Wireless 900MHz
Touchscreen
IBR-TOUCH-WL
Smart 7" IoT Touchscreen
(Requires network connection)
.
.
IM PO R T AN T: The ISEC-WL-TOUCH
LCD display is made of glass, therefore
avoid excessive mechanical shock or that
application of strong pressure on the LCD
surface. In addition, the polarizer used on
the LCD surface can be scratched if proper
care is not taken. To clean dust or dirt,
wipe gently with a lint-free cloth that is
damp with isopropyl or ethyl alcohol only.
Do NOT use water, ketone or aromatics
and never scrub the surface!