
Technical Manual


14 All technical manuals are available in PDF format at tech.napcosecurity.com Napco iSecure Security System
Configure the IBR-TOUCH-WL (cont'd)
8
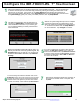
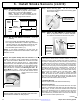
As shown in the image below, the system will then
automatically try to connect the IBR-TOUCH-WL
locally through Wi-Fi, provided the Hub is con-
nected either by the wired Ethernet connection or
the Wi-Fi connection. When connected, tap Next.
If you selected Keypad Only, jump to step 11.
11
If you selected Keypad Only in step 7, the virtual
security system keypad will appear (shown be-
low). Stop here -- you're finished!
If you selected Full Functionality, you're almost
finished...go to next step...
9
The IBR-TOUCH-WL will automatically attempt to
connect, through the "cloud", to the NAPCO iSe-
cure account. Enter your administrator account
User ID and Password and tap Finish.
10
Upon connection to the Internet-based ac-
count for the iSecure system, the resulting
keypad shown in step 12 will be configured
for the payment plan selected by the custom-
er. For example, smart phone notifications
and camera video.
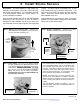
12
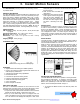
Be sure to verify the touchscreen display reflects the current status of the security Hub. Note: The red text at
the bottom right describes the connections. In this example, the IBR-TOUCH-WL is connected to the Go-
Anywhere Smart Hub through its Wi-Fi connection.