This gas grill must be used only outdoors in a well-ventilated space and must not be used inside a building, garage, screened-in porch, gazebo or any other enclosed area. EN APPLY SERIAL NUMBER LABEL FROM CARTON Serial No. XXXXXX000000 MODEL NO. FR PG.15 PG.29 DO NOT DISCARD BISZ300 INFRARED BISB245 SIDE BURNER DANGER IF YOU SMELL GAS: • Shut off gas to the appliance. • Extinguish any open flame. • Open lid.
Quality System Certified To EN 9001-2008 All NAPOLEON gas grills are manufactured under the strict Standard of the world recognized ISO 9001-2008 Quality Assurance Certificate. NAPOLEON products are designed with superior components and materials, and are assembled by trained craftsmen who take great pride in their work. The burner and valve assembly are leak tested and test-fired at a quality test station.
WARNING! Failure to follow these instructions could result in property damage, personal injury or death. Read and follow all warnings and instructions in this manual prior to operating grill. Safe Operating Practices • • • • • • • • • • • • • • • • • • • • • • • • • • • • • • • • • • This gas grill must be assembled exactly according to the instructions in the manual.
EN General Information This gas barbecue is CERTIFIED UNDER CANADIAN AND AMERICAN NATIONAL STANDARDS, CSA 1.6a-2006 AND ANSI Z21.58a -2006 RESPECTIVELY FOR outdoor gas grills and should be installed TO CONFORM WITH LOCAL CODES. In the absence of local codes, the installation must conform with either ANSI Z223.1 / NFPA 54, Natural Gas and Propane Installation code, CSA B149.1 or Propane Storage and Handling Code, B149.2.
Propane Enclosure OPENING A EN 5” (127 mm) MAXIMUM OPENING B 34” (864 mm) RECOMMENDED 5” (127 mm) MAXIMUM 1” (25.4 mm) MAXIMUM 2” (51 mm) MINIMUM PARTITION TO ISOLATE CYLINDER FROM GRILL NON LOCKING DOOR CYLINDER SIZE OPENING A AREA OPENING B AREA 20 lb (9.1 kg) 20 in (130 cm ) 10 in2 (65 cm2) 30 lb (13.
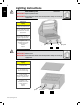
Lighting Instructions EN BISZ300NSS/PSS Off Position WARNING! Open lid / Remove Cover WARNING! Ensure all burner controls are in the off position. Slowly turn on the gas supply valve. Main Burner Lighting 1. Open lid / Remove Cover 2. Turn either left or right infrared burner control to high position. 3. Press and hold igniter button until burner lights, or light by match. 4. If ignition is not immediate, turn burner control off. Wait 5 minutes. Repeat.
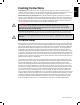
Cooking Instructions Initial Lighting: When lit for the first time, the gas grill emits a slight odor. This is a normal temporary condition caused by the “burn-in” of internal paints and lubricants used in the manufacturing process and does not occur again. Simply run the main burners on high for approximately one-half hour. Infrared Main Burner Use (If Equipped): Follow the Infrared Burner Ignition procedures and operate on high for 5 minutes with the lid closed or until the ceramic burners glow red.
EN Infrared Grilling Chart Food Control Setting Cooking Time Helpful Suggestions Steak 1 in. (2.54cm) thick High setting 2 min. each side. 4 min. – Rare High setting 2 min. each side then medium setting. 6 min. – Medium High setting 2 min. each side then medium setting. 8 min. – Well done When selecting meat for grilling, ask for marbled fat distribution. The fat acts as a natural tenderizer while cooking and keeps it moist and juicy. High setting 2 min. each side. 4 min.
Cleaning Instructions Warning! Always wear protective gloves and safety glasses when servicing your grill. Warning! To avoid the possibility of burns, maintenance should be done only when the grill is cool. Avoid unprotected contact with hot surfaces. Ensure all burners are turned off. Clean grill in an area where cleaning solutions will not harm decks, lawns, or patios. Do not use oven cleaner to clean any part of this gas grill.
EN Maintenance Instructions We recommend this gas grill be thoroughly inspected and serviced annually by a qualified service person. At all times keep the gas grill area free from combustible materials, gasoline and other flammable vapors and liquids. Do not obstruct the flow of ventilation and combustion air. Keep the cylinder enclosure ventilation openings (located on the cart sides and at the front and back of the bottom shelf) free and clear from debris.
CAUTION! Beware of Spiders Spiders and insects are attracted to the smell of propane and natural gas. The nest or web will cause the burner to burn with a soft yellow or orange flame or cause a fire (flashback) at the air shutter beneath the control panel. To clean the inside of the burner, remove the cap and use a soft wire brush to remove any debris from the burner ports. Do not enlarge the ports.
EN Troubleshooting Problem Possible Causes Low heat / Low flame For propane - improper lighting when valve turned procedure. to high. Solution Ensure lighting procedure is followed carefully. All gas grill valves must be in the off position when the tank valve is turned on. Turn tank on slowly to allow pressure to equalize. See lighting instructions. For natural gas - undersized supply line. Pipe must be sized according to installation code. For both gases - improper preheating.
Problem Possible Causes Solution Infrared burner flashes back (during operation the burner abruptly makes a loud “whoosh” sound, followed by a continuous blowtorch type sound and grows dim.) Ceramic tiles overloaded with grease drippings and build-up. Ports are clogged. Turn burner off and allow to cool for at least two minutes. Relight burner and burn on high for at least five minutes or until the ceramic tiles are evenly glowing red.
KEEP YOUR RECEIPT AS PROOF OF PURCHASE TO VALIDATE YOUR WARRANTY. EN Ordering Replacement Parts Warranty Information MODEL: DATE OF PURCHASE: SERIAL NUMBER: (Record information here for easy reference) Before contacting the Customer Solutions Department, check the Napoleon Grills Website for more extensive cleaning, maintenance, troubleshooting and parts replacement instructions at www.napoleongrills.com. Contact the factory directly for replacement parts and warranty claims.
Ce gril doit être utilisé uniquement à l’extérieur, dans un endroit bien aéré et ne doit jamais être utilisé à l’intérieur d’un bâtiment, d’un garage, un gazebo, une véranda avec paramoustique, ou de tout autre endroit fermé. APPOSEZ LÉTIQUETTE DU NUMERO DE SERIE DU CARTON NO de série XXXXXX000000 NO DE MODÈLE FREN NE PAS JETER BISZ300 INFRARED BISB245 SIDE BURNER DANGER SI VOUS DÉTECTEZ UNE ODEUR DE GAZ : • Fermez l’alimentation en gaz à l’appareil. • Éteignez toute flamme nue.
Système de qualité certifiè 9001-2008 Les grils à gaz NAPOLÉON sont fabriqués conformément aux normes strictes du Certificat d’assurance de qualité mondialement reconnues ISO 9001-2008. Les produits NAPOLÉON sont conçus avec des composantes et des matériaux de qualité supérieure, assemblés par des artisans qualifiés qui sont fiers de leur travail.
AVERTISSEMENT! Si ces instructions ne sont pas suivies, des dommages matériels, des blessures corporelles ou des pertes de vie pourraient s’ensuivre. Lisez et respectez tous les avertissements et les instructions de ce manuel avant de faire fonctionner le gril. Pratiques Sécuritaires D’utilisation • • • • • • • • • • • • • • • • • • • • • • • • • • • • • • • • • • Ce gril à gaz doit être assemblé conformément aux instructions du manuel.
FR Information Générale CE GRIL À GAZ EST CERTIFIÉ SELON LES NORMES NATIONALES CANADIENNES ET AMÉRICAINES, CSA 1.6a2006 AND ANSI Z21.58a - 2006 RESPECTIVEMENT POUR DES GRILS À GAZ POUR L’EXTÉRIEUR ET SON INSTALLATION DEVRAIT ÊTRE CONFORME AUX CODES LOCAUX. En l’absence de codes locaux, installez selon les normes courantes CAN1-B149.1 du code d’installation de Propane au Canada, ou B149.2 code sur le stockage et la manipulation du propane, ou selon les normes ANSI Z223.
Propane enceinte OUVERTURE A 5” (127 mm) MAXIMUM OUVERTURE B 34” (864 mm) RECOMMANDÉS 5” (127 mm) MAXIMUM 1” (25.4 mm) MAXIMUM 2” (51 mm) MINIMUM FREN LA PARTITION DOIT ISOLER LE CYLINDRE DU GRIL PORTE NON VERROUILLABLE GRANDEUR DU CYLINDRE OUVERTURE A OUVERTURE B 20 lb (9.1 kg) 20 in2 (130 cm2) 10 in2 (65 cm2) 30 lb (13.
Instruction D’allumage BISZ300NSS/PSS Fermez AVERTISSEMENT! Ouvrez le couvercle / Retirez le couvercle AVERTISSEMENT! Fermez tous les boutons de contrôle des brûleurs, ouvrez la soupape d’alimentation en gaz lentement. FR Allumage du brûleur principal. 1. Ouvrez le couvercle / Retirez le couvercle 2. Tournez le bouton du brûleur infrarouge sur “high”. 3. Poussez et tenir la bouton d’allumeur ou allumez avec une allumette. 4.
Instructions D’opération 21 Éclairage initial: Lorsqu’il est allumé pour la première fois, le gril dégagera une légère odeur. Ceci est un phénomène normal et temporaire causé par l’évaporation des peintures et lubrifiants internes utilisés dans le processus de fabrication et ne se reproduira plus. Allumez simplement les brûleurs de cuve à “high” pendant une demi-heure.
Tableau de cuisson à l’infrarouge FR Aliment Réglage Des Contrôles Temps De Cuisson Conseils Pratiques Steak 1” (2.54cm) d’épaisseur Réglage à “high” 2 min chaque côté 4 min - Saignant Réglage à “high” 2 min chaque côté ensuite réglage à “medium” 6 min - À point Lorsque vous choisissez votre viande, demandez une viande qui est marbrée. Le gras de la viande agira comme un élément attendrissant durant la cuisson et gardera la viande plus juteuse.
Nettoyage AVERTISSEMENT! Portez toujours des gants protecteurs et des lunettes de sécurité lorsque vous l’entretien votre gril. AVERTISSEMENT! Assurez-vous que les brûleurs sont éteints avant de nettoyer. Éviter tout contact avec les surfaces chaudes. Nettoyez votre gril dans un endroit où les produits de nettoyage n’endommageront pas votre patio, terrain ou terrasse. N’utilisez pas de produit de nettoyage à fourneau pour nettoyer votre gril.
Instructions D’entretien Nous vous conseillons de faire inspecter ce gril à gaz annuellement par un technicien de service qualifié. L’emplacement du gril à gaz doit être gardé libre de tous matériaux combustibles, essence ou autres liquides et vapeurs inflammables en tout temps. Les apports d’air comburant et d’air de ventilation ne doivent pas être obstrués.
ATTENTION! Aux araignées Les araignées et les insectes sont attirés par l’odeur du propane et du gaz naturel. Le nid ou la toile causera le brûleur à produire une flamme lâche de couleur jaune ou orange. Pour nettoyer l’intérieur du brûleur, retirez le capuchon et utilisez une brosse à filaments souples pour retirer les débris des orifices du brûleur. N’agrandissez pas les orifices. Les capuchons du brûleur sont en porcelaine émaillée et peuvent être nettoyés avec de l’eau savonneuse chaude.
Guide De Dépannage Problème Causes Possibles Solution Chaleur faible / Flamme petite lorsque le bouton de contrôle est sur “high”. Pour le propane - procédure d’allumage incorrect. Assurez-vous que la procédure d’allumage est suivie à la lettre. Tous les boutons de contrôle du gril doivent être fermés lorsque vous ouvrez la soupape d’arrivée de gaz à la bonbonne ce qui devrait être fait lentement pour assurer l’équilibre de la pression. Voir les instructions d’allumage.
Problème Causes Possibles Solution Le brûleur infrarouge produit des retours de flamme (pendant qu’il fonctionne, le brûleur fait subitement un bruit qui s’apparente à un “whoosh”, suivi d’un bruit continuel semblable à une lampe à souder et qui diminue en intensit Les tuiles de céramique sont surchargées de graisse de cuisson et d’accumulations, les orifices sont obstrués. Fermez le brûleur et laissez-le refroidir pendant au moins deux minutes.
GARDEZ VOTRE REÇU COMME PREUVE D’ACHAT POUR VALIDER VOTRE Commande De Pièces De Rechange Information Sur La Garantie MODÈLE: FR DATE D’ACHAT: NUMÉRO DE SÉRIE: (Inscrivez l’information ici pour y avoir accès facilement.) Avant de contacter le département du service aux consommateurs, consultez le site Web de Napoleon Grills pour obtenir plus d’instructions sur le nettoyage, l’entretien, le dépannage et le remplacement des pièces à www.napoleongrills.com.
Caution! During unpacking and assembly we recommended you wear work gloves and safety glasses for your protection. Although we make every effort to make the assembly process as problem free and safe as possible, it is characteristic of fabricated steel parts that the edges and corners might be sharp and could cause cuts if handled incorrectly. WARNING! Construction materials and masonry dust may cause surface damage to units and accessories.
Built-In Unit Opening Dimensions Dimensions D’ouverture Pour Les Grils Encastrés OPENING DIMENSIONS/DIMENSIONS DE L’OUVERTURE MODEL/MODÈLE W D H BISZ300 20 1/8” (511mm) 20 5/8” (524mm) 9 5/8” (244mm) BISB245 20 1/8” (511mm) 20 5/8” (524mm) 8 7/8” (225mm) BUILT-IN SIDEBURNER BRÛLEUR LATÉRAL ENCASTRÉ OUTDOOR GFI ELECTRICAL OUTLET RECOMMENDED - LOCATE ON SAME SIDE OF GRILL AS ROTISSERIE BRACKET.
Built-In Accessory Opening Dimensions Dimensions D’ouverture Pour Les Accessoires Note! Accessory frames overlap opening by 1 ¾” on all 4 sides. NOTE! Le cadre des accessories chevaluche l’ouverture de 1 ¾” sur les quatre côté.
BISZ300 2 x N305-0079 BISZ300 1 x N305-0071 BISB245 BISZ300FT / BISB245 2 x N570-0066 www.napoleongrills.
This grill is designed for masonry, non-combustible enclosures only, and must be installed and serviced by a qualified installer to local codes. 1. Attach side mounting brackets to each side of the grill using #14 x 1/2” screws (N570-0086). 2. Lay the rear trim piece across the back of the opening. To keep it in place, a dab of silicone may be applied to each wing of the rear trim. 3. Lower the unit in place. A flexible metal connector is included to simplify the installation of the unit.
Parts List / Liste Des Pièces Item Part # Description 1 2 N135-0040G N385-0129 N450-0044 N510-0002 N010-0486 N325-0058 N135-0041G N570-0015 N735-0002 N570-0024 N570-0008 N520-0032 N305-0079 N655-0065 N010-0499 N565-0002 N240-0025 N750-0005 N200-0070 N051-0007 N380-0022-RD N630-0003 N357-0014 N432-0017 N725-0009 N725-0010 N455-0007 N455-0008 N255-0016 N720-0044 N010-0541 N200-0084 N475-0208 N010-0622 N385-0140 N010-0486 N080-0213 N570-0086 N715-0078 N200-0087 N325-0042 N570-0066 N010-0281 W445-0031
BISZ300SS/FT 35 www.napoleongrills.
Parts List / Liste Des Pièces Item Part # Description BISB245 1 N325-0042 handle cover / poignée de couverture x 2 N200-0117 cover grill / gril de couverture x 3 N570-0066 M4 x 6mm screw / vis M4 x 6mm x 4 N305-0071 side burner grate / grille du brûleur latéral x 5 N100-0031 burner, assembly, side burner / brûleur latéral p N100-0030 burner, assembly, side burner / brûleur latéral n N720-0049 tube, side burner supply stainless steel / tube, brûleur latéral en acier inoxydable
BISB245 37 www.napoleongrills.
Notes www.napoleongrills.
Notes 39 www.napoleongrills.
N415-0207