
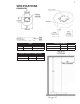
Specifications Sheet


6
www.napoleonreplaces.com
INSTALLATION
WARNING! When the appliance is being used with the oponal tripod, it must not be situated on a
combusble surface, nor can it be located below a combusble overhang.
The glass embers and the burner assembly are shipped together.
• Remove the glass embers and burner assembly and check for damage. DO NOT install damaged compo
nents.
The glass embers may have sharp edges, wear safety glasses and gloves when handling.
• Place the appliance on a level/secure surface in desired locaon. This locaon must be adjacent to the
gas supply line or cylinder.
NOTE: Minimum clearances to combusble construcon must be maintained, see "SPECIFICATIONS" secon.
WARNING! You must have clear and easy access to the on/o valve AFTER the appliance is installed
and connected to the gas supply in order to safely turn o the burner.
THE ON/OFF GAS VALVE IS USED TO TURN THE BURNER ON AND OFF.
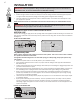
NATURAL GAS
Connect the incoming gas supply line to the on/o gas valve of the appliance. Make certain ALL gas connecons are
ght, turn the on/o valve at the unit slowly to the on posion and use soapy water to test for leaks as indicated in
the diagrams.
DO NOT USE AN OPEN FLAME.
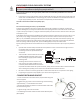
LP (PROPANE) GAS
Aach cylinder retaining bracket supplied to the base of the cylinder. Then secure to the surface to which it
sits. Cylinder should be on a level surface.
This appliance has been designed for use with a 20lb. (9.1kg) or a 30lb (13.6kg) size propane cylinder only
(not supplied).
• Make sure cylinder valve is in its full o posion. (Turn clockwise to stop).
• Check cylinder valve features to ensure it has proper external mang threads. (Cylinder Valve Marked:
USE
WITH TYPE 1)
• Inspect hose shipped with the unit for damage. Never aempt to use damaged or plugged equipment. See
your local LP Gas Dealer for repairs.
• Aer inspecng the LP hose shipped with the unit, connect the end with the female ng on the hose to
the male ng on the on/o gas valve at the end of the ex tube. Tighten ngs using 2 wrenches.
• When connecng regulator assembly to the cylinder valve, hand ghten black QCC1 nut clockwise to a
posive stop. DO NOT use a wrench to ghten. Use of a wrench may damage the quick closing coupling
nut and result in a hazardous condion.
• Locate the hose out of pathways where people may trip over it or in areas where the hose may be subject
to accidental damage.
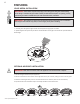
• Open cylinder valve fully (counter-clockwise). Turn the on/o valve at the unit slowly to the on posion
and use a soapy water soluon to check all connecons for leaks as indicated in the diagrams before
aempng to light the appliance. If a leak is found, turn tank valve o and do not use the appliance unl
repairs can be made.
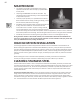
Manual Gas
Valve (on/off)
Burner Assembly
Manual Gas
Valve (on/off)
Burner Assembly
Cylinder Retaining
Bracket
DO NOT USE AN OPEN FLAME.