This gas grill must be used only outdoors in a well-ventilated space and must not be used inside a building, garage, screened-in porch, gazebo or any other enclosed area. EN APPLY SERIAL NUMBER LABEL FROM CARTON Serial No. XXXXXX000000 MODEL NO. FR PG.15 DO NOT DISCARD PG.29 LD485/LD485RSIB STOP DO NOT RETURN TO PLACE OF PURCHASE. PLEASE CONTACT 1-866-820-8686 FOR ASSISTANCE. WE CAN HELP WITH DAMAGED OR MISSING PARTS, ASSEMBLY AND OPERATION QUESTIONS.
EN THANK YOU FOR CHOOSING NAPOLEON NAPOLEON products are designed with superior components and materials, and are assembled by trained craftsmen who take great pride in their work. The burner and valve assembly are leak tested and test-fired at a quality test station. This grill has been thoroughly inspected by a qualified technician before packaging and shipping to ensure that you, the customer, receive the quality product you expect from NAPOLEON.
WARNING! Failure to follow these instructions could result in property damage, personal injury or death. Read and follow all warnings and instructions in this manual prior to operating grill. Safe Operating Practices • • • • • • • • • • • • • • • • • • • • • • • • • • • • • • • • • • • • • This gas grill must be assembled exactly according to the instructions in the manual.
EN Cylinder Specification/Gas Hook Up This gas barbecue is certified under Canadian and American National Standards, CAN/CSA 1.6 – 2005 and ANSIZ21.58 -2005 respectively for outdoor gas grills and should be installed to conform with local codes. In absence of local codes, install to the current CAN/CGA-B149.1 Propane Installation Code in Canada or to the National Fuel Gas Code, NFPA54/ANSI Z223.1 in the United States.
Natural Gas Hook-Up This natural gas grill is supplied with a 10ft supply hose (complete with a quick disconnect) designed for natural gas and certified for outdoor use. The gas grill is designed to operate at an inlet pressure of 7 inches water column. Piping and valves upstream of the quick disconnect are not supplied. The installation must comply with CAN B149.1 Natural Gas and Propane installation code in Canada, or to the National Fuel Gas Code, ANSI Z223.1 in the United States.
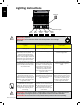
Lighting Instructions EN Side Burner Side Burner Igniter Left Burner Rear Burner Left Centre Right Centre Burner Burner Right Burner Off Position WARNING! Open lid. WARNING! Ensure all burner controls are in the off position. Turn on the gas supply valve. Main Burner Lighting Rear Burner Lighting (Rotisserie Burner) (if equipped) Side Burner Lighting (If equipped) 1. Open grill lid. 1. Open grill lid. 1. Open side burner cover. 2.
Operating The Grill Initial Lighting: When lit for the first time, the gas grill emits a slight odor. This is a normal temporary condition caused by the “burn-in” of internal paints and lubricants used in the manufacturing process and does not occur again. Simply run the main burners on high for approximately one-half hour. Main Burner Use: When searing foods, we recommend preheating the grill by operating all main burners in the high position with the lid closed for approximately 10 minutes.
EN CAUTION! Due to the intense heat the infrared burners provide, food left unattended over burners will burn quickly. Keep the lid open when cooking with the infrared burners on high. The intense heat ensures adequate searing temperatures even with the lid open. This also allows observation of the food, so as to prevent burning. Protection Of Your Infra Red Burners: The infrared burners of your grill are designed to provide a long service life.
Infrared Grilling Chart EN Food Control Setting Cooking Time Helpful Suggestions Steak High setting 2 min. each side. 4 min. – Rare High setting 2 min. each side then medium setting. 6 min. – Medium High setting 2 min. each side then medium setting. 8 min. – Well done When selecting meat for grilling, ask for marbled fat distribution. The fat acts as a natural tenderizer while cooking and keeps it moist and juicy. 1 in. (2.
EN Maintenance / Cleaning Instructions We recommend this gas grill be thoroughly inspected and serviced annually by a qualified service person. At all times keep the gas grill area free from combustible materials, gasoline and other flammable vapors and liquids. Do not obstruct the flow of ventilation and combustion air. Keep the cylinder enclosure ventilation openings (located on the cart sides and at the front and back of the bottom shelf) free and clear from debris.
Grids And Warming Rack: The grids and warming rack are best cleaned with a brass wire brush during the pre-heating period. Steel wool can be used for stubborn stains. It is normal that stainless grids (if equipped) will discolor permanently from regular usage due to the high temperature of the cooking surface. 11 Cast Iron Cooking Grids: The cast iron cooking grids supplied with your new grill offer superior heat retention and distribution.
EN Tube Burner: The burners are made from heavy wall 304 stainless steel, but extreme heat and a corrosive environment can cause surface corrosion to occur. This can be removed with a brass wire brush. CAUTION! Beware of Spiders. Spiders and insects are attracted to the smell of propane and natural gas. The burner is equipped with an insect screen on the air shutter, which reduces the likelihood of insects building nests inside the burner but does not entirely eliminate the problem.
Problem Possible Causes Solution Flames lift away from burner, accompanied by the smell of gas, and possibly difficulties in lighting. Improper air shutter adjustment. Close air shutter slightly according to combustion air adjustment instructions. (This must be done by a qualified gas installer.) Humming regulator. Normal occurrence on hot days. This is not a defect. It is caused by internal vibrations in the regulator and does not affect the performance or safety of the gas grill.
EN KEEP YOUR RECEIPT AS PROOF OF PURCHASE TO VALIDATE YOUR WARRANTY. Ordering Replacement Parts Warranty Information MODEL: DATE OF PURCHASE: SERIAL NUMBER: (Record information here for easy reference) Before contacting the Customer Solutions Department, check the Napoleon Grills Website for more extensive cleaning, maintenance, troubleshooting and parts replacement instructions at www.napoleongrills.com. Contact the factory directly for replacement parts and warranty claims.
Ce gril doit être utilisé uniquement à l’extérieur, dans un endroit bien aéré et ne doit jamais être utilisé à l’intérieur d’un bâtiment, d’un garage, un gazebo, une véranda avec paramoustique, ou de tout autre endroit fermé. APPOSEZ LÉTIQUETTE DU NUMERO DE SERIE DU CARTON NO de série XXXXXX000000 NO DE MODÈLE FR NE PAS JETER LD485/LD485RSIB NE PAS RETOURNER PAS À L’ENDROIT DE L’ACHAT. VEUILLEZ CONTACTER LE 1-866-820-8686 POUR DE ’ASSISTANCE.
MERCI D’AVOIR CHOISI NAPOLÉON FR Les produits NAPOLÉON sont conçus avec des composants et des matériaux de qualité supérieure, assemblés par des artisans qualifiés qui sont fiers de leur travail. Le brûleur et le montage de la soupape subissent un test de détection de fuites et d’allumage à une station de test de qualité.
AVERTISSEMENT! Si ces instructions ne sont pas suivies, des dommages matériels, des blessures corporelles ou des pertes de vie pourraient s’ensuivre. Lisez et respectez tous les avertissements et les instructions de ce manuel avant de faire fonctionner le gril. Pratiques Sécuritaires D’utilisation • • • • • • • • • • • • • • • • • • • • • • • • • • • • • • • • • • • • • Ce gril à gaz doit être assemblé conformément aux instructions du manuel.
Spécifications De La Bonbonne / Branchement Du Gaz CE GRIL À GAZ EST CERTIFIÉ SELON LES NORMES NATIONALES CANADIENNES ET AMÉRICAINES, CAN/CSA1.6-2005 ET ANSI Z21.58 -2005 POUR LES GRILS À GAZ EXTÉRIEURS ET SON INSTALLATION DOIT ÊTRE CONFORME AUX CODES LOCAUX. En l’absence de codes locaux, l’installation doit être conforme au Code d’installation du gaz CAN/CGA-B149.1 au Canada ou au National Fuel Gas Code, NFPA54/ANSI Z223.1 aux États-Unis.
Branchement Au Gaz Naturel 19 Ce gril à gaz naturel est équipé d’un boyau d’alimentation de 10 pieds (incluant un système de déconnexion rapide) conçu pour un branchement au gaz naturel et certifié pour une utilisation extérieure. Ce gril à gaz a été conçu pour fonctionner à une pression d’alimentation de 7 pouces de colonne d’eau. Les tuyaux et les soupapes en amont du système de déconnexion rapide ne sont pas fournis L’installation doit être conforme à la norme CAN B149.
Instruction D’allumage Brûleur de latéral FR Bouton d’allumeur du brûleur Brûleur de Brûleur de latéral Brûleur de Bruleur Brûleur de gauche d’arriere gauche centre droite centre droite Fermez AVERTISSEMENT! Ouvrez le couvercle. AVERTISSEMENT! Assurez-vous que tous les boutons de contrôle sont à « off ». Ouvrez ensuite la soupape d’alimentation en gaz. Allumage Du Brûleur Principal Allumage Du Brûleur Arrière Rotissérie Brûleur (si équipé) Allumage Du Brûleur Latéral (si équipé) 1.
Instructions D’opération Éclairage initial: Lorsqu’il est allumé pour la première fois, le gril dégagera une légère odeur. Ceci est un phénomène normal et temporaire causé par l’évaporation des peintures et lubrifiants internes utilisés dans le processus de fabrication et ne se reproduira plus. Allumez simplement les brûleurs de cuve à “high” pendant une demi-heure.
FR 1. Faites fonctionner à « high » pendant 5 minutes avec le couvercle ouvert ou jusqu’à ce que les brûleurs en céramique deviennent incandescents. 2. Placez les aliments sur les grilles de cuisson et faites saisir pendant environ 2 minutes par côté. 3.
Tableau de cuisson à l’infrarouge Aliment Réglage Des Contrôles Temps De Cuisson Conseils Pratiques Steak 1” (2.54cm) d’épaisseur Réglage à “high” 2 min chaque côté 4 min - Saignant Réglage à “high” 2 min chaque côté ensuite réglage à “medium” 6 min - À point Réglage à “high” 2 min chaque côté ensuite réglage à “medium” 8 min - Bien cuit Lorsque vous choisissez votre viande, demandez une viande qui est marbrée.
Instructions D’entretien et de Nettoyage Nous vous conseillons de faire inspecter ce gril à gaz annuellement par un technicien de service qualifié. L'emplacement du gril à gaz doit être gardé libre de tous matériaux combustibles, essence ou autres liquides et vapeurs inflammables en tout temps. Les apports d’air comburant et d’air de ventilation ne doivent pas être obstrués.
Grilles de cuisson et grille de réchaud : Les grilles de cuisson et la grille de réchaud sont plus faciles à nettoyer durant la période de préchauffage en utilisant une brosse en laiton. Une laine d’acier peut être utilisée pour les taches les plus tenaces. Il est normal que les grilles de cuisson en acier inoxydable (s’il y a lieu) décolorent de façon permanente à l’usage en raison des températures élevées de la surface de cuisson.
FR Nettoyage De L’extérieur Du Gril: N’utilisez pas de produits abrasifs pour nettoyer les pièces peintes, de fini porcelaine ou en acier inoxydable. Les éléments en porcelaine émaillée doivent être manipulés avec soin. Le fini émaillée étant cuit il devient comme du verre; il s’ébrèchera au moindre choc. Vous pouvez vous procurer de la peinture émaillée pour les retouches chez votre détaillant NAPOLEON.
Problème Causes possibles Solutions Poussées de flamme excessives/chaleur inégale. Plaques de brûleur mal installées. Assurez-vous que les plaques sont installées avec les trous vers l’avant et les fentes en dessous. Voir les instructions d’assemblage. Mauvais préchauffage. Préchauffez le gril en allumant les brûleurs de cuve à « high » pendant 5 à 10 minutes. Accumulation excessive de graisse et de cendres sur les plaques de brûleur et dans le tiroir d’égouttement.
GARDEZ VOTRE REÇU COMME PREUVE D’ACHAT POUR VALIDER VOTRE Commande De Pièces De Rechange Information Sur La Garantie MODÈLE: FR DATE D’ACHAT: NUMÉRO DE SÉRIE: (Inscrivez l’information ici pour y avoir accès facilement.) Avant de contacter le département du service aux consommateurs, consultez le site Web de Napoleon Grills pour obtenir plus d’instructions sur le nettoyage, l’entretien, le dépannage et le remplacement des pièces à www.napoleongrills.com.
Caution! During unpacking and assembly we recommended you wear work gloves and safety glasses for your protection. Although we make every effort to make the assembly process as problem free and safe as possible, it is characteristic of fabricated steel parts that the edges and corners might be sharp and could cause cuts if handled incorrectly. Getting Started 1. Remove all cart panels, hardware, and grill head from carton. Raise lid and remove any components packed inside.
If necessary, tapped down with a rubber mallet. Si nécessaire, peut être enfoncé avec un maillet en caoutchouc. www.napoleongrills.
If necessary, tapped down with a rubber mallet. Si nécessaire, peut être enfoncé avec un maillet en caoutchouc. x8 N570-0086 (#14 x 1/2”) www.napoleongrills.
If necessary, tapped down with a rubber mallet. Si nécessaire, peut être enfoncé avec un maillet en caoutchouc. x4 www.napoleongrills.
x1 N570-0086 (#14 x 1/2”) 2 1 3 x4 N570-0086 (#14 x 1/2”) www.napoleongrills.
x4 N570-0091 (1/4”-20 x 1/2”) N640-0001 x1 PROPANE ONLY - To avoid assembly difficulties, prior to mounting the grill head, remove the zip tie holding the regulator up under the control panel. This was installed at the factory to protect the regulator hose during shipping and is no longer required. (Take care when removing the tie not to damage the hose). Ensure the regulator drops behind the beam on the front of the cabinet.
x4 N570-0082 (1/4”-20 x 5/8”) N340-0007 x4 N485-0016 (1 1/4”) N485-0017 (7/8”) x2 1 See Lighting Instructions. Voir Instruction D’allumage. 2 1 1/4” TOP DESSUS 4 7/8” BOTTOM DESSOUS www.napoleongrills.
x2 N430-0002 x2 N105-0011 N160-0022 x2 1 2 x2 4 3 5 TOP DESSUS www.napoleongrills.
x2 N570-0073 (1/4”-20 x 3/8”) x8 x8 N570-0082 (1/4”-20 x 5/8”) N735-0001 x2 X www.napoleongrills.
x5 N570-0076 (#8 x 1/2”) Engage edge of shelf under ribs in end cap. 1 LD485RSIB x1 LD485 x2 3 Engager bord du plateau sous les côtes de bouchon. 2 4 x4 www.napoleongrills.
LD485RSIB LD485 1 2 3 x4 www.napoleongrills.
N160-0023 x1 1 2 3 www.napoleongrills.
WARNING! The Infrared side burner is supplied with a drip pan which holds only a minimal amount of grease. To prevent grease fires, the pan must be cleaned after each use. AVERTISSEMENT! Le brûleur latéral infrarouge est muni d’un plateau d’égouttement qui ne peut contenir qu’une petite quantité de graisse. Afin d’éviter les feux de graisse, le plateau doit être nettoyé après chaque utilisation. Cooking Grid Placement: The cooking grid can be placed at two different heights.
LD485RSIB LD485 www.napoleongrills.
www.napoleongrills.
Rotisserie Kit Assembly Instruction (optional) Assemble rotisserie kit components as shown. Instructions D’assemblage De L’ensemble De Rôtissoire (optionnelle) Assemblez les composantes de la rôtissoire tel qu’illustré. X Ensure stop bushing is tightened on the inside of hood casting. Assurez-vous que la bague d’arrêt soit serrée à l’intérieur de la hotte. www.napoleongrills.
Propane Only – Proper Hose Connection Propane Seulement - Branchement Adéquat Du Boyau Ensure the regulator drops into the small opening, between the tank heat shield and the right side of the cabinet. Assurez-vous que le régulateur passe dans la petite ouverture, entre le protecteur de chaleur de la bonbonne et le côté droit du cabinet. Clip hose to side panel using hose retainer clip supplied. Fixez le boyau au panneau latéral à l’aide de la clip de retenue fournie.
Natural Gas Only – Proper Hose Connection Gaz Naturel Seulement - Branchement Adéquat Du Boyau WARNING! The installation must be performed by a licensed gas fitter, and all connections must be leak tested before operating the grill. Do not use pipe dope or teflon tape on this connection. Tighten the connection with two wrenches.
Natural Gas Only – Improper Hose Connection Gaz Naturel Seulement - Branchement Inadéquat Du Boyau WARNING – FIRE HAZARD ATTENTION - RISQUE D’INCENDIE WARNING! Do not route hose underneath drip pan. AVERTISSEMENT! Ne pas passer le tuyau d’alimentation sous le tiroir d’égouttement afin de garder. X WARNING! Do not route hose over top of rear panel. AVERTISSEMENT! N’acheminez pas le boyau par-dessus le panneau arrière.
Leak Testing Instructions WARNING! A leak test must be performed annually and each time a cylinder is hooked up or if a part of the gas system is replaced. Warning! Never use an open flame to check for gas leaks. Be certain no sparks or open flames are in the area while you check for leaks. Sparks or open flames will result in a fire or explosion, damage to property, serious bodily injury, or death.
Test De Détection De Fuites 49 AVERTISSEMENT! Il doit être fait avant la première utilisation, annuellement et à chaque fois qu’une pièce du système de gaz est remplacée ou réparée AVERTISSEMENT! N’utilisez pas une flamme nue pour vérifier pour des fuites de gaz. Assurezvous qu’il n’y ait aucune étincelle ni flamme nue à proximité de l’endroit à vérifier. Les étincelles ou les flammes nues provoqueront un feu ou une explosion, causant des dommages matériels, des blessures graves ou des pertes de vie.
Parts List / Liste Des Pièces ITEM PART # DESCRIPTION 1 N010-0716 manifold assembly c/w valves / assemblage du collecteur avec soupapes p N010-0717 manifold assembly c/w valves / assemblage du collecteur avec soupapes n N010-0787 manifold assembly c/w valves / assemblage du collecteur avec soupapes p N010-0786 manifold assembly c/w valves / assemblage du collecteur avec soupapes n 2 N720-0055 side burner supply tube / tuyau d’alimentation de brûleur latéral x 3 N455-0062 side burn
Parts List / Liste Des Pièces ITEM PART # DESCRIPTION 485 N010-0924-BK lid assembly - black / ensemble du - noir x RSIB 32 N135-0042-BK1HT left side lid casting / moulage gauche du couvercle x x 33 N135-0043-BK1HT right side lid casting / moulage droit du couvercle x x 34 N335-0084 stainless steel lid insert / couvercle en acier inoxydable x N335-0085-BK2GL black lid insert / couvercle en noir x 35 N585-0078 heat shield lid / couvercle pare-chaleur x 36 N570-0091 1/4”-20 x 1/
Parts List / Liste Des Pièces ITEM PART # DESCRIPTION 485 RSIB 72 N325-0087-SER door handle / poignée de porte x x 73 N340-0007 tool hook / crochet à ustensile x x 74 N485-0016 door pivot pin top / pivot supérieur x x 75 N485-0017 door pivot pin bottom / pivot inférieur x x 76 N160-0022 clip door pivot pin / attache de pivot x x 77 N475-0406-BK1SG rear cart panel / panneau arrière pour chariot x x 78 N590-0267-BK1SG bottom shelf / tablette du bas x x 79 N010-0891
34 38 32 33 36 35 17 20 15 19 18 40 46 39 42 12 47 45 14 13 43 37 41 55 22 88 56 9 23 69 76 30 25 60 92 31 29 28 8 3 83 4 59 67 95 26 27 6 2 1 57 62 69 5 7 76 82 81 94 74 96 61 73 68 72 50 77 64 66 49 67 73 72 63 70 54 53 87 97 13 74 85 93 43 16 36 24 84 21 11 98 86 10 57 79 89 48 81 80 90 91 58 82 44 65 68 50 71 75 69 51 78 69 52 75 54 53 www.napoleongrills.
Notes www.napoleongrills.
Notes 55 www.napoleongrills.
Napoleon products are protected by one or more U.S. and Canadian and/or foreign patents or patents pending. Les produits de Napoléon sont protégés par notre brevet d’invention dans les pays États Units, Canada et international.