
Installation Guide


EN
W415-1542 / D / 11.10.17
10
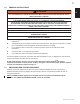
Due to the many different materials used on different walls, it is highly
recommended that you consult your local builder before you install this
appliance on the wall.
A. Select a location that is not prone to moisture and is located at
least 36" (914mm) away from combustible materials such as curtain
drapes, furniture, bedding, paper, etc.
B. Have 2 people hold the appliance against the wall to determine the
final location.
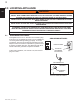
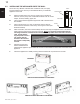
C. Place unit face down on a soft, non abrasive surface. Remove
the bracket from the back of the unit by removing the screws (see
illustrations below)
D. Mark out location, then mount the bracket(s) onto the wall using the supplied screws. This bracket
MUST have the hooks facing upward and be level. NOTE: It is strongly recommended that the
mounting bracket be screwed into the wall studs where possible. If the wall studs cannot be
used, ensure that the
supplied plastic anchors
are used to affix the
bracket to the wall and
the bracket is adequately
secured.
E. With the wall mounting
bracket installed have 2
people lift the appliance up and insert the 2 hooks on the bracket into the 2 slots on the back of the
appliance.
F. Check the appliance for stability ensuring that the bracket will not pull free from the wall.
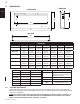
3.3 INSTALLING THE APPLIANCE ONTO THE WALL
HOOK
SCREWS
HOOK
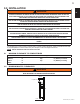
SIDE VIEW
BODY
FLOOR
GLASS FRONT
21 5/8"
55cm
NEFL32/42/50FH BRACKET ILLUSTRATED
NEFL60/72/100FH BRACKET ILLUSTRATED
BRACKET