
Installation Guide

Due to the many different finish materials used on walls, it is highly recommended that you consult your local
builder before you install this appliance in the wall.
Select a location that is not prone to moisture and is located at least 36" (914mm) away from combustible
materials such as curtain drapes, furniture, bedding, paper etc.
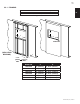
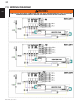
3.4 RECESSING THE APPLIANCE INTO THE WALL
A. Measure the appliance and create a rough in with electrical.
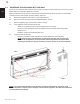
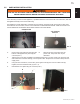
B. Remove the front glass. See "FRONT GLASS REMOVAL" section.
C. Hold the appliance up to ensure it will fit into the framing.
D. If the appliance is fully recessed into the wall:
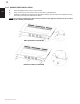
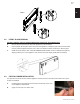
• Bend the 2 top tabs upward on the front glass (FIG. 3, next page).
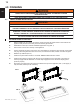
• Use the 6 screws (provided) to lock the appliance into the wall with the existing 2 side
flanges (FIG. 1).
• Install the media and reinstall the glass front.
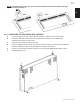
E. If partial recess into the wall:
• Use the 2 mounting brackets (supplied) to lock the appliance to the wall (FIG.2).
NOTE: 2 sets of holes are provided for recessing into wall. The wall structure may
limit how far the appliance can be recessed. Use the appropriate set of holes when
recessing to the frame, it may be necessary to use the 4 holes on the top and bottom.
NOTE: It is recommended the walls of the appliance enclosure be finished (ie. drywall) to avoid
exposed insulation or vapour barrier coming in contact with the appliance. This will ensure clearance
to combustibles is maintained.
FIG. 1
FIG. 2
EN
W415-1542 / D / 11.10.17
12