
Installation Sheet


W415-2212 / E / 06.27.18
EN
14
installation
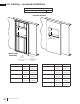
FIG. 5
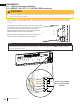
4.4.1 trim installation (recessed installation only)
1. Install left and right trims, and secure with fasteners (FIG. 1).
2. Install top and bottom trims, and secure with fasteners (FIG. 2).
FIG. 1 FIG. 2
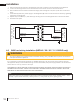
5. Install trims (see “trim installation” section).
6. Hold the appliance up to ensure it will fit into the framing (see “framing - recessed installation” section).
7. Apply shims (not supplied) between the appliance and the frame.
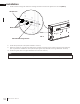
8. Use 4 screws to secure the appliance into the wall (FIG. 5). Do not overtighten screws.
9. Re-install the plastic panel holders.
10. Place the crystals or optional topaz glass chips and drift wood logs (CHD models only) along the media tray
(see “crystal ember installation” and “optional topaz glass chips and drift wood log installation” sections).
11. Install front glass (see “front glass installation and removal” section).
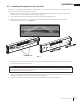
2 sets of holes are provided for recessing into the wall. The wall structure may limit how far the appliance
can be recessed. Use the appropriate set of holes when recessing to the frame. Apply shims (not supplied)
between appliance and frame.
note:
It is recommended that the walls of the appliance enclosure be finishing (i.e. drywall) to avoid exposed insula-
tion or vapour barrier coming in contact with the appliance. This will ensure clearance to combustibles is
maintained.
note: