This gas appliance must be used only outdoors in a well-ventilated space and must not be used inside a building, garage, screened-in porch, gazebo or any other enclosed area. EN APPLY SERIAL NUMBER LABEL FROM CARTON Serial No. XXXXXX000000 MODEL NO. FR PG.35 DO NOT DISCARD PATIOFLAME OUTDOOR GAS FIREPIT KENS1 (GPFR) KENS2 (GPFS) KENS3 (GPFC40) DANGER! CARBON MONOXIDE HAZARD This appliance can produce carbon monoxide, which has no odor. Using it in an enclosed space can kill you.
EN NAPOLEON products are designed with superior components and materials, and are assembled by trained craftsmen who take great pride in their work. Every component has been thoroughly inspected by a qualified technician before packaging and shipping to ensure that you, the customer, receive the quality product you expect from NAPOLEON.
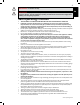
WARNING! For Outdoor Use Only. WARNING! Improper installation, adjustment, alteration, service or maintenance can cause injury or property damage. Read the installation, operating and maintenance instructions thoroughly before installing or servicing this gas appliance. Safe Operating Practices • • • • • • • • • • • • • • • • • • • • • • • • • • • • THIS APPLIANCE IS HOT WHEN OPERATING AND CAN CAUSE SEVERE BURNS IF CONTACTED. Installation and repair should be done by a qualified service person.
EN General Information This gas appliance was tested and listed to Canadian and American National Standards, ANSI Z21.97-2014 / CSA 2.41-2014 “Standard for Outdoor Decorative Gas Appliance”. When an appliance is for connection to a fixed piping system, the installation must conform with local codes, or in the absence of local codes, with the National Fuel Gas Code, ANSI Z223.1/NFPA 54, International Fuel Gas Code, Natural Gas and Propane Installation Code, CSA B149.
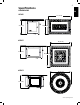
Specifications DIMENSIONS EN KENS1 23” (59 cm) 56” (143 cm) 36” (92 cm) KENS2 48” (121 cm) 23” (59 cm) 48” (121 cm) KENS3 48” (121 cm) 23” (59 cm) www.napoleongrills.
INPUT EN MINIMUM CLEARANCE TO COMBUSTIBLES MODEL FUEL MAX. INPUT Btu/Hr KENS1 KENS2 Natural Gas 60, 000 KENS1 KENS2 Propane Gas 60, 000 KENS3 Natural Gas 40, 000 INCHES MM Side Walls 24 610 Top of unit to ceiling 72 1830 GAS INLET PRESSURES KENS3 Propane Gas 40, 000 Maximum Inlet Pressure CENTRE OF PATIOFLAME 24” (610mm) MAXIMUM OVERHANG 72” (1830mm) 24” (610mm) THE TABLE IS APPROVED FOR USE ON COMBUSTIBLE FLOORS. www.napoleongrills.com NATURAL PROPANE 7.0" w.c. 11.
Location Locating Your Outdoor Appliance EN It is important when selecting a location for your appliance to ensure clearances to adjacent combustibles are met. This appliance is intended for installation on an outdoor patio or in your yard. It is highly recommended that this appliance be installed in a sheltered area (following the guidelines outlined below). Direct wind will cause an erratic flame and possible pilot or main burner outage.
EN Gas Hook-Up Instructions WARNING! If these instructions are not followed exactly, a fire causing death or serious injury may occur. Propane Cylinder Specifications A dented or rusty cylinder may be hazardous and should be checked by your propane supplier. Never use a cylinder with a damaged valve. The LP-gas supply cylinder must be constructed and marked in accordance with the U.S. D.O.T.
1 EN 2 3 www.napoleongrills.
EN Conversion to Natural Gas WARNING! To avoid the possibility of burns conversions should only be done when the patio flame is . Ensure burner is turned off. Turn gas off at source and disconnect the patio flame before beginning conversion. WARNING! Glass embers may have sharp edges wear safety glasses and gloves when handling. WARNING! This conversion must be performed by a licensed gas fitter, and all connections must be leak tested before operating the patio flame.
6. Reconnect the stainless steel flex connector to the orifice and tighten using (2) wrenches. 7. Place the burner back into the enclosure. 8. Fill out the conversion label included with your patio flame and apply it to the inside of the control panel access door. 11 A leak test must be performed according to the leak testing instructions found in the manual. Natural Gas Hook-Up The gas appliance is designed to operate at an inlet pressure of 7 inches water column.
EN Finishing Glass Ember Installation WARNING! Do not use the patio flame without the glass embers in place. WARNING! Glass embers may have sharp edges, wear safety glasses and gloves when handling. Do not change or substitute the glass ember material provided with this appliance. If replacing, use only replacement glass embers available from your local authorized dealer / distributor. WARNING! Glass embers may have a fine oil residue that needs to be cleaned prior to installation.
Leak Testing Instructions WARNING! A leak test must be performed annually, or if a part of the gas system is replaced. Warning! Never use an open flame to check for gas leaks. Be certain no sparks or open flames are in the area while you check for leaks. Sparks or open flames will result in a fire or explosion, damage to property, serious bodily injury, or death. Leak testing: This must be done before initial use, annually, and whenever any gas components are replaced or serviced.
EN Lighting Instructions KENS1 (GPFR) / KENS2 (GPFS) Igniter Contol Knob KENS3 (GPFC40) Contol Knob Igniter WARNING! Keep face and body away from burner area when lighting. WARNING! Ensure burner controls are in the off position. Slowly turn on the gas supply valve. 1. Press and hold electronic igniter button ( ). 2. Turn the burner control to the high position, press and hold in. When the burner lights, release the electronic igniter button. 3.
Operating The Patio Flame WARNING! Never use this appliance for other than the intended use. Do not use this appliance to prepare food. WARNING! You must have clear and easy access to the on/off valve AFTER the appliance is installed and connected to the gas supply in order to safely turn off the burner. Initial Lighting: When lit for the first time, the appliance emits a slight odor.
EN Maintenance / Cleaning Instructions WARNING! Glass embers may have sharp edges, wear safety glasses and gloves when handling. Do not change or substitute the glass ember material provided with this appliance. If replacing, use only replacement glass embers available from your local authorized dealer / distributor. Warning! To avoid the possibility of burns, maintenance should be done only when the appliance is . Avoid unprotected contact with hot surfaces. Ensure burner is turned off.
Reinstallation: Reverse the procedure to reinstall the burner. Check that the valve enters the burner when installing. Replace the glass embers. When the appliance is put back in service, check the burner flame pattern with the image below. NORMAL ABNORMAL Cleaning The Outer Appliance Surface: Do not use abrasive cleaners or steel wool on any painted, or stainless steel parts of your Napoleon Appliance. Doing so will scratch the finish. Exterior surfaces should be cleaned with warm soapy water.
EN Troubleshooting Problem Possible Causes Solution Low heat / Low flame when valve turned to high. For propane - improper lighting procedure. Ensure lighting procedure is followed carefully. The valve must be in the off position when the tank valve is turned on. Turn tank on slowly to allow pressure to equalize. See lighting instructions. For natural gas - undersized supply line. Pipe must be sized according to installation code. Burners burn with yellow flame, accompanied by the smell of gas.
KEEP YOUR RECEIPT AS PROOF OF PURCHASE TO VALIDATE YOUR WARRANTY. Ordering Replacement Parts EN Warranty Information MODEL: DATE OF PURCHASE: SERIAL NUMBER: (Record information here for easy reference) Before contacting the Customer Solutions Department, check the Napoleon Grills Website for more extensive cleaning, maintenance, troubleshooting and parts replacement instructions at www.napoleongrills.com. Contact the factory directly for replacement parts and warranty claims.
KENS1 EN 3/8” (10mm) 1 x8 2 3 x8 x8 x8 www.napoleongrills.
EN 4 x4 N570-0094 (M5 x 10mm) 5 6 www.napoleongrills.
EN ENSURE NO GLASS IS BLOCKING ANY OF THE OPEN PORTS ON THE IGNITION PORTION OF THE BURNER, DIFFICULTIES IN LIGHTING MAY RESULT. WARNING! The cover must be removed when the burner is in operation. After use, wait until the unit cools before installing the cover. The table surfaces are hand painted. The variation in brush strokes enhances the natural beauty of the product. www.napoleongrills.
KENS2 EN 3/8” (10mm) 1 x8 2 3 x8 x8 x8 www.napoleongrills.
EN 4 x4 N570-0094 (M5 x 10mm) 5 6 www.napoleongrills.
EN ENSURE NO GLASS IS BLOCKING ANY OF THE OPEN PORTS ON THE IGNITION PORTION OF THE BURNER, DIFFICULTIES IN LIGHTING MAY RESULT. WARNING! The cover must be removed when the burner is in operation. After use, wait until the unit cools before installing the cover. The table surfaces are hand painted. The variation in brush strokes enhances the natural beauty of the product. www.napoleongrills.
EN KENS3 1 3/8” (10mm) x8 2 3 x8 x8 x8 www.napoleongrills.
EN 4 x4 N570-0094 (M5 x 10mm) 5 6 www.napoleongrills.
EN ENSURE NO GLASS IS BLOCKING ANY OF THE OPEN PORTS ON THE IGNITION PORTION OF THE BURNER, DIFFICULTIES IN LIGHTING MAY RESULT. WARNING! The cover must be removed when the burner is in operation. After use, wait until the unit cools before installing the cover. The table surfaces are hand painted. The variation in brush strokes enhances the natural beauty of the product. www.napoleongrills.
PARTS LIST KENS1 Item Part # Description 1 Z010-0034 burner base x 2 Z475-0016 burner surround x 3 Z585-0009 burner shield x 4 N680-0001-SER thermocouple x 5 Z565-0001 burner screen x 6 Z240-0001 electrode x 7 N570-0073 screw, 1/4-20 x 3/8 x 8 N450-0025 nut, 1/4-20 x 9 N570-0008 screw, #8x1/2 x 10 N725-0056 valve x W455-0076 orifice #43 p N455-0066 orifice #25 n 11 N043-0002 battery x 12 W175-0227 flex connector x 13 N530-0003 regulator x 14
PARTS DIAGRAM KENS1 EN 27 9 3 5 7 9 18 2 19 1 4 6 8 12 10 14 17 13 16 11 20 21 22 23 24 25 26 www.napoleongrills.
PARTS LIST KENS2 Item Part # Description 1 Z010-0036 burner base x 2 Z475-0019 burner surround x 3 Z585-0010 burner shield x 4 Z585-0011 burner wind shield x 5 N680-0001-SER thermocouple x 6 Z565-0001 burner screen x 7 Z240-0001 electrode x 8 N570-0073 screw, 1/4-20 x 3/8 x 9 N450-0025 nut, 1/4-20 x 10 N570-0008 screw, #8x1/2 x W455-0076 orifice #43 p N455-0066 orifice #25 n 11 N725-0056 valve x 12 N357-0013 igniter x 13 N043-0002 battery x 14
EN PARTS DIAGRAM KENS2 27 8 10 4 3 9 6 2 19 1 7 5 12 17 13 14 11 16 15 20 21 22 23 24 25 26 www.napoleongrills.
PARTS LIST KENS3 Item Part # Description x 1 N100-0054 burner x 2 N500-0060 burner plate x 3 N710-0097 burner pan x 4 N585-0109 burner shield x 5 N570-0094 screw M5 x 10mm x 6 Z570-0032 screw M4 x 10mm x 7 Z570-0024 screw M6 x 12mm x 8 N725-0061 valve x 9 N357-0013 igniter x 10 N500-0061 control panel x 11 N380-0033 control knob x 12 N530-0005 regulator x 13 N720-0076 flex connector x 14 N500-0062 bracket electrode x 15 N240-0038 electrode x
PARTS DIAGRAM KENS3 EN 1 6 19 4 7 13 20 2 9 8 10 5 11 28 6 18 3 14 17 12 6 16 15 21 22 24 23 25 27 www.napoleongrills.
Ce l’appareil au gaz doit être utilisé uniquement à l’extérieur, dans un endroit bien aéré et ne doit jamais être utilisé à l’intérieur d’un bâtiment, d’un garage, un gazebo, une véranda avec paramoustique, ou de tout autre endroit fermé.
Les produits NAPOLÉON® sont conçus avec des composants et des matériaux de qualité supérieure, assemblés par des artisans qualifiés qui sont fiers de leur travail. Chaque composant de l’appareil a été soigneusement inspecté par un technicien qualifié avant d’être emballé et expédié pour garantir que vous, le client, recevez le produit de qualité dont vous vous attendez de NAPOLÉON®.
AVERTISSEMENT! Pour usage extérieur seulement. AVERTISSEMENT! Une installation non conforme, des ajustements, des altérations, un service ou un entretien inadéquats peuvent causer des dommages matériels. Lisez attentivement toutes les instructions d’installation, d’opération et d’entretien avant d’installer ou d’effectuer un travail d’entretien sur ce l’appareil au gaz.
FR Information Générale Cet appareil au gaz a été testé et homologué selon les normes nationales canadiennes et américaines ANSI Z21.97-2014/CSA 2.41-2014 pour les appareils au gaz décoratifs extérieurs. Lorsqu’un appareil doit être connecté à un système d’approvisionnement fixe, l’installation doit être conforme aux normes locales ou, en l’absence de normes locales, selon le National Fuel Gas Code ANSI Z223.
Spécifications DIMENSIONS KENS1 56” (143 cm) FR 23” (59 cm) 36” (92 cm) KENS2 48” (121 cm) 23” (59 cm) 48” (121 cm) KENS3 48” (121 cm) 23” (59 cm) www.napoleongrills.
PRESSIONS D'ALIMENTATION EN GAZ DÉBIT COMBUSTIBLE DÉBIT MAX. Btu/h KENS1 KENS2 Gaz naturel 60 000 KENS1 KENS2 Propane 60 000 DÉGAGEMENTS MINIMAUX AUX MATÉRIAUX COMBUSTIBLES KENS3 Gaz naturel 40 000 KENS3 Propane 40 000 POUCES 24 72 MODÈLE FR Pression d'alimentation maximale Murs latéraux Dessus de l'appareil jusqu'au plafond CENTRE DU PATIOFLAME 24” (610mm) SAILLIE MAX 72” (1830mm) 24” (610mm) La table est approuvé pour utilisation sur des planchés combustible www.
Emplacement Emplacement de votre l’appareil extérieur Lors du choix d’un emplacement de votre l’appareil extérieur,il est important d’assurer que le dégagement près des matériaux combustibles adjacents est respecté. Cet appareil est conçu pour être installé sur votre terrasse ou dans votre cour arrière. Il est fortement recommandé que cet appareil soit installé dans un endroit couvert (selon les directives énoncées ci-dessous).
Branchement Au Gaz AVERTISSEMENT! Si ces instructions ne sont pas suivies à la lettre, un incendie pourrait s’ensuivre, causant des blessures graves ou la mort. Spécifications Pour La Bonbonne De Propane FR Un cylindre bosselé ou rouillé peut être dangereux et devrait être vérifié par votre fournisseur de propane. N’utilisez jamais un cylindre avec une soupape endommagée. Le cylindre de propane doit être fabriqué et étiqueté conformément aux spécifications américaines du D.O.T.
1 FR 2 3 www.napoleongrills.
Conversion au gaz naturel AVERTISSEMENT! Pour éviter les risques de brûlure, la conversion doit uniquement avoir lieu lorsque le Patioflame est froid. Vérifiez que le brûleur est bien éteint. Coupez l’alimentation en gaz à la source et débranchez le Patioflame avant d’entreprendre la conversion. AVERTISSEMENT! Les braises de verre peuvent avoir des rebords tranchants. Portez des lunettes de sécurité et des gants lorsque vous les manipulez.
7. Placer le brûleur dans l'enceinte. 8. Remplissez l'étiquette de conversion inclus avec votre flamme patio et l'appliquer à l'intérieur de la porte d'accès du panneau de commande. Faites un test de détection de fuites selon les instructions fournies dans le manuel. Branchement au gaz naturel Cet appareil au gaz est conçu pour fonctionner à une pression d’entrée de 7 po de colonne d’eau. Le tuyau qui va jusqu’à l’appareil est la responsabilité de l’installateur.
Finitions Installation Des Braises Vitrifiées AVERTISSEMENT! N'utilisez pas le Patioflame sans les braises vitrifiées. FR AVERTISSEMENT! Il est possible que les braises vitrifiées soient coupantes, portez donc des lunettes de sécurité et des gants protecteurs pour les manipuler. Ne pas changer ou substituer les braises vitrifiées fournies avec cet appareil. Si vous les remplacez, utilisez seulement des braises vitrifiées disponibles chez votre détaillant local autorisé.
Test De Détection De Fuites 47 AVERTISSEMENT! Il doit être fait avant la première utilisation, annuellement et à chaque fois qu’une pièce du système de gaz est remplacée ou réparée AVERTISSEMENT! N’utilisez pas une flamme nue pour vérifier pour des fuites de gaz. Assurezvous qu’il n’y ait aucune étincelle ni flamme nue à proximité de l’endroit à vérifier. Les étincelles ou les flammes nues provoqueront un feu ou une explosion, causant des dommages matériels, des blessures graves ou des pertes de vie.
Instruction D’allumage KENS1 (GPFR) / KENS2 (GPFS) Bouton d’allumeur FR Bouton de contrôle KENS3 (GPFC40) Bouton de contrôle Bouton d’allumeur AVERTISSEMENT! Éloignez votre visage et votre corps du brûleur lors de l’allumage. AVERTISSEMENT! Assurez-vous que les commandes du brûleur sont en position éteinte. Ouvrez doucement la soupape d’alimentation en gaz. 1. Appuyez sur le bouton d’allumage électronique ( ) et maintenez-le enfoncé. 2.
Instructions D’opération AVERTISSEMENT! N’utilisez jamais le l’appareil à des fins autres que celles prévues. Ne vous servez pas de l’appareil pour préparer de la nourriture. AVERTISSEMENT! Afin de pouvoir éteindre le brûleur en toute sécurité, vous devez vous assurer d’avoir un accès facile et sans obstruction à la soupape « on/off » UNE FOIS que l’appareil est installé et branché à l’alimentation en gaz.
Instructions D’entretien et de Nettoyage AVERTISSEMENT! Il est possible que les braises vitrifiées soient coupantes, portez donc des lunettes de sécurité et des gants protecteurs pour les manipuler. Ne pas changer ou substituer les braises vitrifiées fournies avec cet appareil. Si vous les remplacez, utilisez seulement des braises vitrifiées disponibles chez votre détaillant local autorisé.
Les orifices du brûleur peuvent se boucher avec le temps à cause des débris ou de la corrosion. Utilisez un trombone déplié ou une mèche de perceuse pour les déboucher. Il est plus facile de nettoyer les orifices si le brûleur a été enlevé du le l’appareil, mais il est aussi possible de le faire quand le brûleur est en place. Réinstallation : Inversez la procédure pour réinstaller le brûleur. Vérifiez que le l’injecteur entre bien dans le brûleur lors de la réinstallation. Replacez les braises de verre.
Guide De Dépannage Problème Causes possibles Solutions Faible chaleur/petite flamme lorsque le bouton de contrôle est à “high”. Pour le propane - procédure d’allumage incorrect. Assurez-vous que la procédure d’allumage est suivie à la lettre. Tous les boutons de contrôle doivent être fermés lorsque vous ouvrez la soupape de la bonbonne. Tournez la soupape de la bonbonne lentement pour assurer l’équilibre de la pression. Voir les instructions d’allumage.
GARDEZ VOTRE REÇU COMME PREUVE D’ACHAT POUR VALIDER VOTRE Commande De Pièces De Rechange Information Sur La Garantie MODÈLE: FR DATE D’ACHAT: NUMÉRO DE SÉRIE: (Inscrivez l’information ici pour y avoir accès facilement.) Avant de contacter le département du service aux consommateurs, consultez le site Web de Napoleon Grills pour obtenir plus d’instructions sur le nettoyage, l’entretien, le dépannage et le remplacement des pièces à www.napoleongrills.com.
KENS1 3/8” (10mm) 1 FR x8 2 3 x8 x8 x8 www.napoleongrills.
4 FR x4 N570-0094 (M5 x 10mm) 5 6 www.napoleongrills.
FR ASSUREZ-VOUS QU’AUCUN MORCEAUX DE BRAISES VITRIFEéS N’OBSTRUE L’OUVERTURE DES PORTS DE L’ALLUMEUR ET D’IGNITION DU BRûLEUR, PEUT CAUSER DES difficultés LORS DE L’ALLUMAGE. AVERTISSEMENT! Le couvercle doit être enlevé lorsque le brûleur fonctionne. Après l’utilisation, attendez que l’appareil refroidisse avant d’installer le couvercle. Les surfaces de table sont peintes à la main. La variation dans les coups de pinceau rehausse la beauté naturelle de ce produit. www.napoleongrills.
KENS2 3/8” (10mm) 1 FR x8 2 3 x8 x8 x8 www.napoleongrills.
4 FR x4 N570-0094 (M5 x 10mm) 5 6 www.napoleongrills.
FR ASSUREZ-VOUS QU’AUCUN MORCEAUX DE BRAISES VITRIFEéS N’OBSTRUE L’OUVERTURE DES PORTS DE L’ALLUMEUR ET D’IGNITION DU BRûLEUR, PEUT CAUSER DES difficultés LORS DE L’ALLUMAGE. AVERTISSEMENT! Le couvercle doit être enlevé lorsque le brûleur fonctionne. Après l’utilisation, attendez que l’appareil refroidisse avant d’installer le couvercle. Les surfaces de table sont peintes à la main. La variation dans les coups de pinceau rehausse la beauté naturelle de ce produit. www.napoleongrills.
KENS3 1 3/8” (10mm) FR x8 2 3 x8 x8 x8 www.napoleongrills.
4 FR x4 N570-0094 (M5 x 10mm) 5 6 www.napoleongrills.
FR ASSUREZ-VOUS QU’AUCUN MORCEAUX DE BRAISES VITRIFEéS N’OBSTRUE L’OUVERTURE DES PORTS DE L’ALLUMEUR ET D’IGNITION DU BRûLEUR, PEUT CAUSER DES difficultés LORS DE L’ALLUMAGE. AVERTISSEMENT! Le couvercle doit être enlevé lorsque le brûleur fonctionne. Après l’utilisation, attendez que l’appareil refroidisse avant d’installer le couvercle. Les surfaces de table sont peintes à la main. La variation dans les coups de pinceau rehausse la beauté naturelle de ce produit. www.napoleongrills.
LISTE DES PIÈCES KENS1 Article N° de pièce Description 1 Z010-0034 brûleur cuve x 2 Z475-0016 brûleur support x 3 Z585-0009 brûleur protecteur x 4 N680-0001-SER thermocouple x 5 Z565-0001 brûleur écran x 6 Z240-0001 électrode x 7 N570-0073 vis 1/4-20 X 3/8 x 8 N450-0025 écrou 1/4" - 20 x 9 N570-0008 vis #8 x 1/2" x 10 N725-0056 soupape brûleur x W455-0076 injecteur de brûleur propane #43 p N455-0066 injecteur de brûleur naturel #25 n 11 N043-0002 batteri
DIAGRAMME DE PIÈCES KENS1 27 9 3 5 7 9 18 FR 2 19 1 4 6 8 12 10 14 17 13 16 11 20 21 22 23 24 25 26 www.napoleongrills.
LISTE DES PIÈCES KENS2 Article N° de pièce Description 1 Z010-0036 brûleur cuve x 2 Z475-0019 brûleur support x 3 Z585-0010 brûleur protecteur x 4 Z585-0011 brûleur protecteur x 5 N680-0001-SER thermocouple x 6 Z565-0001 brûleur écran x 7 Z240-0001 électrode x 8 N570-0073 vis 1/4-20 X 3/8 x 9 N450-0025 écrou 1/4" - 20 x 10 N570-0008 vis #8 x 1/2" x W455-0076 injecteur de brûleur propane #43 p N455-0066 injecteur de brûleur naturel #25 n 11 N725-0056 soup
DIAGRAMME DE PIÈCES KENS2 27 8 10 4 FR 3 9 6 2 19 1 7 5 12 17 13 14 11 16 15 20 21 22 23 24 25 26 www.napoleongrills.
LISTE DES PIÈCES KENS3 Item Part # Description x 1 N100-0054 brûleur x 2 N500-0060 brûleur support x 3 N710-0097 brûleur cuvette x 4 N585-0109 brûleur protecteur x 5 N570-0094 vis M5 x 10mm x 6 Z570-0032 vis M4 x 10mm x 7 Z570-0024 vis M6 x 12mm x 8 N725-0061 soupape brûleur x 9 N357-0013 allumeur électronique - 1 étincelles - AAA 1.
DIAGRAMME DE PIÈCES KENS3 1 6 19 FR 4 7 13 20 2 9 8 10 5 11 28 6 18 3 14 17 12 6 16 15 21 22 24 23 25 27 www.napoleongrills.
Notes 69 FR www.napoleongrills.
Notes FR www.napoleongrills.
Notes 71 FR www.napoleongrills.
Napoleon products are protected by one or more U.S. and Canadian and/or foreign patents or patents pending. Les produits de Napoléon sont protégés par notre brevet d’invention dans les pays États Units, Canada et international.