
User manual


14
Important
The centre hinge can be moved horizontally by
about 3 mm to allow alignment of the doors, as
follows:
slacken the two screws securing the centre hinge to
the cabinet and move the hinge until the doors are
in line. Re-tighten the hinge securing screws.
Warning
Once the opening direction of the doors has been
changed, check that the magnetic seal adheres to
the cabinet.
If the ambient temperature is cold (for example in
winter), the seal may not adhere perfectly to the
cabinet. In this case, wait for the seal to adapt
naturally to its new position, or accelerate this
process by heating up the area involved with a
normal hairdryer.
Building and securing the appliance into the tall
kitchen unit
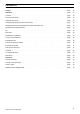
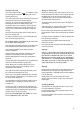
Recess characteristics (Fig. 1-2)
Fig. 1
The dimensions
of the recess for
fitting the
appliance into a
tall kitchen unit
must be as
indicated in the
table above.
Ventilation is
provided though
the bottom grille,
secured to the bottom of the appliance, and through
an opening to be cut in the base of the kitchen unit
(minimum size 200 cm
2
- Fig. 1).
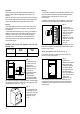
Fig. 2
A vent outlet, 50
mm deep by 540
mm wide must be
cut in the top of
the unit (Figs.
1-2)
Recess height Recess
depth
Recess
width
1446 mm 550 mm 560 mm
D140
8
25
200 cm
2
50
D010
540
50
L
P
H
Warning
A top seal is supplied loose with the appliance; this
seal must be fitted before inserting the appliance
into the recess (the holes for fixing it are
pre-drilled).
A plastic sealing strip is also supplied; snap it into
place between the appliance and the kitchen unit.
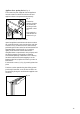
Fig. 3
Remove the
backing from the
edging strip, then
stick it vertically
onto the front
edge of the
appliance, on the
side on which the
door opens
(Fig. 3).
Fitting this strip eliminates any gaps between the
edge of the appliance cabinet and the inside of the
kitchen unit recess.
Fitting the appliance into the recess (Fig. 4)
To position and secure the appliance inside the
recess, proceed as follows:
Fig. 4
position the
appliance inside the
tall kitchen unit,
pushing it against
the inner side of
the unit on which
the door opens
(Fig. 4); make sure
that, with the door
closed, the
appliance is set
back 8 mm from the front of the recess (Fig. 1).
Using the 6 screws provided, secure the bottom
ventilation grille and the top seal (the holes are
pre-drilled).
D030
D117
A
A