Let’s build the 0 30 SEMBL Y A S M I N UT E 3 Harlow Headboard Scan me! Inspiration Digital Instructions Free Lifetime Warranty 20-1203
Ok, let’s get rolling This should be easy, just follow our instructions and you will be back to Netflix in no time.
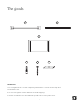
The goods A B C 1 2 3 IMPORTANT 1. Do not tighten bolts / screws completely until all bolts / screws are lined up and inserted into holes. 2. Do not over tighten screws and bolts to avoid stripping. 3. Please use hand tools to assemble this product. Do not use power tools.
Installation option 1: with rails Psst.
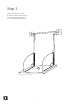
Step 1 Let’s get this thing fired up! Mount metal rail where you want your headboard to go using wall anchors. 1 1 A 1 1 2 2 Drill Bit Tip: Use a 1/4” drill bit when drilling the holes to accomodate the provided wall anchors. Step 2 A Hang straps from metal rail by snapping top buttons.
Step 3 Match up the Velcro straps between headboard panel (C) and straps.
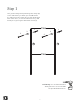
Step 4 Align the bottom holes in the straps to be 715 mm apart and mark the holes on the wall. Then, insert wall anchors and screws through the strap holes. 1 C 2 1 2 C Drill Bit Tip: Use a 1/4” drill bit when drilling the holes to accomodate the provided wall anchors.
Step 5 Flip headboard panel up, undo top button then fasten Velcro and the top button of the front of the panel. You did it! Time to celebrate with some bubbly and pizza? The answer to that is always yes.
Installation option 2: without rails 9
Step 1 Let’s get this thing fired up! Arrange the straps (B) on the wall where you want your headboard to go, making sure the straps are 715 mm apart from each other. Then, secure the wall anchors (1) and metal piece (3) using the M4*35mm Screw (2). 3 1 3 2 1 2 B B Drill Bit Tip: Use a 1/4” drill bit when drilling the holes to accomodate the provided wall anchors.
Step 2 Screw on the rest of the wall anchors (1) through the straps. You’re doing great! 1 1 2 2 Drill Bit Tip: Use a 1/4” drill bit when drilling the holes to accomodate the provided wall anchors.
Step 3 Match the Velcro straps between the headboard panel and straps and press the headboard piece (C) to the straps (B). Until now, we didn’t think it was possible to use the word “straps” this many times in one sentence.
Step 4 Flip panels up, undo top button, and then fasten Velcro and top button of top panel. You did it! Time to celebrate with delivery pizza? We think yes.
No heartburn, when we handle the return Give us a call 1-866-619-1004 or shoot us a message at help@nathanjames.com we will issue you a free replacement with zero hassle. Our way Their way Give us a call Re-package item Replacement Schedule pick up You Track package Replacement You We really don’t want you to go through the hassle of re-packaging your item and sending it back, because let’s be honest…nobody has time for that.
Safety first, fun later We want your Harlow headboard to last as long as possible, so we recommend that you tighten the screws 2 weeks after assembly and for added safety check the tightness of all screws every 2 months. For proper care and treatment of fabric please check our website at NathanJames.com/products Safe use of this product starts with you. Do not modify the structure of this product in any way. Use this headboard responsibly with the primary concern for your safety.
We are only in business if you’re happy For starters, thanks for being you. Toll-free at 1-866-619-1004 Help@nathanjames.com NathanJames.com/help We do our best to ensure your furniture arrives without any problems, but occasionally mistakes happen—as humans we are imperfect beings. In the event that a part is damaged or missing, we will be more than happy to provide you with replacement part(s) for free. Warranty This product comes with a lifetime warranty from the date of purchase.